Analyze
The capabilities under the Analyze menu enable you to view detailed scan results, perform analysis, make decisions on other actions, and export scan results for external use.

These analytics provide a wide variety of features to facilitate on-line analysis, such as dynamic selection of one or more data sets; column selection; sorting and filtering; basic column-level searching; advanced sorting; and exporting content. The analytics pages also provide a number of predefined views of the data based on some of the most common ways to look at raw vulnerability results—from all results including services and informational items, to just results with specific vulnerability severity codes, to rolled-up aggregate counts by Host.
You can also set your own data context with the Data Filters options; control data grid displays from option under the Grid Actions dropdown menu and record level Actions; and create your own pre-defined views using the Data View Options capabilities. The Data Filters you define will always be visibility for data context in the left Data Filters column. The arrow displays on the top right side of the Data Filters board can be used to Hide this column to give you more usable screen space for analysis or Show it for context while performing analysis.
The list of pre-defined views are displayed dynamically, based on the type of scan results selected. For example, selecting an exploit-related scan (penetration testing; individual exploits or tool) will display views that customize the list of available columns specific to exploit scans. Selecting a vulnerability or configuration scan will display views customized for these types of content. Each view is described below.
Network Map
The Network Map capability provides a color-coded diagram of the scanned targets and the interconnections between the targets, making it easier to locate problem areas in your network. This feature is only available to customers who have the Network Map feature enabled in their license key.

By default, the color of the targets in the network map represents the maximum CVSS severity level of the vulnerabilities detected on the target, not including excluded vulnerabilities unless exclusions are shown (see Exclusions). Mouse over any target to see the corresponding CVSS score as well as the full hostname and IP address of the target. Click on a target to bring up a detailed grid showing the vulnerabilities found on that target by descending CVSS score.
Besides CVSS, the target colors can also represent the SAINT severity level, asset criticality, risk level (if VRM is enabled in your license), or risk forecast (if VRM is enabled). The color-coding scheme can be selected from the Color By menu under Map Actions. Once it is changed, the selection will remain in your user profile so it will be the default the next time the map is loaded. Mouseovers will now show the selected metric, and the detail grid will be sorted by the selected metric. To remove the color coding and draw a grayscale map, set Color By to None.
If you wish to use the network map outside of SAINT, you can export the map to an image file by choosing Export under the Map Actions menu. This brings up another menu allowing you to choose the image format, PNG or JPG. The image will then open in a new browser tab. Use the browser’s Save As function to save the image.
For network mapping to work, the scanner must be running SAINT 10.5 or higher at the time of the scan, the scan policy must be Full Vulnerability Scan or a similar compliance policy, and the Trace Route option must be enabled in the Scan Options. Even when these conditions are satisfied, the ability to draw an accurate map is subject to the availability of route information, which may be blocked by some routers. Since there are some random elements involved in Internet routing, the map of the same targets may differ from scan to scan.
All Results
This view shows vulnerability results for the selected data set(s) at the host level of detail, for all vulnerability severity levels, to include services and facts coded as “informational” only. This view also shows an aggregation of all related CVEs, for each vulnerability, with hyperlinks from the CVE to the associated external source. You can also see all available column values for a record by double clicking the row. You can also view the full tutorial about the vulnerability by clicking on the tutorial button in the row's Action column..
View All Facts
The View all Facts option is available only in the All Scan Results view, and displays all scan information recorded during the selected scan—not just vulnerability, service and information items determined by interrogating the host.

This level of detail is not applicable to day-to-day risk and vulnerability analysis, but can be beneficial in troubleshooting and false positive investigation, as they include codes that are recorded at scan run time and can have an effect on how scan probes and checks are executed. Some of the more common codes follow:
-
Severity = “a” (available)
-
Severity = "i" "full user list"
-
Severity “r”, “y” and “b” (red, yellow, brown) are "number of vulnerabilities"
-
Severity “g” (Green) is "number of services"
-
Severity = “u” (unavailable) is sometimes useful for troubleshooting by SAINT’s Support engineers.
-
Severity = “n” (network or broadcast address) is only used for legacy Smurf and Fraggle checks and are rare seen anymore, but may be included in the results.
-
Severity “b” (bad, unable to resolve) and “x” (look into further) may be in the results data and may require further investigation by SAINT Support to make a determination of cause or affect.
Note that your SAINT support engineer may ask for this information or refer to it during an on-line troubleshooting call. Therefore, having access to this information directly through the user interface can save time whenever they are asked to assist in an issue.
All Vulnerabilities
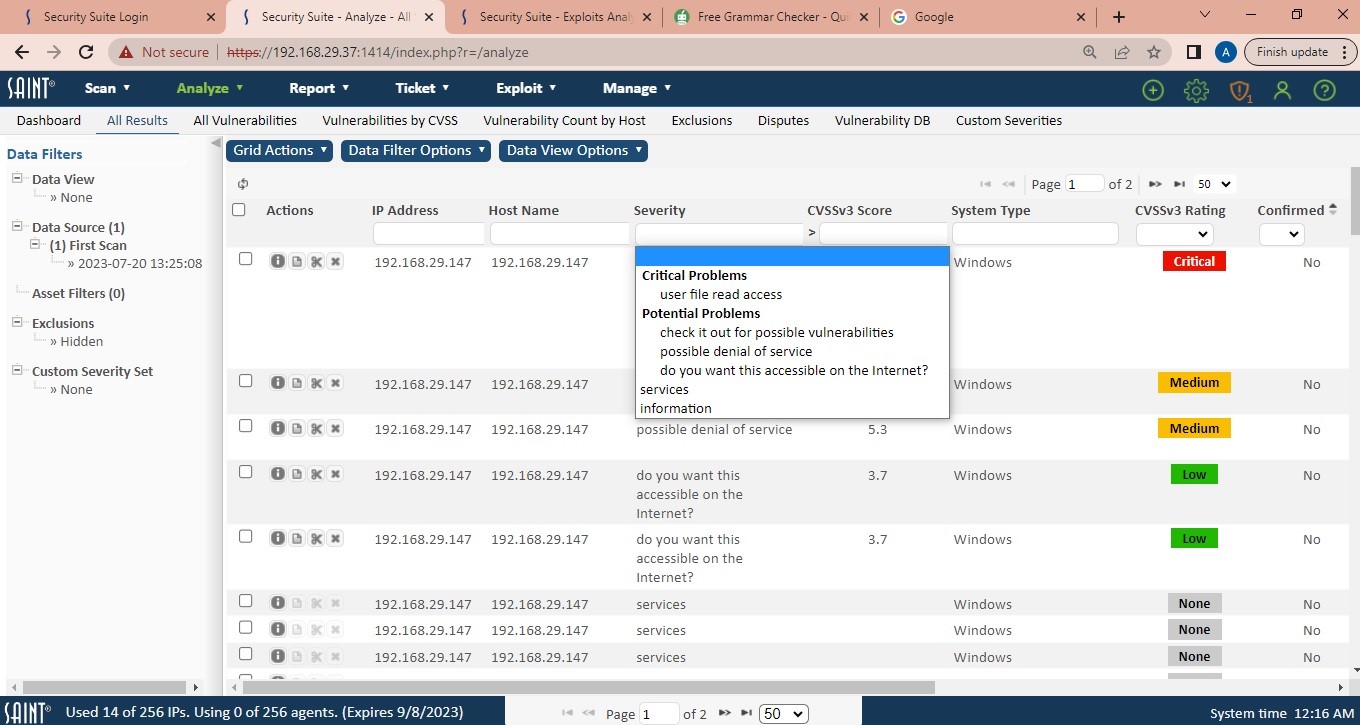
This view shows vulnerability results for the selected data set(s) at the host level of detail, excluding services and facts coded as “informational” only. As with the All Scan Results view, this view also shows an aggregation of all related CVEs for each vulnerability associated with the SAINT Vulnerability Check; hyperlinks from the CVE to the associated external source; access to the summary view of all vulnerability columns; and the tutorials. The following shows an example of this page, with the Severity column being used to select a Severity type of filtering results:
Vulnerabilities by CVSS
This view shows vulnerability results for the selected data set(s) at the host level of detail, excluding services and facts coded as “informational” only. This view is different than the All Vulnerabilities page in that it shows all vulnerability records at the vulnerability, CVE, CVSSv3 and CVSS score level of detail. This view makes it easier to sort by CVSS score, search and filter by CVSS or export this level of detail quickly without additional view customization.
Vulnerability Count by Host
This view provides a one-click approach to answering one of the most commonly asked questions – what are my most vulnerable hosts? This view shows both the total number of vulnerabilities by severity level, and the aggregate total. If you are using the asset tagging features in Asset Management, these tags will also be available as columns to align these asset metrics with scan results. The following shows an example of this use-case:

All Exploits
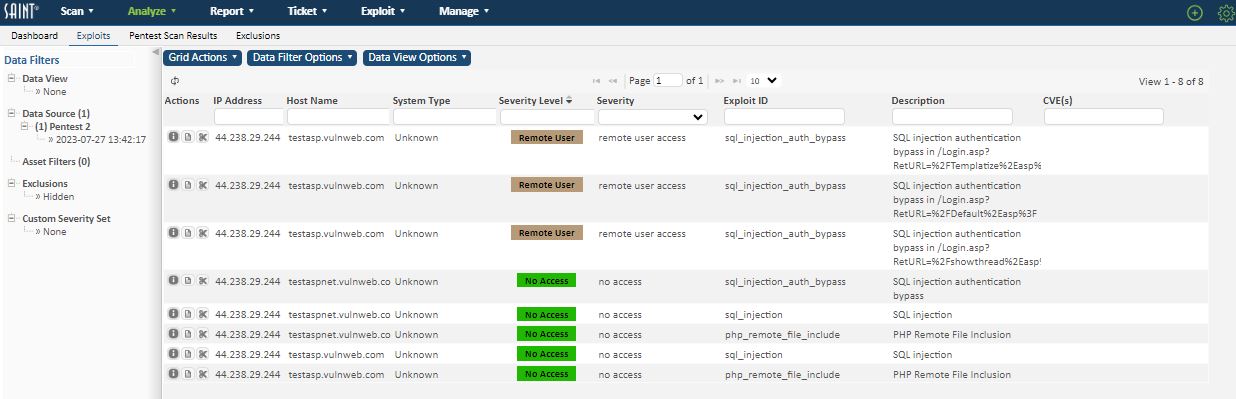
This view is provided for viewing and assessing the results of running individual exploits or tools. The default view provides the raw results at the host level of detail, including unsuccessful exploits as well as exploits executed on the host(s). As with other views, the results grid allows you to search and filter by any displayed column, to include the exploit-specific severity levels that define the type of exploit (remote admin; remote user; client access; privilege elevation) or if you just want to see what hosts had a successful exploit run on it.
All Pen Test Scan Results
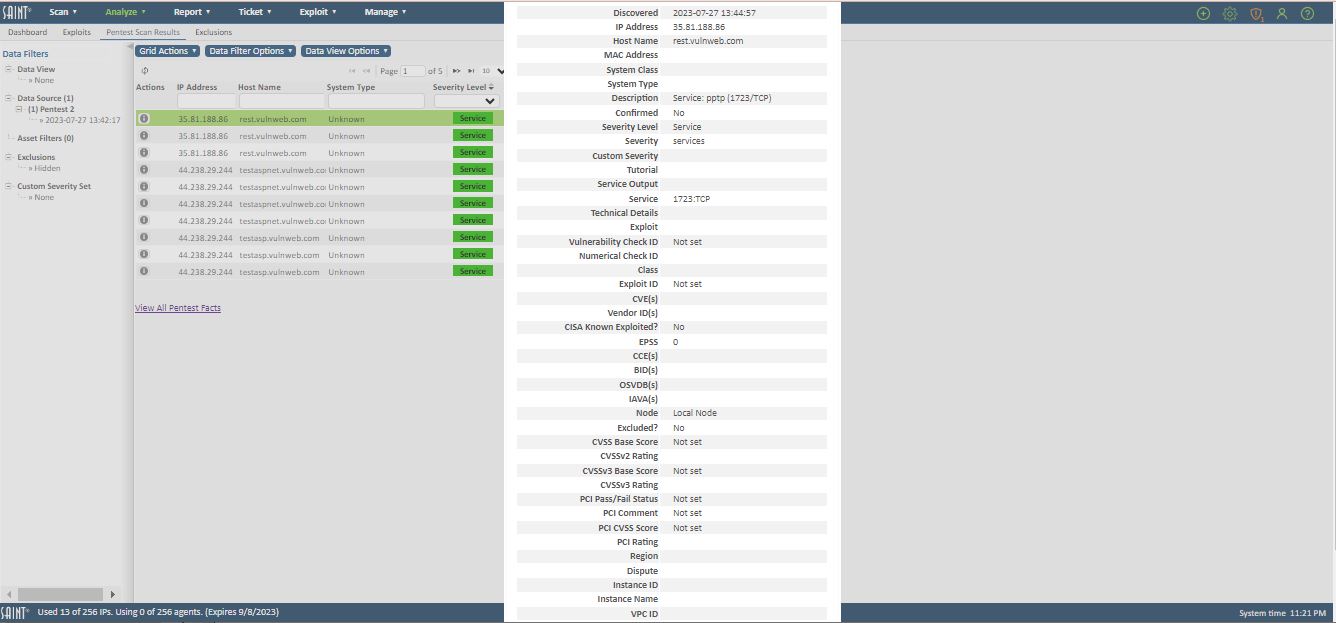
This view is provided for viewing and assessing the results of the automated penetration test scan policy – executed as a scan job. It is similar to views for individual exploits; however, it provides a subset of columns specific to pen test analysis, as well as a View all Pen Test Facts feature to investigate both returned exploit information and details about all facts returned during the test, as well as links to tutorial information for individual exploits, as shown in the following example:
Using the Results Grid
Scan results selected from the Data Set selector are presented in the data grid, based on default settings upon installation. Many of these settings are also available for customizing as you are performing your analysis. The following describe the various controls available in this grid to support data presentation, as well as ad hoc analysis and exporting.
View External Source References
External source references, such as CVE, BID, OSVDB and vendor references like Microsoft Bulletins and Red Hat advisories can be selected from the column selector and displayed in the grid. These coded references also contain a hyperlink to allow you to click on the reference and launch the external source’s detail page about the vulnerability.
Report
There are times when you will need to generate a quick report from the filtered data in a results grid, rather than navigating to the Report features and building a report through the report wizard. The “All Results” and “All Vulnerabilities” grids have the option to quickly generate a “Full Scan” report by selecting “Report” from the “Grid Actions” dropdown menu. This report feature will generate a report using the vulnerabilities results, as filtered in the grid and the Data Filter options, using the visible grid columns, with the following exceptions and considerations:
-
The System Class, CCE(s) and Vendor ID(s) columns are not currently supported in report output.
-
The “Severity” column is displayed as “Severity Level” in reports.
-
If “Custom Severity” and SAINT’s “Severity Level” columns are used in a grid, the report includes report graphs for both.
-
If only the “Custom Severity” column is used, the report will exclude SAINT’s “Severity Level”.
-
Host List columns will vary from the standard Full Report template, based on which severity-related columns are visible in the grid.
IMPORTANT: Note that report widths have inherent limitations due to document and print sizes. Therefore, there may be cases where the visible data grid columns and content exceed readability when generating a report. It may be necessary to limit or modify the columns used in order to produce a report that is both legible and beneficial to the report purpose.
Export to CSV or XML
Exporting the raw scan results simple. Click the export option from the Grid Actions dropdown, then choose CSV or XML from the pop-up menu and save the file.
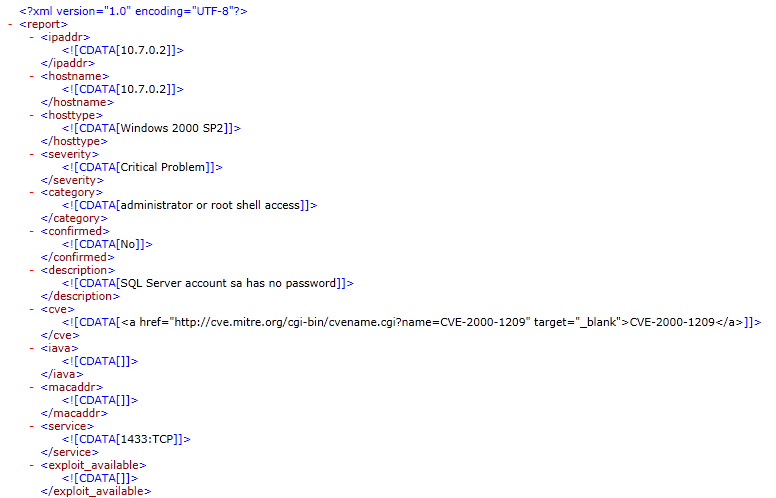
The export feature will export all columns and vulnerability records for the selected context (data set(s)) to the selected path. An example XML output is shown below:
Export to Cisco FireSIGHT
Through our partnership with Cisco, you can configure the Security Suite manager to communicate with Cisco FireSIGHT and export scan results into the data corre3lation engine. This allows the scan results to be viewed in Cisco FireSIGHT and used in Cisco FireSIGHT’s impact assessment.
To export scan results to Cisco FireSIGHT, first configure Security Suite to communicate with Cisco FireSIGHT. (See System Options/Cisco FireSIGHT.) Then, from the All Scan Results, All Vulnerabilities, or Vulnerabilities by CVSS grids, click on the export option from the Grid Actions dropdown list. Then click on FireSIGHT from the pop-up menu. This will open a dialog box which tells you whether the export was successful.
Scans can also be configured to export results to Cisco FireSIGHT automatically when the scan completes. See Export Results to Cisco FireSIGHT for further instructions on this feature.
Export to Splunk
In addition to automatically transmitting scan results to Splunk when scans have completed, scan results can also be exported manually in a format that can be imported into Splunk. This option is available from the All Scan Results; All Vulnerabilities; and Vulnerabilities by CVSS grids. Click on this Export option through the Grid Actions drop-down to choose how you wish to transmit the data shown in the data grid into the pre-configured Splunk instance. Click Transmit Now to automatically export the data to Splunk. Click Save Export File to generate a file which can be used to import data into Splunk using the JSON data source type. An error message will be displayed if the Splunk configuration settings have not been configured in the Configuration – System Options page or the target Splunk instance is unavailable. See System Options/Splunk for further instructions on this feature.
View a Record's Details
In addition to viewing a vulnerability record’s displayed columns, you can also quickly view the full details of a vulnerability record by clicking on the Fact icon (i) in the Action column. You can also view all of a record’s detail by double clicking on a highlighted row.
View a Tutorial
SAINT develops and maintains its own tutorial categories and articles about vulnerabilities. These tutorials contain information such as impact, background, problem and resolution information. Some articles also contain a more information section that can include links to external references to aid in your research and remediation activities.
You can view the tutorial articles for any vulnerability records by clicking on the Tutorial Information ( ) icon in the far right column. An example of a tutorial is shown below:
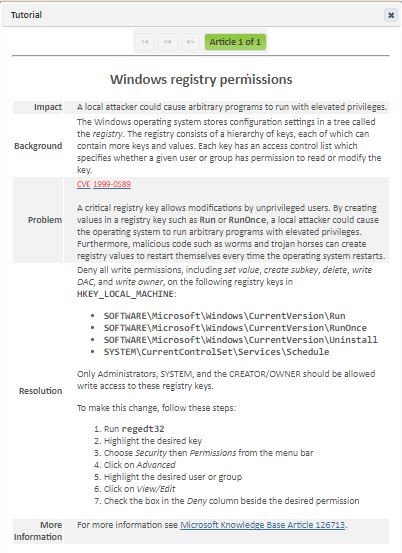
Note that some tutorials contain more than one article, due to the scope and magnitude of a vulnerability. In instances where a tutorial contains more than a single article, you can page through the tutorial by using the left (back) and right (forward) arrows to navigate through the articles.
Result Comments
The “All Results”, “All Vulnerabilities”, and “Vulnerabilities by CVSS” grids have an option to create/edit/remove a comment on any of the rows/results in the grid. A user that has “modify results” permission on the displayed data set(s) can do this on an individual basis by selecting the “result comment” icon in the Actions column. Note that selecting just one row (i.e., showing just one CVE) of a vulnerability in the “Vulnerabilities by CVSS” grid will apply the result comment to all rows for that vulnerability. Result comments may also be added for multiple rows/results at one time by using the checkbox to choose specific rows and then selecting “Result Comment” from the “Grid Actions” dropdown menu. Result comments will be saved along with the username of the person who edited the comment. A result comment can be removed by emptying the comment dialog and selecting Save. Any relevant grids, including the dashboard grids, have the option to show the “Result Comment” column.
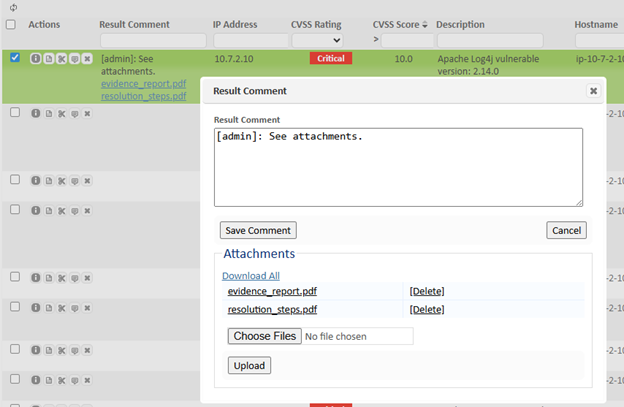
The result comment dialog also allows you to attach one or more files to the chosen scan results record.
- To upload files, click on “Choose files” and then select one or more files to attach.
- To delete attachments, use the “Delete” button next to an attachment.
- All attachments can be downloaded by using the “Download All” link.
- Attachments can be viewed by clicking on the file name from either the Result Comment dialog or the Result Comment grid column.
Attachments can also be uploaded to multiple results records by selecting multiple scan results and clicking on Grid Actions -> Result Comment. Attachments may not be viewed or deleted when using the bulk upload method, but you can click on the “Result Comment” button for an individual record afterwards to delete and download attachments.
Exclusions
The scan engine reports all vulnerabilities found, whether confirmed by clear evidence or inferred as a result of other information obtained during the scan. For example, for some vulnerability checks, the presence of TCP wrappers, a packet filter, a firewall, back-ported patches or other security measures on a target host could cause the scanner to return a false alarm. For other vulnerabilities, it is impossible to determine with certainty whether or not the vulnerability in fact exists, merely by probing it remotely. Unconfirmed vulnerabilities usually fall into the brown level, but it is also possible for a red or yellow vulnerability to be a false alarm. If, after further investigation, it is determined that a vulnerability does not exist, then the vulnerability is a false alarm. In other scenarios, you may know the existence of a vulnerability, but local policies or decisions dictate that you need to tag the vulnerability in a special way and exclude it from current or future analysis or reporting. SAINT supports these types of scenarios by allowing you to set an exclusion flag on the vulnerability, and determine whether the vulnerability should be specific to a host, all hosts, a selected scan job or for all future scan jobs. While this feature can be a helpful way to minimize your analysis time and focus on risks you deem the most important, a periodic review of the tutorials that correspond to excluded vulnerabilities is recommended in order to confirm that they should remain excluded, or to determine if there is a new vulnerability with the same description that may impact your decisions for exclusions.
The exclusions features are found on pages under the Analyze menu, and contain two primary functions: 1) Use the Set Exclusions option (scissors icon) to create an exclusion or view exclusion information specific to a selected row; 2) Use the Exclusions column in the analysis grids to determine whether individual rows have exclusions set for them; 3) use the Exclusions page option under the Analyze menu to view and manage all exclusions set in the system; and 4) Use the Exclusions are Included/Hidden option in the Data Filters option dropdown to hide or show exclusion records.
Create an Exclusion
-
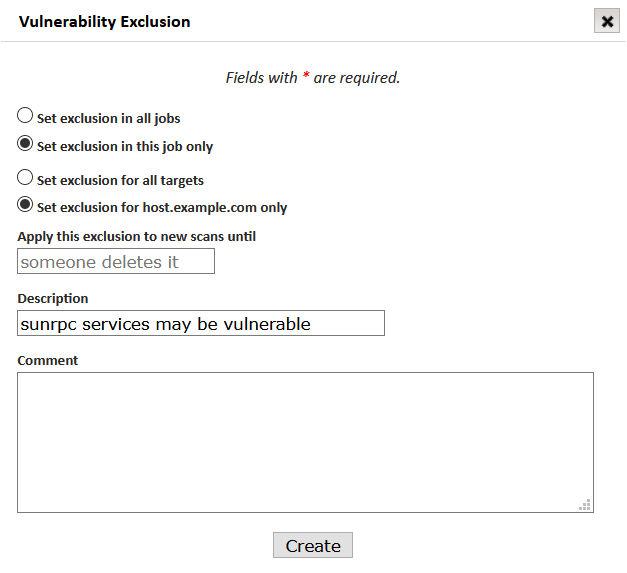
To exclude a vulnerability, click on the Set Exclusions (scissors) option in the Actions column of the vulnerability to be excluded. In the example, we will exclude sunrpc vulnerability for the current scan job and a specific host.
-
By default, the exclusion will only be applied to the current job. Choose “Set exclusion in all jobs” if you want the exclusion also to be applied to other jobs. Note: If the logged-in user is not an administrator, then the exclusion will only be applied to the user’s own jobs and jobs to which the user has exclude results permissions. (See Modifying Permissions.)
-
By default, the exclusion will only be applied to the current target. Choose “Set exclusion for all targets” if you want the exclusion also to be applied to other targets.
-
By default, the exclusion will be applied to new scans (including those from new jobs if all jobs was chosen in step 2) until someone deletes the exclusion. If you would prefer to automatically stop applying the exclusion to new scans on a predetermined date, click on the Apply this exclusion to new scans until box and choose a date.
-
Enter detailed comments to describe the reason for the exclusion and any other relevant information that will be useful later in your overall risk strategy.
-
Click the Create button to save the exclusion.
Show/Hide Excluded Vulnerabilities
Although a vulnerability can be flagged as an exclusion, it can still be displayed or hidden dynamically while performing analysis.
Show
To show excluded vulnerabilities in the displayed results, the Show/Hide option is a toggle option under the Data Filters Option dropdown list. Show Exclusions will be displayed when Exclusions are hidden. Hide Exclusions will be displayed when Exclusions are currently being displayed in scan results and calculations. The Data Filters column (left-most column) will display the current state of this filter.
In the following example, all vulnerabilities are shown, to include all that have been flagged as exclusions:
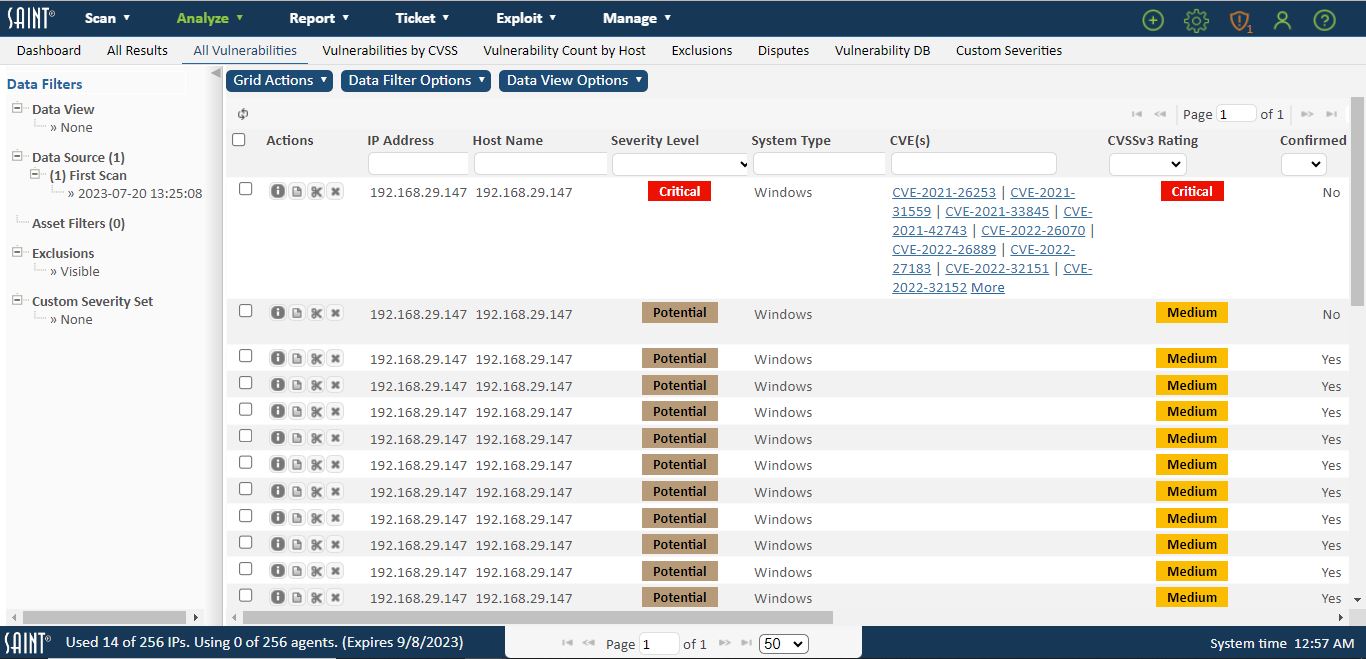
In this example, there are 164 total vulnerability records displayed for the scan – including those having been flagged as an exclusion. You can use the column search feature to locate specific excluded vulnerabilities or to merely sort the list in ascending or descending order for exclusions (yes/no). Click on the set exclusion (scissors) option for an exclusion record, to view the information previously defined for the exclusion. The Vulnerability Exclusion dialog will display in the same manner as for creating an exclusion.
Hide
To perform analysis without excluded vulnerabilities, choose the Hide Exclusions option in the Data Filters dropdown list. The display is refreshed again, hiding all excluded vulnerabilities. View the total record count at the bottom of the grid to see how many vulnerability records have been affected by the exclusions. In our example, the record count is now down to 159, as a result of hiding multiple exclusions affecting three different hosts:

Remove an Exclusion
Exclusions can also be removed in order to facilitate changes to the environment, organization decisions, compliance requirements and risk strategies.
One method is to locate the exclusion within an Analysis grid, selecting the affected job and vulnerability. This method is typical when managing exclusions at low levels of detail (job, host). Use the following steps to remove exclusions directly within the Analysis grid:
-
Select a scan job (and/or specific scan) that is affected by an exception.
-
Select the All Vulnerabilities view to limit your display to vulnerability records.
-
Use the Column Chooser to include the Exclusions column in your display grid.
-
Use the column sort feature to sort your view by Exclusions = “yes”.
-
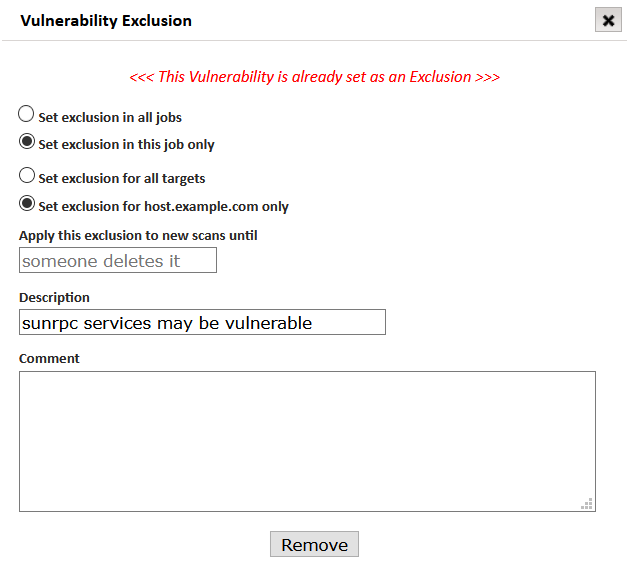
Click on the Set Exclusions (scissors) option on the vulnerability exclusion record to remove.
SAINT will display the Vulnerability Exclusions dialog.
-
Click the Remove button.
The exclusion flag will be removed, leaving the vulnerability record intact for future analysis. Note that deleting an exclusion configured to impact “all jobs and selected host target” or “all jobs and all host targets” will remove this condition and not set exclusions for subsequent scans.
The second method for removing exclusions is to perform the delete within the Exclusions page found under the Analyze menu. Refer to the next section (below) for steps for viewing all exclusions in the system and editing or deleting as required.
View Exclusions
The previous section described how individual exceptions are created, and can be used or hidden while performing detailed analysis. This section describes how to view all exclusions that have been created in the system, and the features available for editing details or deleting exclusions without having to locate them within affected scans.
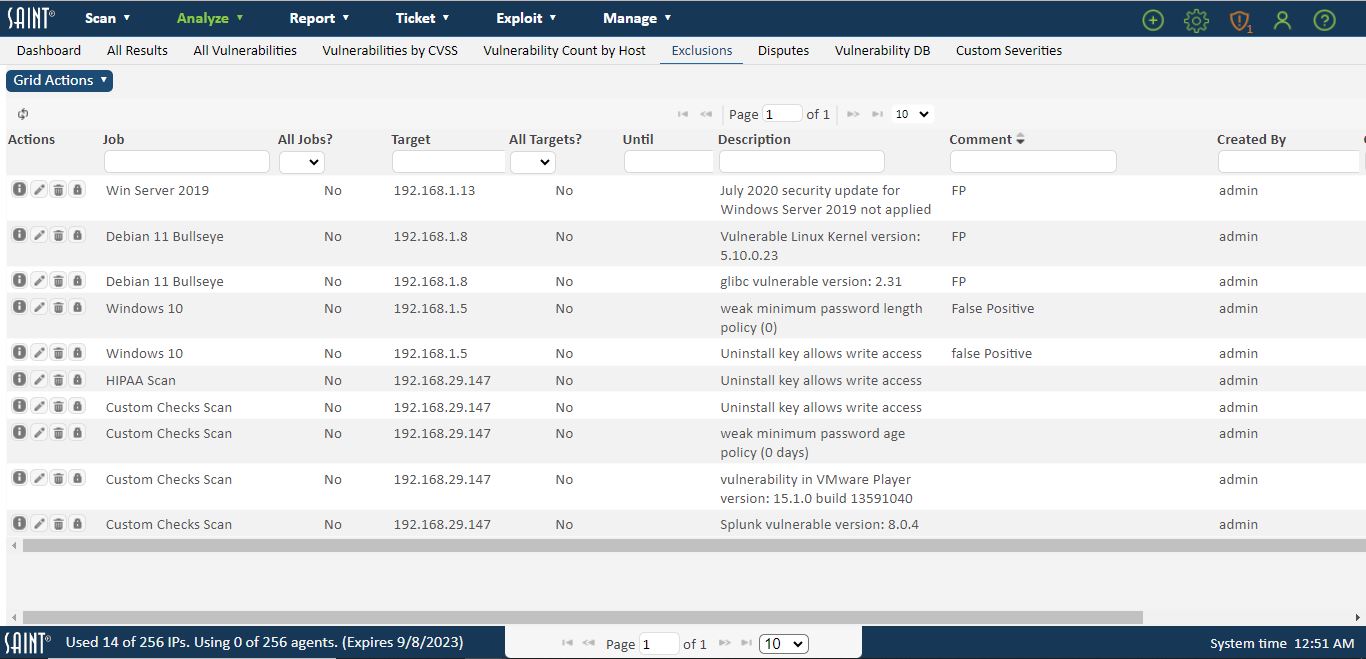
First, click on the Exclusions page under the Analyze menu to display a list of all current exclusions:
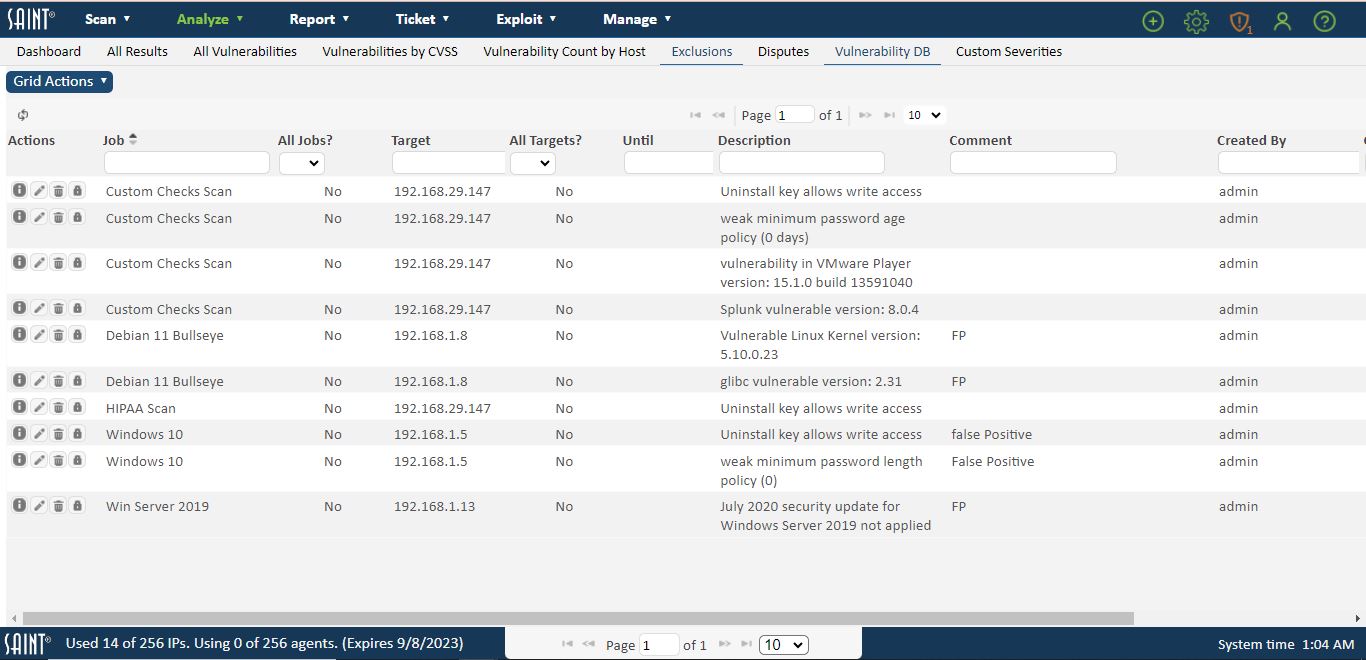
You can now view, sort, and search exclusion content in the same manner you would with other grids in the system. This display shows useful information, such as the author of the exclusion and when it was created, as well as the scope of the exclusion, such as individual or all host targets, and whether the exclusion is specific to a job or spanning all jobs. Additional columns may also be available through the column chooser, depending on your current display.
Use the Edit (pencil) option to view the current settings of the exclusion and modify the comments or end date.
Use the Delete (trashcan) option to delete the exclusion. Note that deleting an exclusion configured to impact “all jobs and selected host target” or “all jobs and all host targets” will remove this condition and not set exclusions for subsequent scans.
Quarantines
In some cases, if a critical vulnerability is detected on a host, it may be desirable to quarantine that host from the rest of the network as a protective measure. This capability exists on networks which use Cisco ISE for authentication of devices to network resources, and can be initiated using the Cisco pxGrid service. After a target is quarantined, it will be unable to access the network, thus preventing any compromise of the target from affecting the rest of the network.
Creating a Quarantine Policy in ISE
Before a target can be quarantined, you must create a quarantine profile in ISE. The steps below only provide a basic overview. Please consult the ISE documentation for the full details.
-
(ISE 1.x only) Change the service status to Enabled under Administration > System > Settings > Adaptive Network Control.
-
Create a new authorization profile called Quarantine of type ACCESS_ACCEPT under Policy > Policy Elements > Results > Authorization > Authorization Profiles.
-
Under Policy > Authorization, insert a new rule above the Basic_Authenticated_Access rule. In the Conditions box, choose Create New Condition > Select Attribute > Session > EPStatus. In the next box, choose Quarantine. In the Authz Profile box, choose Standard > Quarantine. The final rule should read: “if Session:EPSStatus EQUALS Quarantine then Quarantine”.
Quarantine or Unquarantine a Target
-
Locate the desired vulnerability record on any of the Analyze grids.
-
Click on the Quarantine icon (exclamation point inside a triangle) in the Actions column for that record. (This icon only appears if the Cisco pxGrid client has been configured in SAINT. See Cisco pxGrid configuration.)
-
A dialog box reports the current status of the vulnerable target as reported by ISE.
-
If the target is currently unquarantined, click on the Quarantine button to request that it be quarantined.
-
If the target is currently quarantined, click on the Unquarantine button to request that it be unquarantined.
-
If the target does not have an active session with the ISE server, then no action can be taken.
-
-
The quarantine or unquarantine request will take effect the next time the target authenticates to ISE. Until then, the status reported in the dialog box will remain unchanged, and the request can be cancelled by re-opening the dialog box and clicking on the Keep Quarantined or Keep Unquarantined button.
Disputes
While the exclusion feature discussed in the previous section is useful for informally excluding certain findings, SAINT also includes a vulnerability dispute feature for situations where a more formal approval process and audit trail are required. This feature is primarily designed to satisfy the reporting requirements in the ASV Program Guide, but it can also be used for other purposes as needed. Disputes can be created by any user who has dispute results permission on the scan job, but can only be resolved by a user who has resolve disputes permission on the system.
Create a Dispute
To dispute a vulnerability, go to the Analyze -> All Results or Analyze -> All Vulnerabilities page, and click on the Dispute button (X icon) in the Actions column for the vulnerability. This opens the dispute dialog containing three expandable sections: Dispute Information, Evidence, and Response:
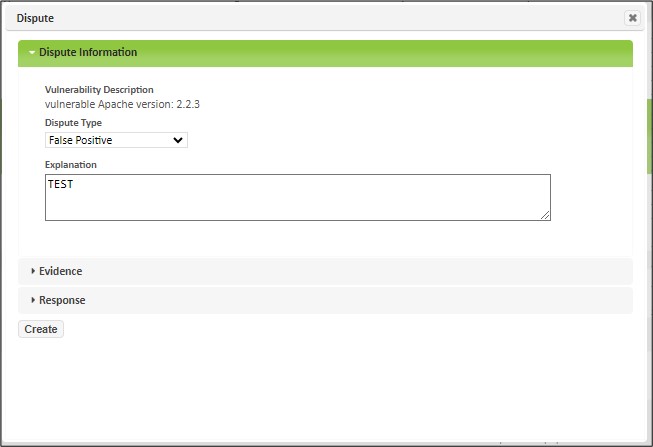
Select the dispute type from the drop-down menu, and explain why you disagree with the vulnerability finding in the Explanation box. If you have evidence files to support the dispute, expand the Evidence section by clicking on the triangle beside the Evidence section header:
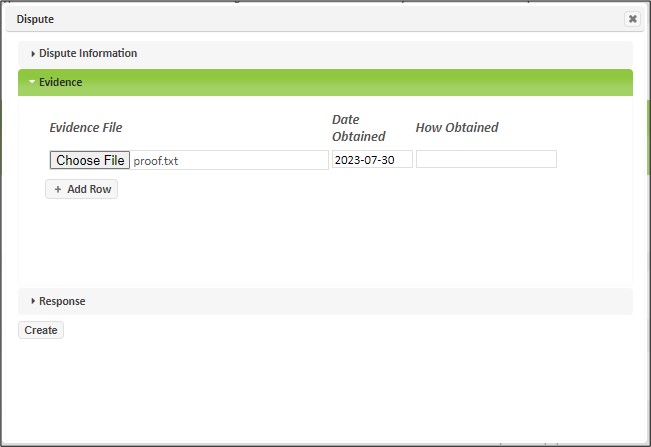
Click on the Browse button to select the evidence file to upload, and specify the date the file was obtained, and a brief explanation of how it was obtained. Click on the Add Row button if you have more than one evidence file.
If the Other occurrences of this dispute section is present, then the same vulnerability on the same target has been disputed before in other scans. Expand this section to see the date and status of those disputes.
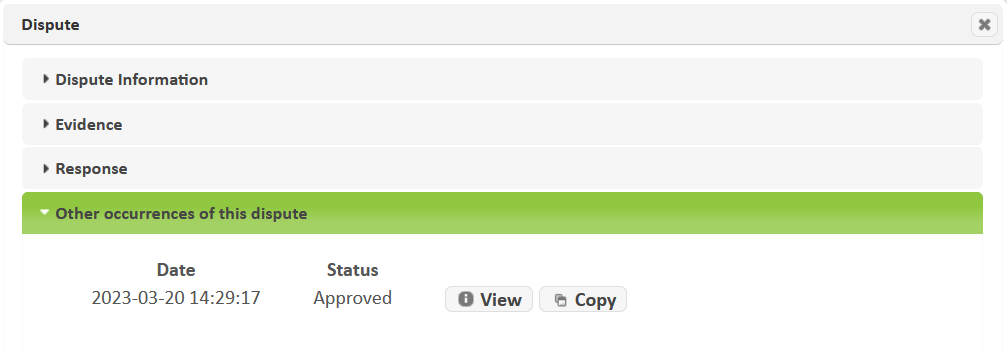
Click the View button to view the dispute, or the Copy button to copy the dispute type and explanation from the other dispute into the current dispute. (The evidence file is not copied since the ASV Program Guide requires evidence to be resubmitted for each scan.)
When you are finished, click on the Create button.
Bulk Disputes
Sometimes the same explanation and evidence apply to several disputed vulnerabilities. In these cases, it is faster to create one dispute covering all the disputed vulnerabilities rather than creating a separate dispute for each one. To create a dispute covering multiple vulnerabilities, go to the Analyze -> All Results or Analyze -> All Vulnerabilities page, and check the boxes beside the desired vulnerabilities. Then choose Dispute from the Grid Actions menu. Fill out the dispute form as described in the previous section.
View Disputes
To view a list of disputes, go to the Analyze -> Disputes page. This page displays a grid showing all disputes in the system which you have permission to view or resolve. Disputes can be filtered by their status using the drop-down menu at the top of the Status column, to help resolvers find the disputes that require a resolution.
To view a dispute, click on the Details button (“i” icon) beside the desired dispute. This brings up a dialog containing two tabs:
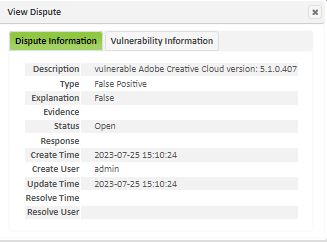
The Dispute Information tab shows the information about the dispute itself, including links to any evidence files. The Vulnerability Information tab shows information about the disputed vulnerability. If more than one vulnerability is being disputed, use the pager buttons to page through the vulnerability information.
Each dispute also has action buttons allowing you to edit the dispute, delete the dispute, or view the dispute’s activity log.
Resolve a Dispute
Once created, a dispute can only be resolved by a user who has both View Results permission on the scan job and Resolve Disputes permission globally. (Global permissions are set from the Permissions tab when editing the user or group on the Manage Users and Groups page. See Access Controls for more information about permissions.) Before resolving a dispute, review the dispute information, evidence files, and associated vulnerability information as described in the previous section, and decide whether to approve the dispute, deny the dispute, or request additional information from the user who created the dispute.
To resolve the dispute, go to the Analyze -> Disputes page and click on the Edit button (pencil icon) beside the desired dispute. Alternatively, go to the Analyze -> All Results or Analyze -> All Vulnerabilities page and click on the Dispute button (X icon) beside the vulnerability. This opens the dispute dialog. Click on the triangle beside the Response section header to expand the response section:
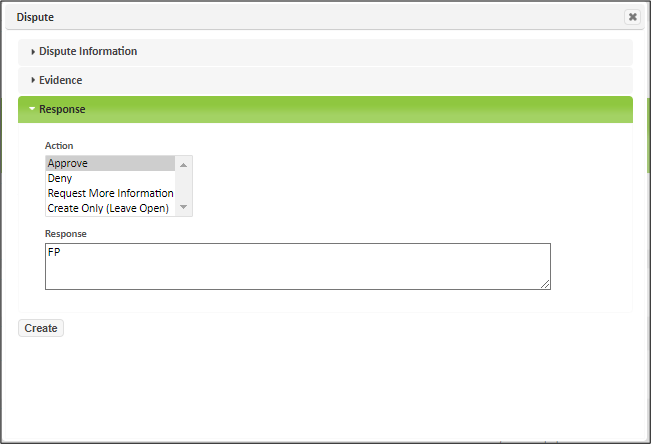
Click on Approve, Deny, or Request More Information, and enter a response explaining your decision. If you are approving the dispute, the response will go into the PCI Comment column of the analyze grids as well as the ASV Summary report, so ensure that it is clear and brief. If you are requesting more information, be sure to state what information is needed. The dispute status will change to pending until someone modifies the dispute, at which time it will change back to open. When you are done, click on the Update button. The dispute status will then be changed to reflect your decision. Furthermore, if you approved the dispute, then the PCI status will change to Pass and the PCI Comment will show your response.
If the Other occurrences of this dispute section is present, then the same vulnerability on the same target has been disputed before in other scans. Expand this section to see the date and status of those disputes.
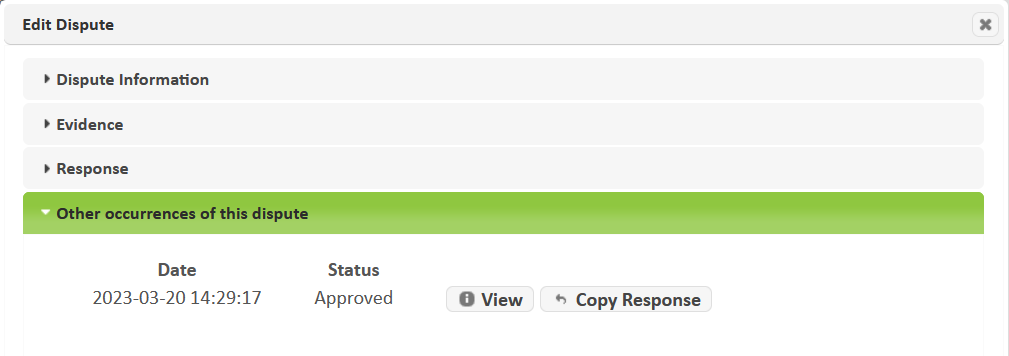
Click the View button to view the dispute, or the Copy Response button to copy the response from the other dispute into the current dispute.
Delete a Dispute
Disputes can be deleted either by clicking on the Delete button inside the dispute dialog, or the delete button (trash can icon) on the Analyze -> Disputes page. Deleting the dispute will cause the PCI and PCI Comment fields to return to their original values if the dispute had previously been approved.
Vulnerability DB
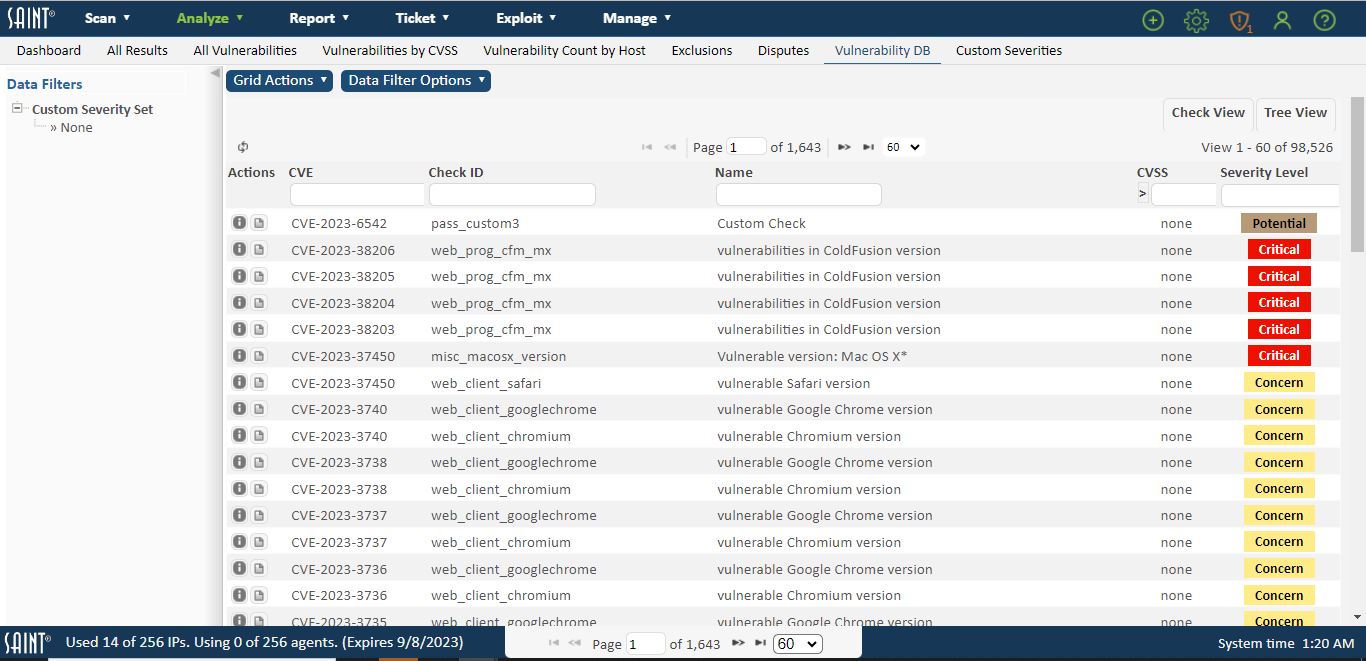
The Vulnerability database page provides access to SAINT’s vulnerability database, to allow you to view information about all of the vulnerabilities SAINT currently supports. This grid provides full support to select the columns to be displayed, column order, column sorts, as well as filtering the displayed results based on any available column, such as: SAINT’s unique check ID, keyword column searches, CVEs, CVSS score, SAINT’s severity category or your organization’s custom severities. In the following example, this grid displays all vulnerability checks (by Check ID), as well as the user’s custom severities associated with their FISMA custom severity set. This particular custom severity assignment sets all checks associated with the check category of “database” to be a Medium custom severity. Note: Each check_id may be associated with multiple CVEs with varying CVSS scores, and Custom Severities. Therefore, the CVSS score and Custom Severity code is the HIGHEST score computed for those instances.
Tree View
This option rolls up vulnerability checks into categories, such as databases, DNS, mail and passwords.
CVE View
This option displays a view of all supported CVEs, including their associated CVSS score, SAINT check ID, SAINT severity level, and any custom severities that have been associated with listed CVEs. From the Grid Actions menu, click Export to create a file in either CSV or XML format which contains all the CVEs that can be identified by SAINT.
Custom Severities
This feature provides the capability to create one or more sets of custom severity codes, and assign them to vulnerabilities, similar to how SAINT and the industry uses other ways to categorize or classify the severity of vulnerabilities, such as: the CVSS scoring system (1-10); PCI (Pass/Fail); SAINT Severity Levels (Red-Critical; Yellow-Area of Concern); SAINT Severity categories (Denial of Service; Privilege Elevation). Some use-cases can include, but are not limited to:
-
Regulatory compliance – create custom severity codes for a regulatory compliance area (e.g., FISMA) that mandates risk management based on a specified list of severities, such as High, Medium, Low for classes or groups of risks/vulnerabilities.
-
Local standards – maybe your organization has an internal method for classifying risks. For example, you define a custom severity set of “Local” and create custom severities by categories defined in your internal risk management framework (e.g., Critical; Important; Routine). Then you assign risks related to the types of checks related to various areas of interest, such as: web servers, web applications and passwords are deemed Critical; risks related to Windows OS are deemed Important; risks related to Print Services are deemed Routine.
-
Classifying high visibility vulnerabilities – in this use-case, you could create a Custom Severity set, and create severities based on the level of risk or severity you deem appropriate for high visibility vulnerabilities that hit the news. For example, assign a High Visibility Severity code of Urgent for individual checks related to vulnerabilities such as: Poodle, Heartbleed and Bash.
Add Custom Severity Sets
-
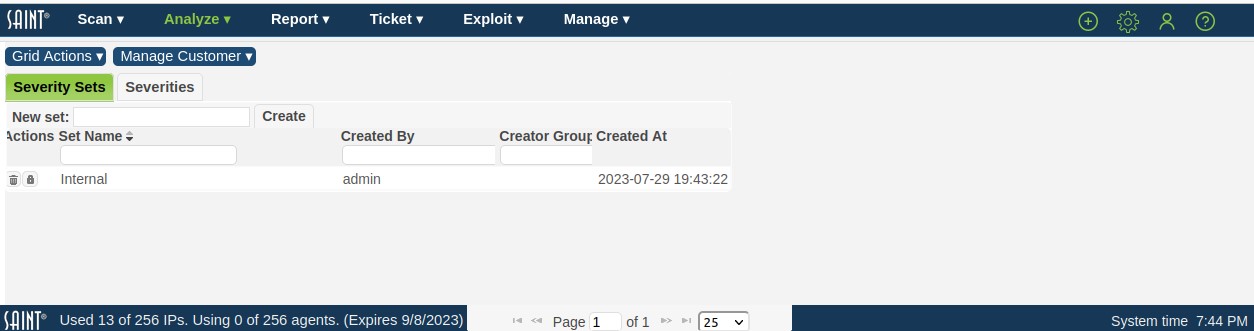
Enter a name in the New Set field in the Severity Sets tab
-
Click the Create button to add the new set to the existing list.
Controlling Permissions to Custom Severity Sets
User access control and permissions can be managed for individual custom severity sets. Permissions can be defined and managed by performing the following steps:
-
Click the Security action button beside the Custom Severity Set to be managed.
-
Select a user or group in the current panel or use the Add button to select the applicable user(s) and/or group(s) to include in your permissions.
-
Use the check boxes in the Permissions for [user] section to define the View, Modify, Delete permission for the selected custom severity set or others, as specified in the permissions dialog.
-
Click OK to save the permissions settings.
Edit/Delete Custom Severity Sets
-
To edit the title of an existing Custom Severity Set, click in the cell of the applicable Set Name, and edit the name as needed. Click outside of the cell when done to retain the changes.
-
To Delete a Custom Severity Set, click the Delete action button in the Actions column. This action will display a second prompt to verify that you want to delete the Custom Severity set.
WARNING: Deleting a custom severity set will also delete all custom severities associated with the custom severity set AND all vulnerability assignments that have been made based on the assignment rules that may exist for the set.
Add Custom Severity Codes
After a Custom Severity Set has been defined, the next step is to create one or more custom severity codes that will be used to assign severities to vulnerabilities.
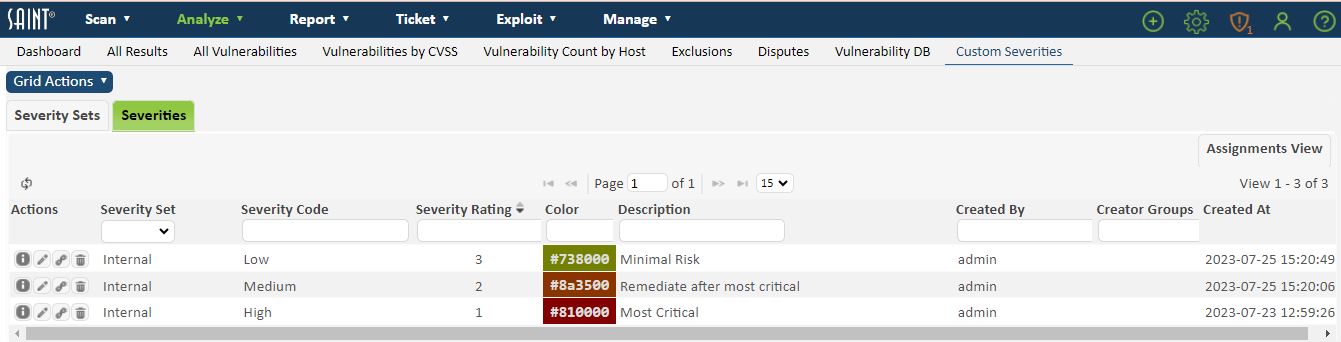
-
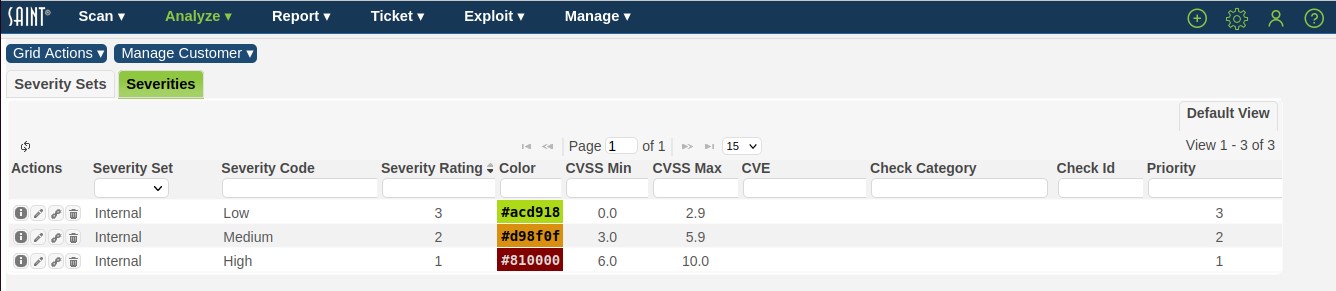
Click on the Severities tab in the Custom Severities grid to view the Severities grid, as shown below:
Default View
-
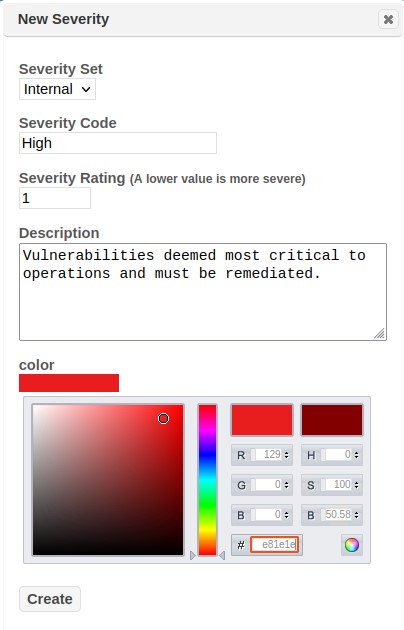
Select Create Severity from the Grid Actions dropdown to display the New Severities creation window.
-
The next step is to define the various attributes of the Severity Code. This detail includes the severity code to the applicable Severity Set; the sort/priority order for the severity in relationship to other codes defined for the set; a short description that defines the code; and a color to associate to the code for applicable charts and graphs.
-
Click the Create button to save the new Custom Severity code.
At this stage in the process, there are no vulnerability assignments associated with the new severity code. Vulnerability assignments are done once a new custom severity code has been defined and associated with a custom severity set.
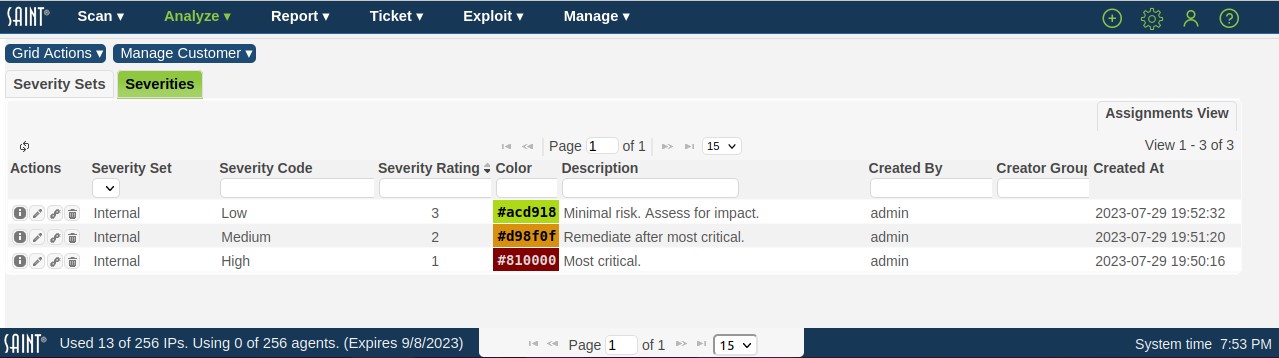
There are two ways to view custom severities. 1) The Default View provides a quick view of the Severity Codes and the details used to create them. This view is the fastest and simplest way to view and make modification to the attributes about a custom severity. 2) The Assignment View provides the details associated with vulnerability criteria assigned to each custom severity. This view is the fastest and simplest way to view and make modifications to the criterion used to map each severity to the target vulnerabilities. Each view and their usage are described below.
Default View
Edit a Custom Severity Code
-
Click on the Edit action button on the row of the applicable severity code to display the detailed information for modification.
-
Modify the settings for the Severity Set, Severity Code, Sort Order, Description or Color, as needed.
-
Click the Update button to save changes.
Delete a Custom Severity Code
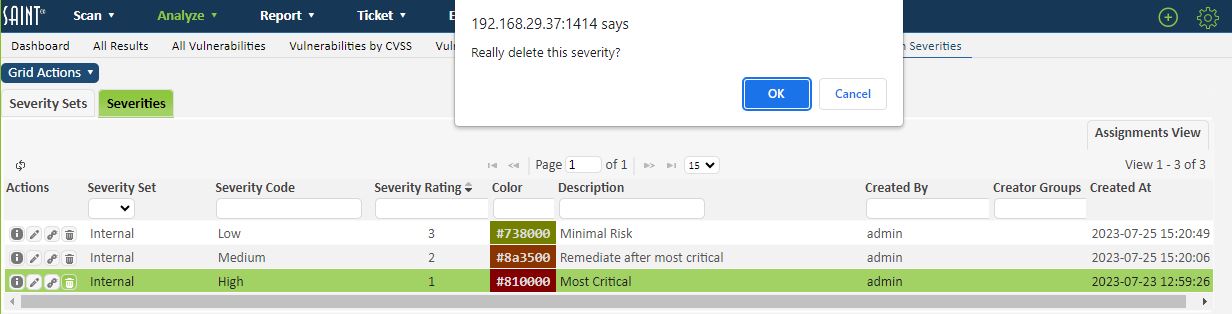
Click on the Delete (trash can) action button on the row of the applicable severity code. This action will display a second prompt to verify that you want to delete the Custom Severity.
Warning: Deleting a custom severity code will also delete all vulnerability assignments that have been made based on the assignment rules that may existing for the code. Do you wish to continue?
Assign Custom Severity Codes to Vulnerabilities
Once Custom Severity Sets and their applicable Severity Codes have been created, they can be assigned to vulnerabilities. Unlike exclusions, where vulnerabilities exclusions must be investigated and determined based on the actual occurrence on a host, and the policy and configuration of a scan job, custom severities can be pre-assigned to vulnerability definition, much like a CVSS score or PCI pass/fail standard.
-
Click the Custom Severities Assignment option (links icon) in the Action column for the corresponding Severity Code, as shown below, to display the assignment options.
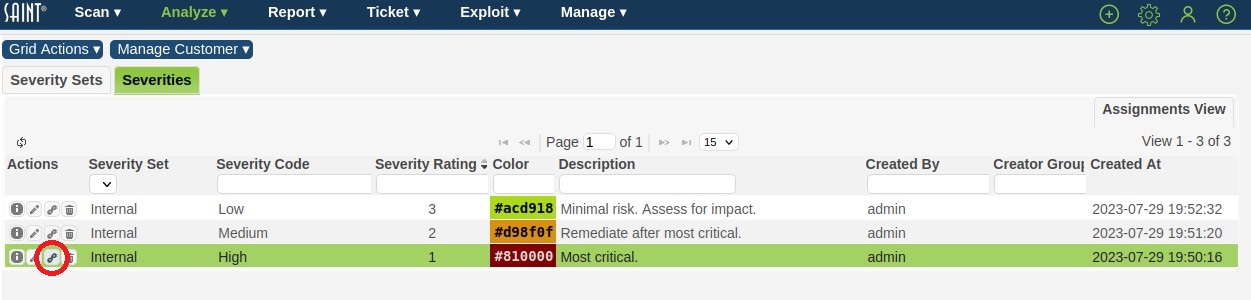
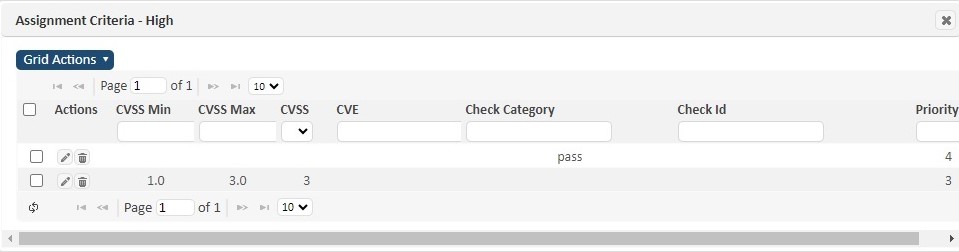
This selection will display a grid that shows all assignment criteria currently defined for a Custom Severity, and Grid Actions for adding Custom Severity Assignment rules:
Custom Severities can be assigned to vulnerabilities in a number of ways.
-
-
CVSS Score or Ranges – assign a severity code to vulnerabilities based on a range of CVSS scores (e.g., CVSS scores 7-10 are assigned high severity)
-
Individual or a collection of CVEs
-
SAINT check categories (e.g., Passwords)
-
SAINT check IDs – Check IDs are identifiers for individual probes used for assessing a target and finding a vulnerability. A vulnerability, as defined in a check, is different than a CVE, as defined by MITRE and published by NIST. CVEs are based on unique instantiations (e.g., enumerations) of a vulnerability, so a Check ID can be associated with one or more related CVEs. For example, the win_samba vulnerability check contains all of the code needed to assess a target against a vulnerability related to Samba 3.x that allows remote attackers to execute arbitrary code via a crafted RPC call. This check covers that vulnerability—including all of its variants—as defined in related CVEs. Two such examples are: CVE-2012-1182 (CVSS 10.0) related to the RPC code generator in Samba; and CVE-2014-2393 (CVSS 2.9) related to the push_ascii function in smbd in Samba. The benefit of assigning a severity code at the check id level is ensuring consistency across the environment in the way you identify the risk of the actual vulnerability, not every instantiation or variant, as defined by CVEs.
-
-
To assign a custom severity to one or more vulnerabilities, click on the Create Assignment Criterion option in the Grid Actions dropdown. An assignment dialog will be displayed to set your criteria, as shown below:

-
Choose the type of criterion to be used from the Assign to dropdown list. (e.g., Check Category)
-
Next, select or enter the specific criterion related to the chosen type. (e.g., Check Category > Passwords)
-
Click the Save button to save each severity code assignment.
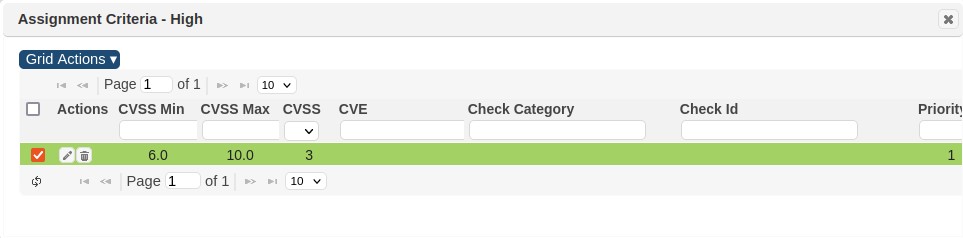
The following shows a single criteria assigned for vulnerabilities to be associated with the “High” custom severity. In this example, all vulnerabilities that have a CVSS score of 6-10, or are associated with SAINT’s “Password” checks will be assigned custom severity = “High” for the “Internal” custom severity set.
Assignments View
The default view for the severities displays all severity sets and their associated custom severities. Click on the Assignments view to see all details, including all current vulnerabilities assignment criteria, as shown in the following example:
Remove a Custom Severity Code Assignment
Custom Severity code assignments can be removed at any time, based on your access and permissions to the associated Custom Severity Set.
-
From the Assignments View, click the Delete (trash can) option for the Assignment Criteria to be removed.
This selection will display three options to control specifically what assignments will be deleted. At this point, you can delete just the selected Criteria; the Severity and all associated Criteria; or even the entire Severity Set and all associated Criteria.

-
Click on Assignment Criteria to remove the assigned custom severity from all impacted vulnerabilities.
Warning: Removing a custom severity code’s assignment will remove the assignment rule from the Custom Severity code’s Checks Criteria, as well as all current and future vulnerability scan records. Once the Submit button is selected, this action cannot be undone. -
Click OK in the confirmation box to delete. Click Cancel to close the box without deleting.
Priority Handling
You will note that when a custom severity is assigned to vulnerabilities, a numeric value is set for the Priority field. The Priority defines the order which assignment rules are applied to vulnerabilities in the event of a conflict. By default, if a conflict occurs, the most recently created assignment rule will take precedence over other assignment rules.
-
When creating assignment rules, if a conflict occurs you will be prompted on whether or not you want to accept the default or if you want to adjust the priority settings. In this use case, there are two choices:
- Click Yes to use your current assignment as the top priority over any previous assignment rules.
-
Click No to save the assignment and bring up the conflict resolution UI.
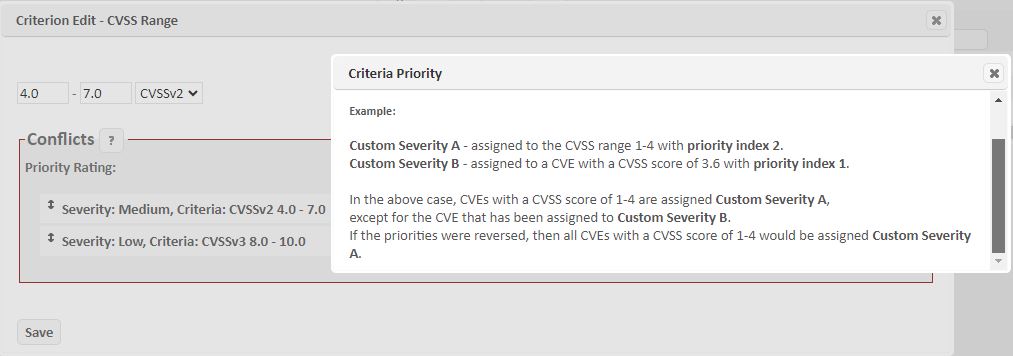
If you click No, a Criteria Edit screen (shown below) will display to allow you to review the conflicting rule and determine if it is OK or if you wish to change the order of priority for the conflicting rules.
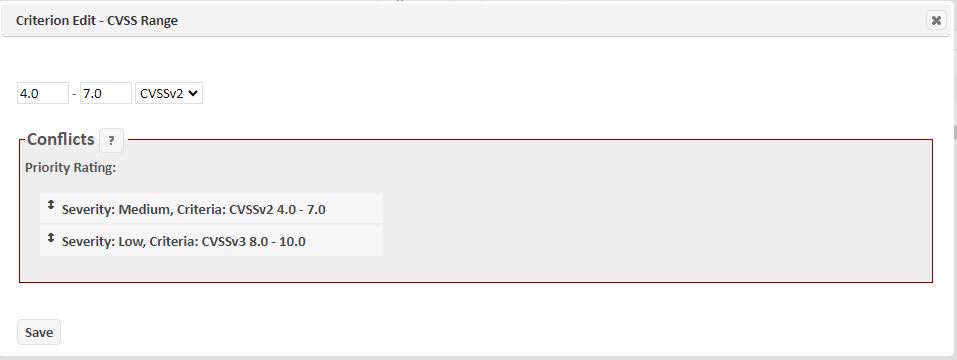
-
Use the up/down arrows in the Priority Ratings list to move the assignment criteria to define the order of priority within this Custom Severity Set.
-
Click on the Conflicts ? to view details about the conflict and help in taking actions to ensure accurate usage of the assigned criteria.
-
Once you have made your decisions, click Save to update the vulnerability data and close the screen. Or,
-
Click the Next Conflict button, if shown, to move to the next criterion conflict for resolution.