Access Controls
Security Suite and SAINTCloud feature a flexible object-based access control system. The system offers several benefits:
-
Protects confidentiality and integrity.
-
Allows users to perform all actions which are necessary for their job functions while preventing them from performing actions which are not.
-
Allows users to share certain objects, such as reports, with selected users or all users.
-
Allows multiple tenants to coexist on the same system without any visibility of other tenants’ activities or even their existence.
Getting the maximum benefit from SAINT’s access control system requires understanding how it works and configuring it properly, as well as creating an organized group structure. (See Groups.)
Object-based Access Controls
Virtually anything that gets created during the course of vulnerability management, either by a user or system generated, is considered an object subject to security and access controls. Objects include users, groups, scanner nodes, scan jobs, target groups, scan policies, reports, and many other types of content. As an object-based security design, the access control list is applied to individual objects. (Note: There are also a few access controls which are global, because they are applied to the system as a whole instead of individual objects. See Assign Permissions to Users.)
Modifying Permissions
Only an object’s owner or an administrator can modify the permissions on an object. To modify an object’s permissions, follow the instructions below.
-
Find the desired object in the appropriate grid. For example, to set permissions on a report, click on the Report tab. Locate the desired object, using the grid’s search boxes and other filtering as necessary. Click on the Security (padlock) icon on the desired object’s row, or select the desired object’s row and select Security from the Grid Actions dropdown menu without selecting any rows to modify the permissions on all of your objects instead of a specific object.
-
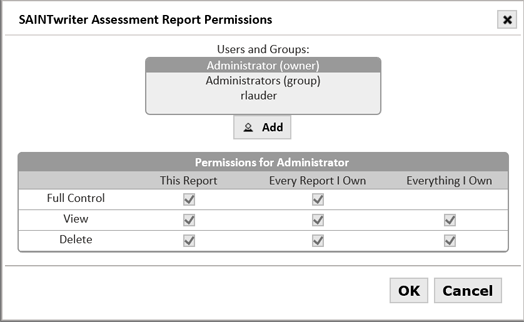
A permissions dialog will be displayed. For example:
-
The select box at the top of the dialog lists all the users and groups who already have some permissions on the object. The Administrator user and the Administrators group always appear in this list. The object’s owner (typically the user who created it), if not the administrator, also appears in the list, marked by the word “owner”.
-
Select the desired user or group from the select box to view or modify the permissions granted to that user or group. If the desired user or group doesn’t appear in the box, that means the user or group currently has no permissions on the object. In that case, click on More Users, select the desired user, and click OK.
-
The permissions table for the selected user or group will appear. The rows of the permissions table correspond to the possible actions on the object, and the columns correspond to the permission scope. (See Permission Scope below.) If the selected user is the Administrator user, the Administrators group, or the object’s owner, then the permissions cannot be unchecked. Those users always have full control over the object.
-
To modify the permissions which the selected user or group has on the object, check or uncheck the desired boxes in the permissions table, and click OK.
Permission Scope
The columns in the permissions table correspond to the permission scope. When setting permissions, there are three possible scopes. This makes it possible, for example, to share all of your scan results with a co-worker without needing to remember to set permissions on every new scan job individually.
The three permission scopes are as follows:
Per object – The permission is only granted on the specific object. The specific object is the one which was selected from the grid when you opened the Permissions dialog, and is also indicated by the title bar of the Permissions dialog. If no object was selected, then this column is not shown.
Per object type – The permission is granted on all co-owned objects of the same type. For example, if you are modifying permissions for a report which you created, then the permission would be applied to all reports that you created.
Per owner – The permission is granted on all co-owned objects. For example, if you are modifying permissions for a report which you created, then the permissions would be applied to everything you create, including target groups, scan jobs, scan policies, etc.
Changing Owners
By default, each object’s owner is the user who created the object. In some cases, however, it may become necessary to transfer ownership of an object to another user in the system. To change an object’s owner, log in as the admin user or a user in the administrators group. Then click on the Security (padlock icon) action button on the desired object’s grid row. This will open the Permissions dialog.
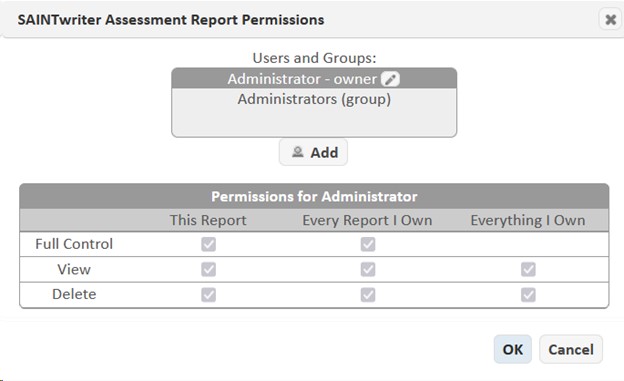
Click on the change (pencil icon) button beside the word owner in the Users and Groups list. That will open the Change Owner dialog.
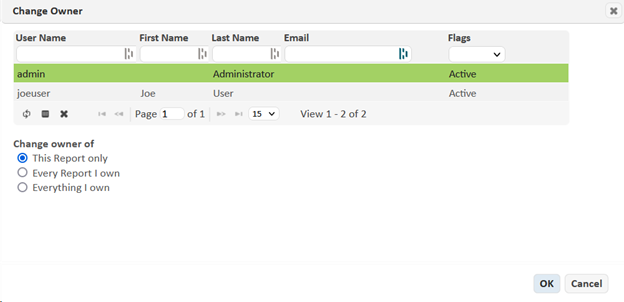
Click on the row corresponding to the new owner, and then choose which objects to change the owner of: this object only, every object of the same type that you or the previous owner owns, or every object you or the previous owner owns. Then click the OK button. Note that the previous owner will immediately lose all access to the selected object(s) unless they have been granted explicit access, and the new owner will immediately gain full access.
Multi-tenancy
One of the benefits of SAINT’s access control system is that it allows multiple tenants to co-exist on the same system without any visibility of other tenants’ activities or even their existence. This is useful for managed service providers who want to provide a portal for their customers without disclosing any of one customer’s data to another.
To create a tenant –
-
Create a new user. See Create a User.
-
Remove the new user from the Users group. See Edit a User.
-
Optional. Create a new group for the new tenant, and add the new user to the new group. See Create a Group.
-
Optional. Enable the create user permission for the new user if you want the tenant to be able to create more users. See Assign Permissions to Users.
Tenants are implemented as groups. For an administrator who manages multiple tenants, wherever data grids display users (e.g., job owner), there is the option to display the groups to which that user belongs. This will assist the administrator in filtering objects by tenant.
Customer Management
To assist managed service providers who are managing their customers in a multi-tenant system, a customer management feature is available. This feature provides a centralized way to help administrators find a selected group’s scans, assets, and other objects and create objects for the selected group.
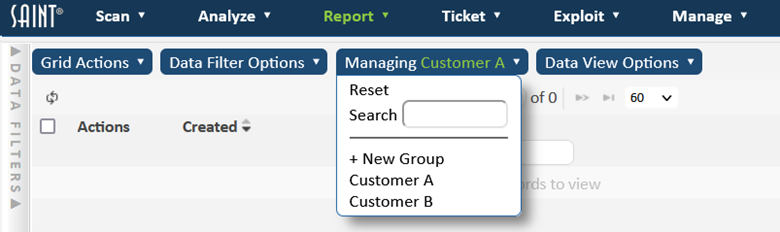
To enable customer management, check the Customer Management checkbox on the Manager tab of the System Options page (gear icon). When the box is checked, administrators will see the Manage Customer button above every grid in the web interface. Mouse over that button to open the customer menu.
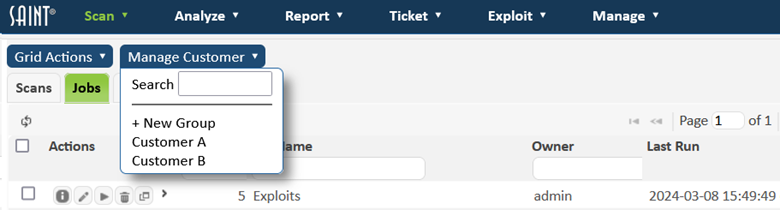
Click on any group in the menu to manage that group. Alternatively, click on New Group to create a new group. If it’s difficult to find the desired group in the menu, then begin typing the group name in the Search box to filter the list.
Once a customer is selected, three things will happen:
-
The Manage Customer button will change to indicate the selected group:

-
All grids and selection menus throughout the manager will be filtered to those objects which are viewable by the selected group. This shows the administrator which scans, assets, and other objects will be seen when the user logs in, but still allows the administrator full control. If a group is selected, then objects which are viewable by that group’s members will also be included.
-
Any objects the administrator creates while managing a group will be automatically shared with that group. This allows administrators to create scans, reports, and other objects for a customer. The permissions to grant to the group are specified by the Customer Management Grant system option.
When you are finished managing the customer, you can either select another customer to manage, or click on the Reset option to undo the selection and clear the filter.