Configurations
SAINT includes a number of configuration options which control the way the system functions, scan run and exploits are executed. Many of these options are configurable in SAINT by users with Administrator permissions or those that have been granted edit permissions (see Manage – Groups) to modify Scan and Exploit configurations during job setup. The following describes each of these options in more detail.
Configuration Files
Behind the scenes, the software uses various configuration settings at job execution time, and passes them via job configuration files. For those using the command line interface, these files can also be modified manually. However, for most situations, SAINT’s automated processes are the recommended method. Configuration files (both global and job specific) can be found in the config directory. The global configuration file is named saint.cf, and the job session configuration files are named <session name>.cf, where <session name> is the name of the scan being executed.
Global vs. Session Configuration
The global configuration file, saint.cf stores all configuration settings needed. These include global settings that are common to all scan jobs, such as settings for the management console and internal web server.
The settings found in the job-level session configuration file are used to control how a scan runs, such as the scan level, timeout values and password guesses. The job level configuration file is created whenever a Job is run. Note that the same variables found in the job’s session configuration file are also contained in the global configuration file, under the line Begin Session Configuration, and in the saintexploit.cf file. However, values are only used to initialize new job session configuration files, and have no other effect.
Both the global and job level configuration files contain Perl variables corresponding to options shown in the Configuration tab, as well as additional variables controlled by the scan engine. Syntactically, lines beginning with a pound sign (#) are comments and do not affect program behavior, but do contain information but may be helpful when viewing or editing content.
The sections below describe each configuration option and the corresponding variables in the configuration file.
Restoring to Default Options
-
All Options – Clicking this option resets all configuration options back to factory default settings. Using this option will remove any prior customized changes you have made.
-
System/Scan/Exploit Specific Options – Each configuration submenu provides an option to restore only the current displayed options (e.g., System only options; Scanning only options or Exploit-only options) to their factory default settings. As with the “All Options” this option will remove any prior changes you have made, but will be limited to the type of option selected.
Search Function
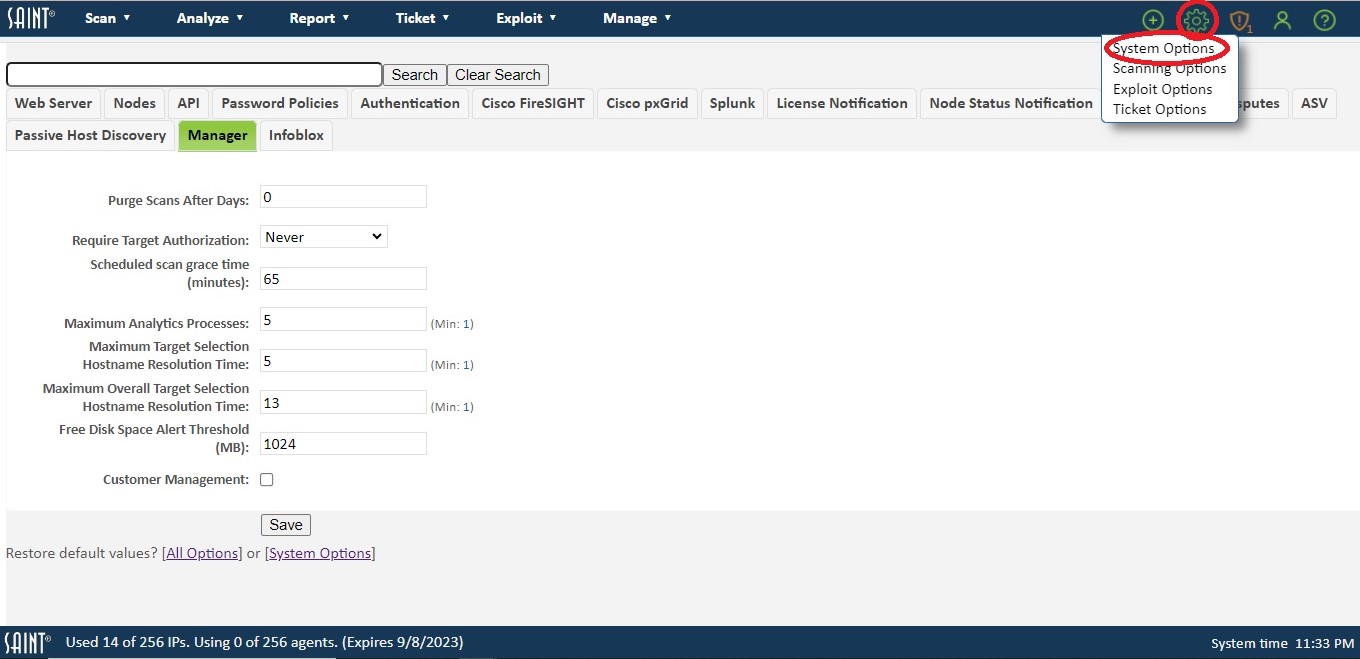
The Configuration section can be accessed by clicking on the Configuration (gear) icon option in the top right corner. Under the Configuration (gear) icon - 'Settings", we have four sections. System Operations, Scanning Options, Exploit Options, and Ticketing Options.
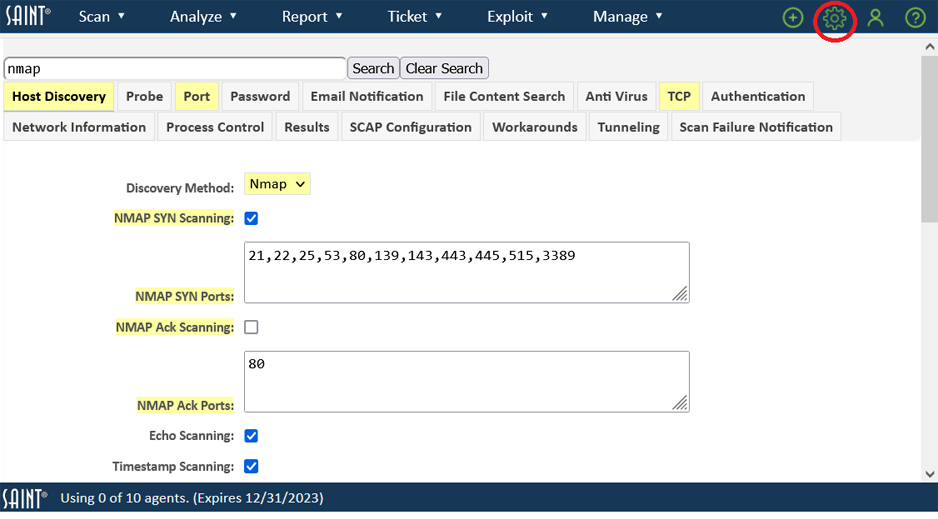
The configuration screens provide a search function to enable you to quickly locate configuration settings (variables) based on keywords. The search function will then highlight all Tabs where settings are located that either contain your search criteria in the setting’s title or is contained in the help text, since other variables may have relevance to your criteria. For example, locate where all settings are related to Nmap. As shown below, there are three tabs that contain references to Nmap – both Nmap specific configuration settings in Host Discovery, Port and TCP options, but also in the "Secs Before Dropping Connection Req" option (fw_timeout variable) since that variable has settings related to using Nmap.
Use the Clear Search button to clear the search field as an alternative to manually deleting or using the backspace key for the same action.
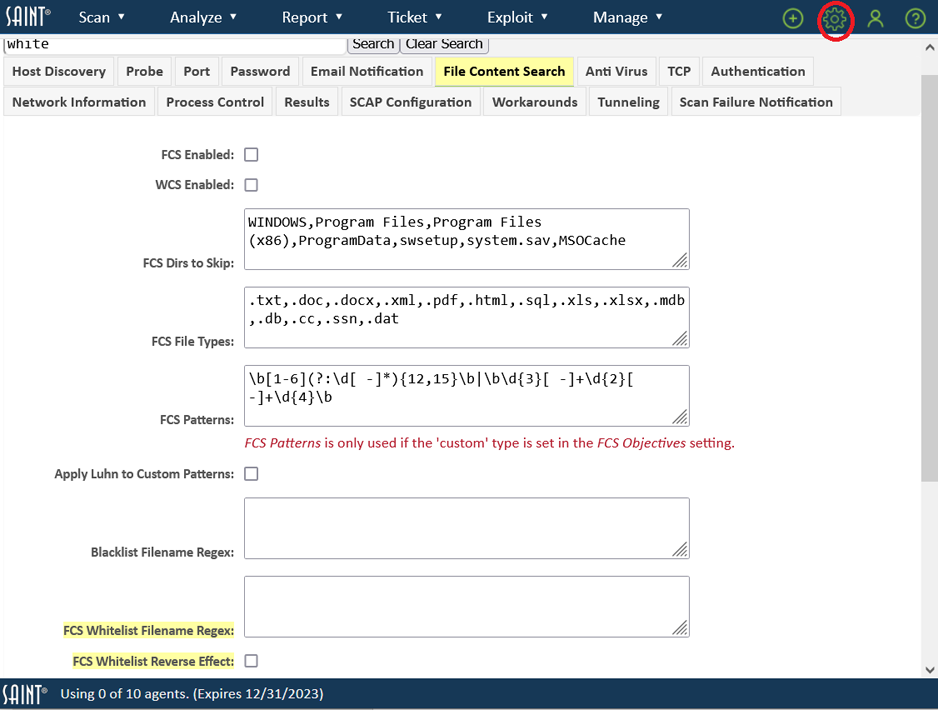
You can also enter partial words or strings, if you are unsure of the specific configuration names. For example, locate any configuration options for white listing content. SAINT provides support for white listing in its File Content Searches. Using only the string “white” found by filename and reverse_effect settings.
System Options
Agent Server
The options described below control the behavior of agent-based scanning. In order to use these features, Agents must be enabled in your license key. See the SAINT Agent Overview.
Enable Agent Scanning
This option specifies whether or not to run the service which allows agents to connect. It must be enabled in order to use agent-based features.
Server Port
This option specifies the TCP port on which the agent should listen for connections. The same port number must be specified when installing the agents in order for the connection to succeed.
Connection Strings
If this option is specified, each agent must provide one of the specified strings in order to connect to the manager. This prevents unauthorized agents from connecting. Use line breaks to separate the strings.
TLS/SSL Version
TLS/SSL protocol to use for remote connections. (TLSv1.1 and higher require Python 2.7.9 or higher and OpenSSL 1.0.1 or higher. TLSv1.3 requires OpenSSL 1.1.1 or higher.)
TLS/SSL Key File
The filename of the TLS/SSL key corresponds to the TLS/SSL certificate specified below.
TLS/SSL Certificate File
The filename of the TLS/SSL certificate which provides security between the manager and the agent. A self-signed certificate can be generated by clicking on the Generate Self-Signed SSL Files button.
Connection Timeout
The number of seconds the manager waits for a response from an agent before assuming the connection has been lost.
Server Address
The fully-qualified registered DNS host name of the manager. This is used as the subject name when generating the self-signed SSL files, it must be correct and resolvable by the agent for connection to succeed. If the manager is not registered in DNS, an IP address may be used. In this case, the same IP address should be specified when installing the agent.
Web Server
SAINT delivers an embedded, proprietary web server with all product versions. This web server contains a number of configuration settings that control the communication between the application and server-based processes. While many of these configuration settings are controlled internal to SAINT, there are some that can be customized depending on local requirements, or are provided in the user interface to assist in troubleshooting possible issues. The options displayed in the configuration tab are described below.
Use TLS/SSL
Whether to enable TLS/SSL encryption for the web server. If TLS/SS is enabled, the URL to the web interface needs to begin with https. This setting only works for IPv4 communication.
Note that with this option, your browser will produce warnings because the default certificate is self-signed, until you either add the certificate to your browser's certificate store, or replace the self-signed certificate with one signed by a certificate authority. (See TLS/SSL Key File and TLS/SSL Cert File below.)
If you select yes, except from localhost, the web server will use TLS/SSL for connections from remote hosts, but not for connections from localhost. This avoids the certificate warnings when used locally, while still ensuring that network communication is encrypted.
Use TLS/SSL (0-No; 1-Yes; 2-Yes, except from localhost)
Enable IPv4
Allow the web interface to be accessed over IPv4.
Enable IPv4 (1-Yes; 0-No).The default is Yes.
Enable IPv6
Allow the web interface to be accessed over IPv6.
Enable IPv6 (1-Yes; 0-No). The default is No.
Hosts Allowed to Connect
This option defines the hosts that are authorized to connect to the application. The default is ALL (*). However, you can use this setting to enter comma delimited IP addresses to limit access to only authorized hosts, if needed.
Server Port
TCP/IP port that the SAINT web server listens on.
Verbose
This setting defines the level of verbose out for help in debugging or troubleshooting. You may be asked to change this setting by a SAINT engineer. However, it is not recommended that these settings be changed in the normal course of use. The values are: (short request/responses; all socket activity; full request/responses; full debug).
verbose (0-short request/responses; 1-all socket activity; 2-full request/responses; 3-full debug).
TLS/SSL Key File
The path to the TLS/SSL private key file, relative to the eSaint directory, used by the web server and API services if Use TLS/SSL is enabled.
TLS/SSL Cert File
The path to the TLS/SSL certificate file, relative to the eSaint directory, used by the web server and API services if Use TLS/SSL is enabled.
TLS/SSL Cipher List
Colon-separated list of allowed TLS/SSL cipher suites to use if Use TLS/SSL is checked. See https://www.openssl.org/docs/manmaster/apps/ciphers.html for the correct format.
Enable SSLv2/SSLv3/TLSv1/TLSv1.x
These checkboxes specify which TLS/SSL protocols to allow for HTTPS connections if Use TLS/SSL is checked. Each HTTPS connection will use the highest selected protocol which is supported by the browser. TLSv1.3 requires OpenSSL 1.1.1 or higher to be installed on the Security Suite host. TLSv1.1 and TLSv1.2 require OpenSSL 1.0.1 or higher to be installed on the Security Suite host. If no supported protocols are checked, then TLSv1.2 is automatically allowed. Be aware that SSLv2, SSLv3, and TLSv1 are affected by known security vulnerabilities and should be avoided, but are still included for backwards compatibility with older browsers.
Node
SAINT’s architecture provides support for multiple scanning engines (nodes), to support large-scale scanning requirements, distributed architectures and load balanced scanning. The following are configuration settings to control the connectivity and security for managing scanner nodes.
Port Number
TCP Port number that the "manager" uses to listen for connections from scanner nodes. The default is port 5252.
Allowed Nodes
Remote nodes that are allowed to connect. This can be a space or comma separated list of fixed IP addresses, CIDR blocks. You can also use * as a default condition without explicit allowances.
Connection String
Each remote scanner node must send this string when connecting to the manager. This helps ensure that only the correct nodes will connect. If this option is left blank, then no connection string is required when connecting a scanner node to the manager.
Max. Concurrent Scans
The number of concurrent scans allowed to run on each scan node. If a new scan is started when there are already this many scans running on the scan node, then the new scan is queued until one of the other scans finishes.
Poll Frequency
The number of seconds for each node to wait between requests for new tasks from the manager. Lower values cause more frequent requests, allowing a faster response from nodes when starting, stopping, or resuming scans. Higher values may be more appropriate when there are many nodes, to avoid overwhelming the manager with requests. The default setting of zero tells the manager to choose the optimal frequency based on the number of connected nodes. The chosen value starts at 1, increasing as more nodes connect and decreasing as nodes disconnect.
TLS/SSL Key File
Path to the TLS/SSL private key file, relative to the saint_manager directory. TLS/SSL is used to protect communications between the manager and remote nodes, if any.
TLS/SSL Cert File
Path to the TLS/SSL certificate file, relative to the saint_manager directory.
TLS/SSL Cipher List
Colon-separated list of allowed TLS/SSL cipher suites to use for communication with remote nodes, if any. See https://www.openssl.org/docs/manmaster/apps/ciphers.html for the correct format.
TLS/SSL Version
The TLS/SSL protocol to use for communications with remote nodes, if any. If All is chosen, each connection will use the highest available protocol which is supported by the browser. TLSv1.1 and TLSv1.2 require Python 2.7.9 or higher and OpenSSL 1.0.1 or higher to be installed on the application's host. TLSv1.3 requires OpenSSL 1.1.1 or higher to be installed on the application’s host. Be aware that SSLv2, SSLv3, and TLSv1 are affected by known security vulnerabilities and should be avoided, but are still included for backwards compatibility with older browsers.
API
API Port
TCP Port number used to listen for API calls. The default port is 4242.The default port setting should only be modified if there is a port conflict with another application.
Allowed API Clients
Remote addresses allowed to connect to the API service. This can be a space or comma separated list of fixed IP addresses, CIDR blocks. You can also use * as a default condition without explicit allowances. The default value is null. If this value is left blank, only the localhost is allowed.
Use TLS/SSL
If this box is checked, then the HTTPS protocol is required for communicating with the API service.
TLS/SSL Cipher List
Colon-separated list of allowed TLS/SSL cipher suites to use if Use TLS/SSL is checked. See https://www.openssl.org/docs/manmaster/apps/ciphers.html for the correct format.
Enable SSLv2/SSLv3/TLSv1/TLSv1.x
These checkboxes specify which TLS/SSL protocols to allow for HTTPS connections if Use TLS/SSL is checked. Each HTTPS connection will use the highest selected protocol which is supported by the client. TLSv1.1 and TLSv1.2 require OpenSSL 1.0.1 or higher to be installed on the application's host. TLSv1.3 requires OpenSSL 1.1.1 or higher to be installed on the application’s host. If no supported protocols are checked, then TLSv1 is automatically allowed. Be aware that SSLv2, SSLv3, and TLSv1 are affected by known security vulnerabilities and should be avoided, but are still included for backwards compatibility with older clients.
Memory Saving Mode
If enabled, the API service will handle each request in a child process. This prevents memory consumption from accumulating in the main API process, which could eventually lead to the kernel killing the process. This option should be enabled in use cases where many memory-intensive API resources are called, but should be disabled otherwise since forking the processes could potentially cause a slight decrease in performance.
Password Policies
Administrators can control various password policies through the system Configuration tab by editing the following password-specific System Options:
Minimum Password Length
This numeric value defines the minimum length of the password string that can be used when logging onto the software. The default value is 5.
Allowed Password Special Characters
These values define the non-numeric and non-alphabetic characters that can be used within a password string. The default values are -_!@#$%^&*()+=?.,
Total Stored Passwords
This numeric value defines the number of previous passwords that will be disallowed for reuse. For example, the default value, 5, restricts the user from re-using any of the last five passwords as a current or new password.
Failed Login Attempts
This numeric value defines the number of failed attempts before the system will lock the user out. If this occurs, the user must wait 15 minutes before he or she can log in, or notify a user with administrator rights to unlock the account.
Maximum Password Age
This numeric value specifies the number of days after which passwords expire. When this number of days have passed since the password was last changed, the user will be required to change the password the next time he or she logs in. The maximum password age requirement can be disabled by setting this value to zero.
Minimum Password Age
This numeric value specifies the number of days after which a password can be changed again. After a user changes the password, another password change will not be permitted until this number of days have passed. This prevents a user from defeating the Total Stored Passwords requirement by changing the password multiple times in succession. The minimum password age can be set to zero to allow password changes at any time.
Password Complexity
This setting specifies the character classes which passwords must contain at a minimum. If the new password does not contain the required character classes, the password change will be rejected. A strong password complexity policy greatly decreases the ability of an attacker to crack passwords because it exponentially increases the number of possible character combinations.
Options exist for specifying either the number of character classes (for example, “at least three character classes”) or the specific character classes (for example, “letter and number”) which must be represented. In the former case, new passwords must have at least the specified number of character classes represented, where the four possible character classes are uppercase letters, lowercase letters, numbers, and symbols (non-alphanumeric characters). For example, if the requirement is “at least three character classes,” the password “Saint1” would be accepted because it contains three character classes: an uppercase letter, lowercase letters, and a number. However, “saint1” and “Saint” would not be accepted because they contain only two character classes each.
For options that list specific character classes, at least one character in each of the required character classes must be represented. For example, if the requirement is “letter and number,” then “Saint1” would be accepted because it contains letters and a number. However, “Saint!” would not be accepted because, even though it contains three character classes, it does not contain a number.
If the password complexity is set to “none,” then no password complexity requirement is imposed.
Login Session Timeout
This numeric value defines the number of seconds allowed for user inactivity before a user’s session times out and is closed. Once this timeout is reached, the user must log back into the system to establish a new session and interact with the application. Changes to this configuration do not impact current user sessions. The new timeout value will take effect for users upon subsequent logins. The default value is 28,800 seconds (8 hours).
Authentication
SAINT offers the option of using an Active Directory server for authenticating users to the Security Suite. This allows users to use the same password to log into Security Suite as they do to log into the Windows domain. To enable this feature, use the settings described below, and set the authentication type for each desired user to Active Directory in the Edit User form.
Active Directory Server
This setting specifies the Active Directory server to be used for authentication. It may be an IP address or a registered hostname, but note that if SSL is enabled, this setting should match the common name of the server’s certificate.
Active Directory Port
This setting specifies the port number on which the Active Directory server listens for LDAP connections. The default value, 389, is normally correct and doesn’t need to be changed.
Active Directory SSL Port
This setting specifies the port number on which the Active Directory server listens for LDAPS connections. It is unused unless the SSL option is enabled below. The default value, 636, is normally correct and doesn’t need to be changed.
Use SSL
This setting specifies whether or not to use SSL to encrypt the LDAP traffic to and from the Active Directory server. If this option is not chosen, then passwords will go over the network in clear text. If this option is chosen, then the Active Directory server’s certificate must be installed on the application's host, and the TLS_CACERT setting in the ldap.conf file should be set to the path of the certificate. See http://www.sans.org/reading-room/whitepapers/protocols/ssl-secure-ldap-traffic-microsoft-domain-controllers-33784 for more information about setting up SSL certificates for Microsoft domain controllers.
NetBIOS domain name
This setting is the NetBIOS name of the Active Directory server’s domain. For example, MYCOMPANY. Unlike the fully-qualified domain name, it should not include any top-level domain extensions such as .local.
Create users
Configuring this option will automatically create a new user if Active Directory authentication succeeds for a login name which does not yet exist in the system. In other words, any time there is an attempt to log into Security Suite with a non-existent login name, the system will ask the Active Directory server whether the login and password are valid, and if they are, an account will be created and the login session will proceed using that account. This feature may be convenient for allowing new users onto the SAINT system without needing to manually create accounts for them. But it may be undesirable if only certain users from the Windows domain should be allowed into the system.
Active Directory domain
This setting specifies the fully-qualified domain name of the Active Directory server’s domain (for example, mycompany.local) or the Base DN for the LDAP search (for example, DC=mycompany,DC=local). It is used to search the server for information about the user when automatically creating new users. It is unused unless the Create Users option is enabled.
Two-step Verification Message
This setting is the text message which gets sent to the user’s cell phone when two-step verification is enabled in the user’s profile. The string “%code%” (including the percent signs) will get replaced with the six-digit verification code whenever the message is sent. See Two-Step Verification for more information.
Cisco FireSIGHT
Security Suite provides the capability to export scan results to Cisco FireSIGHT. This allows the scan results to be viewed in Cisco FireSIGHT and used in Cisco FireSIGHT’s impact assessment. (See Export to Cisco FireSIGHT.)
The following options are used to configure Security Suite to communicate with Cisco FireSIGHT. These settings must be properly configured if you will be exporting results to Cisco FireSIGHT.
-
Cisco FireSIGHT IP Address – This option specifies the IP address of Cisco FireSIGHT.
-
Cisco FireSIGHT Port – This option specifies the TCP port on which the Cisco FireSIGHT Host Input API listens for connections. The default is 8307.
-
Cisco FireSIGHT Certificate – Cisco FireSIGHT uses PKCS12 certificates for authentication of host input clients. To generate the certificate, log into the Cisco FireSIGHT web interface. Click on System > local > registration > Host Input Client. Enter Security Suite’s IP address in the hostname field. Choose a passphrase for the certificate and enter it in the password field. Then download the certificate, and upload it into the Cisco FireSIGHT Certificate option in Security Suite.
-
Cisco FireSIGHT Password – This should be set to the certificate passphrase you chose when generating the certificate described above.
Cisco pxGrid
Security Suite can be configured as a Cisco pxGrid client, allowing integration with the Cisco Identity Services Engine (ISE). This allows you to further protect your network by initiating a quarantine of high-risk assets directly from the Security Suite user interface. (See Quarantines.)
Oracle Java Runtime Environment (JRE) is required on the Security Suite system in order to use the Cisco pxGrid client.
ISE Server
This setting specifies the host name or IP address of the Cisco ISE server.
User Name
This setting specifies the Cisco pxGrid client name. This must be unique for each client which connects to the Cisco ISE server. You do not need to create the client account on the server. It will be created automatically using the given name the first time a Cisco pxGrid action is performed. (It may need to be approved, however, if auto-registrations are disabled. See ISE Server Configuration.)
ISE Server Certificate
This is where you need to paste the ISE server’s certificate, in PEM format. The correct format begins with the line “-----BEGIN CERTIFICATE-----“ and ends with the line “-----END CERTIFICATE-----“. This certificate can be exported from the System Certificates page in ISE. Be sure to choose the certificate which is used by Cisco pxGrid. The Issued To hostname for this certificate must be registered in DNS and resolvable by the client.
Client Host name
This setting specifies the fully-qualified host name of the Security Suite host. This is used to generate the self-signed certificate as described below, so the host name should be registered in DNS and resolvable by the ISE server.
Client Certificate
This setting is the Security Suite host’s certificate for authentication to the ISE server, in PEM format. The correct format begins with the line “-----BEGIN CERTIFICATE-----“ and ends with the line “-----END CERTIFICATE-----“. If this is a self-signed certificate, then besides being specified here, it must also be imported into the ISE server’s Trusted Certificates page before the pxGrid persona is enabled. The Issued To hostname in this certificate must be the registered DNS hostname for the Security Suite host, and must be resolvable by the ISE server.
If you do not already have a certificate and want the client to use a new self-signed certificate, click on the Generate button beside this setting. This button will fill the Client Certificate text area with a newly generated self-signed certificate using the client hostname specified above. It will also fill the Client Key text area with the private key corresponding to the certificate.
Client Key
This setting is the private key corresponding to the above certificate, in PEM format. If you clicked on the Generate button above, then this setting is automatically filled and should not be changed.
ISE Server Configuration
After all of the above Cisco pxGrid client settings are complete, the ISE server must be configured for Cisco pxGrid. Under Administration > System > Deployment, edit the desired ISE node. Change it to a primary node if it is currently a standalone node. Under Personas, check the box beside pxGrid and click on Save.
Next, on the pxGrid Services page, click on Enable auto-registration if it is not already enabled. Otherwise, you will need to manually approve the client after the first time it attempts to connect. Even after the client is approved, the client’s group may need to be changed to EPS before quarantine requests can succeed.
Splunk
The following describes the steps for configuration Splunk and Security Suite for ingesting scan results for use in Splunk.
Setup the Splunk Add-On
-
From the Splunk instance, download the SAINT Add-on for Splunk from Splunk.com
a. Click on the Splunk Apps Icon
b. Search for 'SAINT' -
Install the Add-on from Splunk’s Data-Input user interface and enable an HTTP Event Collector using the saint8_scandata sourcetype

a. Select 'data inputs'
b. Click on 'HTTP Event Collector'
c. Click on 'New Token.'
d. Give the token a name
e. Click next
f. In the source type setting, click 'Select'
g. Choose 'Custom'
h. Choose 'saint8_scandata.' -
Click Review
-
Click Submit
IMPORTANT – Make a note of the token value it gives you which should look something like this: "0510E530-60C1-4BBB-8469-A294886547B8." You will need this when configuring Security Suite. Also, make a note of the HTTP Event Collector global settings by clicking on the global settings button on the HTTP Event Collector page. You will need to know if SSL Enabled is checked and the port number from there. These settings can be changed but they must match what you configure in Security Suite.
Configure SAINT for Splunk Integration
-
Login to your Security Suite installation
-
Click on the gear icon
-
Click on System Options
-
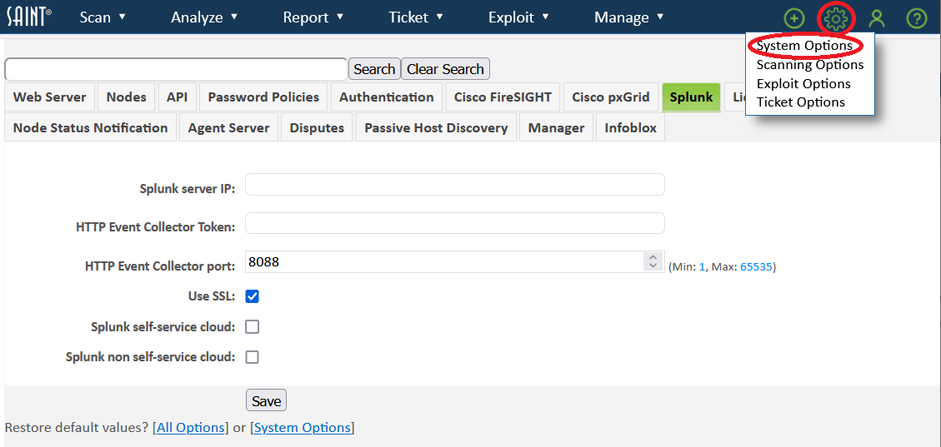
Click on the Splunk tab
-
Complete all fields, as they apply to your Splunk instance:
a. Splunk server IP – the fixed IP of the Splunk host.
b. HTTP Event Collector Token – obtained when setting up Splunk add-on. Example: "0510E530-60C1-4BBB-8469-A294886547B8"
c. HTTP Event Collector Port: Collected in the Splunk global settings by clicking on the 'global settings' button on the HTTP Event Collector page. Security Suite default value is 8088
d. Use SSL – Check if the Splunk HTTP Event Handler is using SSL.
e. Splunk self-service cloud – Check if Security Suite will be forwarding data to a Splunk self-service Cloud instance.
f. Splunk non self-service cloud – Check if SAINT will be forwarding data to a Splunk non self-service Cloud instance. -
Click Save
How to Use Security Suite with Splunk
Option 1
Click on Gear icon – Scanning Options – Results tab to configure Security Suite to automatically transmit scan results to your Splunk installation. Check the “Export Results to Splunk” checkbox to configure Security Suite to transmit all scan results generated by Security Suite to your Splunk instance.
Option 2
Configure individual Jobs to automatically export/import scan results to your Splunk integration any time the Job is run. To transmit scan results by Job, navigate to Step 4 – Advanced when creating or editing a job in the job creation wizard, and click on the Results Tab. Check the “Export Results to Splunk”. Results when then be transmitted every time the specified Job is run.
Option 3
Export scan data from the Analyze grid, and transmit the scan results into the pre-configured Splunk instance. Click on the Splunk option in the Grid Actions dropdown to choose how you wish to transmit the data shown in the data grid into the pre-configured Splunk instance. Click Transmit Now to automatically export the data to Splunk. Click Save Export File to generate a file which can be used to import data into Splunk using the JSON data source type.
Disputes
Enable Dispute Notifications
If this box is checked, an e-mail message will be sent to the dispute’s creator when a dispute is resolved, and to the dispute resolver(s) when a dispute is opened or modified.
Dispute Resolver(s)
This option specifies the user or users who should receive a notification when a dispute is opened or modified if dispute notifications are enabled above. Both SAINT login names and e-mail addresses are accepted. If a login name is specified, the message will be sent to the e-mail address in that user’s profile. Enter a comma-separated list to specify multiple recipients. If this option is left blank, notifications will be sent to all users who have Resolve Disputes permission (see Global Permissions) if any exist, or else to all Administrators.
From Email
This option specifies the From e-mail address for all PCI-related notifications. If left blank, the e-mail address of the user who initiated the event will be used.
From Email Display Name
This option specifies the From name for all PCI-related notifications. If left blank, the name of the user who initiated the event will be used.
Email Server
This option specifies the e-mail server to use for sending PCI notifications. If left blank, the registered MX for the recipient’s domain will be used.
ASV
Note: This tab is only available to users with Attestation of Scan Compliance in their license.
ASV Certificate Number
This option specifies the ASV certificate number to put into the Attestation of Scan Compliance. The ASV certificate number is an eight-digit number (in nnnn-nn-nn format) issued by the PCI Security Standards Council.
Customer Attestations
This option specifies the conditions that the scan customer must accept when requesting an Attestation of Scan Compliance. The default conditions are based on PCI DSS requirements, but some ASVs may wish to reword them or add their own terms. Use a pipe character (|) to separate the conditions. Conditions which begin with an asterisk are required.
Enable Attestation Notifications
If this box is checked, an e-mail message will be sent to the requester when an Attestation of Scan Compliance is approved or denied, or to the attestation resolvers when an attestation request is opened or modified. This option is only used if Attestation of Scan Compliance is enabled in the license.
Attestation Resolver(s)
This option specifies the user or users who should receive a notification when a request for an Attestation of Scan Compliance is opened or modified, if attestation notifications are enabled above. Both SAINT login names and e-mail addresses are accepted. If a login name is specified, the message will be sent to the e-mail address in that user’s profile. Enter a comma-separated list to specify multiple recipients. If this option is left blank, notifications will be sent to all users who have Issue AoSC permission (see Global Permissions) if any exist, or else to all Administrators.
Executive Summary Report Type
This option specifies the name of the report type to use when generating ASV Executive Summary reports for attestation requests. The default is SAINT’s standard PCI Executive report type, but some ASVs may wish to use a custom report template with their own format and branding. If this setting is changed, be sure that the chosen report type complies with the executive summary reporting requirements in the ASV Program Guide.
Detail Report Type
This option is similar to the one above, but specifies the report type to use when generating ASV Detail reports.
AoSC Report Type
This option is similar to the one above, but specifies the report type to use when generating Attestations of Scan Compliance.
Auto Approve Percentage (Max 100)
This option specifies the percentage of ASV attestation requests to approve automatically. The ASV Program Guide states that automatic QA processes must include random smpling of reports for manual review. Excludes scans which have special notes, which are never approved automatcially. A valid ASV Certificate Number and Auto Approve identity must be provided int his tab in order for automatic approval to succeed.
Auto Approve Identity
This option specifies the ASV identity to use for automatic approval if an Auto Approve Percentage is specified. This should be the company or contact name for an existing identity found on the PCI Identities page.
License Notification
The license notification features described below provide visibility into the current status of the product license, and notification triggers for when you are close to the licensed capacity.
Scan License Email Threshold
This threshold is the number of targets/scans left on the license before the notification is sent.
License Warning Email Address
This email address list is a space-separated list of email addresses to which license notifications will be sent.
Email Server
This email server is the hostname or IP address of the email server to use to send the email. If none is provided, the system will use the current default mail server.
Email Subject
This subject is the subject line that will appear on the license warning email messages.
Show License Key Status
If the license type is “metered” or “unique”, the status of the license will be shown on the GUI footer.
Node Status Notification
If the 'Send Email when Node Status Changes' option is enables, an email will be sent when the node status changes.
Passive Host Discovery
The passive host discovery feature attempts to continuously discover devices on the network by silently watching for traffic from new IP and MAC addresses, rather than actively probing a range of addresses. The discovered devices can then be easily imported into a scan job.
Enable Passive Host Discovery
Check this box and then restart the manager to activate the passive host discovery feature. When this box is checked, all connected scan nodes will monitor the chosen network interface and parse all IP and ARP packets. When previously unseen source IP or MAC addresses are found, those addresses are reported back to the manager, where they can be viewed and scanned. (See Passive Host Discovery.)
Note that MAC addresses are only available for sources which are on the same LAN as the node. Furthermore, the traffic that can be seen on each node’s network interface depends on the way the network switches are configured. Typically, the node will only be able to discover hosts which either send out broadcast requests on the node’s local segment, or which have direct communication with the node.
Passive Host Discovery Networks
This option specifies which IP addresses to report. The value is a space- or comma-separated list of Class A, B, or C networks (such as 10, 172.16, or 192.168.1) or CIDR addresses (such as 10.0.0.0/8). This option is used as a filter by the packet capture engine. If it is left blank, no filter is used, and all addresses are reported. In this case, IP addresses which don’t even belong to your organization could get reported, so leaving this option blank isn’t recommended.
Passive Host Discovery Interface
This option specifies which network interface to monitor on the scan node. It is specified as an interface name returned by the “ifconfig” command, such as “eth0”. If it is left blank, the lowest numbered configured interface, excluding the loopback interface, is used. If it is set to “any”, then all interfaces are monitored.
Purge Offline Hosts After
This option is useful for removing stale entries from the passively discovered hosts table. The value specifies the number of days after which a host should be dropped if it has not been seen on the network. This prevents devices which are no longer on the network from being scanned again and again.
Manager
Purge Scans After Days
This option can be used to automatically delete scans and their associated jobs and data after the specified number of days from the start date of the scan. Deletion is performed in a background process whenever the manager starts and every 24 hours thereafter. If this option is set to 0, then automatic deletion is not performed. Note: Regardless of this setting, on-demand deletion can be performed at any time by executing “python3 eSaint/saint_manager/src/modules/datastore/purge.py <days>” from the command line, where <days> is the number of days.
Require Target Authorization
This option allows you to require users to accept an agreement with an electronic signature before running a scan or exploit. This option may be useful if you are hosting a scanning platform for your customers, so you will have evidence that the scan activity was authorized in case you later receive abuse complaints from the target’s owner. The form is presented after the user enters any new targets in the scan wizard or the exploit run form. When this option is enabled, a new menu option appears under the Manage tab called Target Authorizations, which allows you to view and download the authorization forms.
There are three options for this setting. Always will require target authorization for all new targets. Local will require target authorizations only for new targets being scanned or exploited from the local node. This option may be useful if you have some customers who own their own scan nodes for which authorization is not required. Never, which is the default, removes the target authorization requirement.
Target Authorization Agreement
This option only appears when the above option is enabled and allows you to specify the agreement text for target authorizations. This text is the terms and conditions that the user must accept before scanning or exploiting a new target.
Maximum Analytics Processes
The maximum number of analytics processes that can run at the same time, reduce it to save memory and processing power while scanning. New scan data is continuously analyzed by the manager during a scan and setting this value lower could save memory and processing power on systems that require it.
Asset Matching
The asset fields which are used to decide whether a scanned target is the same as an existing asset. This may be any combination of hostname, scan node, IP address, or MAC address. For example, if hostname and IP address are selected, and a scanned targets hostname and IP address match an existing asset, then the target will reference that asset for the purpose of asset filters, risk calculation, etc. but if the target's hostname and IP address don't match any existing asset, a new asset is created. If no options are selected, then hostname, IP address, and MAC address will be used. If the selection includes MAC address and the MAC address is unavailable for either the target or the asset, then the MAC address is not considered for asset matching.
Maximum Target Selection Hostname Resolution Time
The maximum number of seconds to wait for hostname resolution when entering targets to scan by hostname or URL per target.
Maximum Overall Target Selection Hostname Resolution Time
The maximum number of seconds to wait for ALL hostnames to resolve when entering targets to scan by hostname or URL. For example: if this is set to 13 seconds, and a large hostname target list is imported, SAINT will wait for this many seconds before ignoring the hostname resolution and add the targets regardless.
Free Disk Space Alert Threshold (MB)
The number of MB of free disk space in the installation partition below which a low disk space alert will be triggered.
Customer Management
This check box enables the customer management feature. See Customer Management for more information.
Customer Management Grant
The permissions to grant to the selected customer on newly created objects if customer management is enabled and a customer is selected. This should be a comma-separated list of permission types such as view, modify, or delete. For example, if this is set to “view, view results”, and an administrator creates a scan job while managing Group A, then Group A will be able to view that scan job and that scan job’s results, but will be unable to modify, run, or delete that scan job. Permission types that don’t exist for the newly created object type will be ignored. Click on the Security icon in any grid row to see the recognized permission types for that object type.
Infoblox
Two options are available:
-
Infoblox server IP or hostname – The IP address or hostname of your infoblox server.
-
Infoblox API version – The version of the API running on your Infoblox server. SAINT sets this to a lower version by default but if your server supports a higher version then you can set that here.
Scanning Options
The following configuration options define various characteristics and process controls over vulnerability, configuration and application scan activity.

Host Discovery
These options determine the default behavior for discovery scans (SAINT or Nmap) and configuration settings for Nmap if that method is selected for host discovery. These settings can be defined globally, as well as overridden when setting up a scan Job.
Discovery Method
-
SAINT Firewall – In order to avoid wasting time scanning hosts which do not exist or are unreachable, the scan engine attempts to discover live hosts at the start of a scan. The method used to discover live hosts varies depending upon whether a firewall is in place. Also, see the Workarounds section for additional Firewall rules/settings when using this discovery option.
Set this Flag to 0, to use SAINT’s built-in discovery. -
Nmap – Default setting. This setting uses Nmap’s Discovery engine. See the Nmap documentation for a complete list of Nmap options. Use caution when modifying these options, since certain settings may cause the port scan to miss ports in some environments, to use unintended protocols, or to scan unintended targets. Do not set any output options, since SAINT requires machine-readable output and therefore always includes that argument (-oM).
Custom NMAP Flags
Additional command lines flags for NM
NMAP SYN Scanning (nmap_disco_syn)
Sends empty TCP packets with the SYN flag set. Live hosts will reply with either a RST or SYN/ACK TCP packet.
Nmap_disco_syn (0-No; 1-Yes).
NMAP SYN Ports (nmap_disco_synports)
Default is 443. An optional list of comma-separated ports may be supplied. If omitted, the default Nmap ports will be used.
NMAP Ack Scanning (nmap_disco_ack)
Sends empty TCP packets with the ACK flag set. Live hosts will reply with a RST packet. Some firewalls prevent hosts from replying to SYN requests to closed ports, but may still respond to ACK packets.
Nmap_disco_ack (0-No; 1-Yes)
NMAP Ack Ports (nmap_disco_ackports)
Default is 40. An optional list of comma-separated ports may be supplied. If omitted, the default Nmap ports will be used.
Echo Scanning (nmap_disco_echo)
One sends ICMP echo (type 8) request.
Nmap_disco_echo (0-No; 1-Yes)
Timestamp Scanning (nmap_disco_timestamp)
One sends timestamp (type 13) request.
Nmap_disco_timestamp (0-No; 1-Yes)
Netmask Scanning (nmap_disco_mask)
One sends Address Mask (type 17) request.
Nmap_disco_mask (0-No; 1-Yes)
UDP Scanning (nmap_disco_udp)
Sends UDP packets to the given ports. Empty packets will be sent to most ports.
Nmap_disco_udp (0-No; 1-Yes)
UDP Ports (nmap_disco_udpports)
Ports specified here will be included in the config/nmap/nmap-payloads and send the corresponding packets, which will be more likely to elicit a response.
SCTP INIT Scanning (nmap_disco_sctp)
Sends SCTP packet with the minimal INIT chunk. Live hosts will reply with an ABORT chunk if the port is closed or an INIT-ACK chunk if it is open.
Nmap_disco_sctp (0-No; 1-Yes)
SCTP INIT Ports (nmap_disco_sctpports)
An optional list of comma-separated ports may be supplied. If omitted, the default Nmap ports will be used.
IP Proto Scanning (nmap_disco_ip)
Sends an IP packet with the specified protocol number set.
Nmap_disco_ip (0-No; 1-Yes)
IP Protos (nmap_disco_ipprotos)
An optional list of comma-separated protocol list may be supplied. If omitted, the default Nmap protocols will be used.
ARP/IPv6 ND Scanning (nmap_disco_arp)
Uses NMAP to handle ARP requests instead of the host operating system. This is useful for scanning local LANs and may improve performance. If IPv6 targets are used, then ICMPv6 Neighbor Discovery is used instead of ARP.
Firewall mode: Firewall Flag
These options determine the default behavior for scans that use SAINT for host discovery. These settings can be overridden when setting up a scan Job. Each configuration setting and option is defined below:
-
No Firewall Support – The No Firewall Support option is the default, and should be selected if no firewall is in place. With this option, SAINT attempts to send an ICMP echo request (ping) to each host. When the host does not respond, the scanner assumes the host is down and skips further probes.
-
Firewall Support – Use TCP Discovery – If you are scanning targets that are behind a firewall from a system that is not behind the firewall, or in any other case where ICMP does not work, choose this or the ARP Ping Discovery options. This option causes the scanner to use TCP for discovering live targets. Each potential target in the specified target range will be scanned for a few standard TCP ports. If there is a response, either that the port is open or that the connection was refused by the target, then the host is considered to be alive. The ports scanned for this purpose are specified in the Standard Ports settings.
-
Extensive Firewall Support – This option skips the discovery process altogether and does a complete scan of every target address, regardless of whether it is alive. Hence, Extensive Firewall Support can lead to a very slow scan, especially if a large target range was entered. Use this option only when the targets do not respond either to pings or to TCP requests to closed ports, and do not consistently have any of the standard ports open
-
ARP Ping Discovery – With this option, the scanner will consider a potential target to be alive if the IP address can be resolved to a MAC address using the ARP protocol. The benefits of this method are that it still works even when ICMP pings and TCP ports are blocked, and it is the fastest discovery method. But it only works for targets that are on the same local network as the scanner.
-
Combined Firewall Support – Choose this option if you do not know whether your targets are behind a firewall or if some targets may be behind a firewall while others are not. This option uses all of the above discovery methods. It is the slowest option, but also the most likely to succeed in discovering all live targets.
Firewall Flag (0=No Firewall Support; 1=Firewall Support – Use TCP Discovery; 2=Extensive Firewall Support; 3=ARP Ping Discovery; 4=Combined Firewall Support)
STD Ports (std_ports)
TCP Ports to scan to find live hosts, using SAINT’s Discovery method set in Host Discovery, (discovery_method = 0). The firewall_flag value tells SAINT whether to expect the targets to be behind a firewall. If the firewall option is set to use TCP discovery and the primary target contains an IP address range or a subnet, then the scanner will scan each potential target for a few standard TCP ports and check whether or not there is a response, either that the port is open or that the connection is refused. The std_ports values define ports to be scanned for this purpose.
Probe
Spider Depth (spider_depth)
Default level: 3 - SAINT's HTTP probe contains checks for vulnerabilities in many web applications which could be installed in non-standard locations on web servers. SAINT attempts to find these web applications by scanning pages which are linked from the root page, then scanning pages which are linked from those pages, and so on. This process is known as spidering. Increasing the depth allows a more thorough scan, but could cause an exponential increase in the time needed to complete the scan if a target has many links. Setting the depth to zero or unsetting Exhaustive flag at Job setup time tells the scanner to scan only the web root directory and not to follow hyperlinks. Setting the depth to one causes the scanner to also scan any pages linked from the root page. Setting the depth to two causes the scanner to also scan any pages linked from those pages, etc.
HTTP Limit (http_limit)
Default 10000 (Maximum number of pages); 0 - Unlimited. This option compliments the spider_depth setting to prevent scans from taking excessively long on sites that have many pages. In these cases, it is useful to limit the total number of pages scanned, in addition to controlling the depth. To limit the total number of pages scanned on each target, set the web page limit to the desired maximum number of pages. After the scanner has run the specified number of instances of http.saint and https.saint against a target, it will complete the scan and produce a warning message in the scan's status file to inform you that some pages weren’t scanned. To allow an unlimited number of pages to be scanned, set this value to 0.
HTTP Form Limit (http_form_limit)
This setting is similar to the HTTP Limit described above, but limits the number of forms instead of the number of pages. To limit the total number of forms scanned on each target, set the limit to the desired maximum number of forms. After the scanner has run the specified number of instances of http_form.saint and https_form.saint against a target, it will complete the scan and produce a warning message in the scan's status file to inform you that some forms weren’t scanned. The default is 10000. To allow an unlimited number of forms to be scanned, set this value to 0.
HTTP Delay (http_delay)
This setting specifies the number of milliseconds to wait between HTTP requests. The default is 0, meaning each HTTP request should begin as soon as the previous request is finished. This is typically the desired behavior since it minimizes the scan time. However, increasing this value may help if the default value causes a target to crash or become unresponsive.
Note that this setting only controls the delay within each probe instance, but there could be multiple probes making HTTP requests concurrently. To achieve the gentlest possible scan, also set the Maximum Threads to 1 to prevent probes from running concurrently.
HTTP User Agent (http_user_agent)
This setting specifies the User-Agent header to include in most HTTP requests. The default setting resembles the User-Agent header sent by a typical web browser, to make it appear to the target that SAINT’s checks are coming from a real browser. However, it may be useful to change this in some cases. For example, some web application firewalls may allow you to whitelist custom HTTP headers, thus allowing a scan to proceed without interference.
Note that some vulnerability checks must use specific User-Agent headers in order to work as designed. These checks ignore this setting and always use the User-Agent header which allows the check to work.
Crawl Dynamic Content (crawl_dynamic_content)
In the early days of the World Wide Web, most web sites served static HTML content, which could be easily parsed by scanners to find links to other resources. However, modern web applications typically serve pages containing some amount of dynamic content. That is, in some cases the browser executes script embedded in the web page to create page elements, send data to and from the server, or handle mouse clicks and other user actions.
The Crawl Dynamic Content setting tells the scanner to execute the script embedded in each web page, as a web browser would do when loading the page. The scanner then records any HTTP requests which are triggered by the script execution, which may identify additional web resources, leading to improved vulnerability detection. However, since script execution takes time, enabling this option may slow down the scan. If this setting is disabled, embedded script is not executed, but the scanner will still attempt to find links to other resources by parsing the static content.
Clicks Per Page (max_clicks_per_page)
In some cases, simply executing the embedded script as a browser would do when loading a page is insufficient for finding web resources. There could be some content which is only exposed after certain events such as mouse clicks. To ensure that the scanner finds such content, it needs to take it a step further and simulate the mouse clicks which would occur in a browser.
The Clicks Per Page setting specifies the maximum number of elements per web page on which to trigger a click event, if dynamic content crawling is enabled. Higher settings may uncover more web resources but may take more time. A value of zero disables the simulation of mouse clicks, but still allows the initial script execution on each page.
Dynamic Content Timeout (dynamic_content_timeout)
When dynamic content crawling is enabled, there could be situations where the scanner encounters script which takes a long time to run or gets stuck in an endless loop. The scanner aborts the script in this situation, to avoid slowing down the scan. The Dynamic Content Timeout setting specifies the number of seconds that the script is allowed to run on each page before execution is aborted.
Web Program Dirs (cgi_dirs)
The default web program directories are /cgi-bin/ and /scripts/. This setting defines the set of standard web directories to scan that typically contain programs. These directories are specified in a comma-separated list. Each directory should start with a leading slash and end with a trailing slash.
Web Dirs to Skip (cgi_dirs_skip)
Default: blank – SAINT allows you to specify directories not to scan. This option is useful if a certain part of the web site should not be included in the scan. These directories are specified as a comma-separated list, and each directory should start with a leading slash. Each web page found during web crawling will be compared with every item on this list using a case-insensitive comparison starting from the beginning, and if there is a match then the page is omitted from the scan.
Software Inventory
Setting this option ensures all scan policies include probes that retrieve a list of software installed on Windows-based targets. This configuration requires that applicable scan Jobs be defined with Windows Domain credentials (Step 4 in Job setup) or credentials to the targets have been previously defined in the Credentials Manager. The resulting software inventory can then be found in the Vulnerability List section of the Full Scan or Overview reports. Note that the software list is generated by enumerating the Uninstall key in the Windows registry. Therefore, only software registered with the operating system during installation will be included. Software placed on the system without running an installer program is typically omitted. Also, note that registered software incorrectly removed from the target system may still be included in the list after removal, due to orphaned registry keys.
Load Balancing
This setting specifies whether or not to run load balanced scans. With this option, the scan targets will be divided evenly among the available nodes, and the scan will be queued until the desired number of nodes are available. The minimum number of nodes, maximum number of nodes, and the set of nodes among which to run the scan can be customized when creating the scan job.
This option can be overridden when creating the scan job.
Load Balance Minimum
This sets the minimum number of scan nodes among which to balance the scan if the Load Balancing option is enabled. The scan won’t begin until this number of nodes are available in the selected node set. This setting can be overridden when creating the scan job.
Load Balance Maximum
This sets the maximum number of scan nodes among which to balance the scan if the Load Balancing option is enabled. This setting can be overridden when creating the scan job as long as the user has the load balancing feature enabled. (See Assign Features to Users.) If the load balance minimum and maximum are both set to 1, then the scan won’t be divided among multiple nodes, but the node on which to run the scan will still be chosen at random from the available nodes in the selected node set. This can be used to automatically balance many scans among a set of nodes.
Load Balance Timeout
This sets the maximum number of hours to wait for nodes to become available for a load balanced scan. If a load balanced scan remains queued for this many hours, the scan will not run and the status will change to 'error'. This setting can be overridden when creating the scan job as long as the user has the load balancing feature enabled. (See Assign Features to Users.) If this value is set to 0, then there is no timeout and the scan will remain queued until nodes become available, regardless of how long that takes.
Mobile Device Timespan
This setting affects the mobile device scan policy.
By default, a scanner deployed into an internal environment queries Active Directory servers for information about Exchange ActiveSync devices which have been changed in the past year, and uses that information to infer vulnerabilities on those devices. The default setting is intended to avoid reporting on many retired devices. However, this setting allows you to change the default time span to expand the search to include less frequently changed devices, or to limit it to more recently changed devices. Note that mobile device scanning requires Windows domain administrator credentials and the Active Directory server’s SSL certificate. See Authenticating to Windows Targets for more information.
To change this setting, enter the new time span in days. Note that the last change date for a device is usually older than the last sync date.
Vulnerability Check Flags (vuln_check_flags)
This setting allows you to modify the behavior of certain vulnerability checks. It is a comma-separated list of one or more of the following options:
-
internalnetinfo_strict – When checking for internal network information disclosure in SSL certificates, report the vulnerability for any internal IP address, with no exceptions. Without this flag, an exception is made for 192.168.168.168 since this is commonly used in default certificates and doesn’t usually correspond to the real IP address.
Local Checks in Containers (internal_container_scan)
When SAINT runs a credentialed scan of a Linux target which hosts Docker or LXC containers, it enumerates the running containers and lists them as an informational item in the scan results. If this setting is enabled, it will go a step further and run local vulnerability checks inside of each running container. Each container will appear in the scan report as an additional host which was scanned, with the container name as the host name. This helps distinguish the vulnerabilities found in the container from the vulnerabilities found on the host itself. (It will not count as a separate target for licensing purposes.) Note that findings that come from scanning exposed container ports will still appear as if they are on the host, since it is the host which is exposing those ports.
Port
SAINT's portscan and vulnerability scan levels always include a TCP and UDP port scan. These port scans are important to the scan because their results usually determine which of SAINT's vulnerability checks to run.
Port scanning is pre-configured to cover two scopes: “heavy” and “common;” each of which can be controlled in the following settings. Ports included in a heavy port scan generally include a wide range of TCP and UDP ports, which is useful for detecting services running on either common ports or non-standard ports. The common ports include only commonly used ports, and is useful for quickly detecting services running on common ports. The port scan level setting controls which of the above two lists to use for the port scan.
Heavy TCP Ports (heavy_tcp_ports)
The ports included in heavy port scan generally include a wide range of TCP ports, which is useful for detecting services running on either common ports or non-standard ports.
Common TCP Ports (common_tcp_ports)
The common ports include only commonly used ports, and is useful for quickly detecting services running on common TCP ports. The Port scan level setting controls to use for the port scan.
Heavy UDP Ports (heavy_udp_ports)
The ports included in heavy port scan generally include a wide range of UDP ports, which is useful for detecting services running on either common ports or non-standard ports.
Common UDP Ports (common_udp_ports)
The common ports include only commonly used ports, and is useful for quickly detecting services running on common UDP ports. The Port scan level setting controls to use for the port scan.
Authentication Ports (auth_test_ports)
This option allows you to specify the ports that the remote registry and SSH services run on in your network, by default this is '22,139' and for the most part you will not need to change port 139. If you run SSH on a non-standard port (other than 22) specify it here.
Use Heavy port ranges (allports)
Defines which TCP port scan list to use.
Allports (0 – common TCP ports; 1 – Heavy TCP Ports)
OS Type Ports (ostype_ports)
If the scan uses NMAP for TCP port scanning (see TCP options) and the Nmap Flag settings include the -O flag, then Nmap tries to determine the host type of each target during the TCP port scan. This takes advantage of the full port scan results to increase its chances of finding at least one open and one closed port, which improves the reliability of the host type guess. In all other cases, SAINT uses Nmap and Xprobe2, if installed on the scanning platform, to determine the host type of the target by scanning a small number of ports. This port scan takes place in the ostype.saint probe, separately from SAINT's regular port scans executed by the tcpscan.saint and udpscan.saint probes.
The ostype configuration settings enable you to change the port numbers which are scanned for host type detection. By default, services which typically run from the Internet services daemon (inetd) are omitted because Nmap could reportedly crash some older implementations of inetd, so the ports to use at the heavy-plus level is set separately to include those ports.
Password
Security Suite includes checks for password policies for Windows targets. The password policy refers to the rules on the target system designed to enforce good password security practices.
The scanner attempts to identify login account names using finger and rusers on Unix systems, and netbios requests on Windows systems. For each login account name that the scanner identifies, it then checks each account to find out whether or not its password can be guessed.
NOTE ABOUT THE PCI SCANNING POLICY
Although password policy settings can be customized through this option, SAINT's PCI scanning policy setting are pre-defined for the following configurations based on the specified PCI DSS requirement:
-
DSS 8.5.9 - Change user passwords at least every [x] days.
-
DSS 8.5.10 - Require a minimum password length of at least [x] characters.
-
DSS 8.5.12 - Do not allow an individual to submit a new password that is the same as any of the last [x] passwords he or she has used.
-
DSS 8.5.13 - Limit repeated access attempts by locking out the user ID after not more than [x] attempts.
The length refers to the number of characters in the password. Longer passwords are generally considered to be more secure than shorter passwords. History refers to the number of previous passwords which cannot be re-used. This prevents a user from defeating a password change requirement by re-using the same few passwords over and over again. Maximum age and minimum age refer to the range of days over which a password must remain before being changed again. The maximum age requires a user to change his or her password periodically, whereas the minimum age ensures that the user cannot defeat the password change requirement by immediately changing the password back to what it was before. Lockout refers to the number of failed login attempts which are allowed. After this number of failed attempts is surpassed, the account is disabled for a period of time to prevent brute-force password guessing attacks.
Password Guesses (password_guesses)
The number of guesses to try against each account is limited by the Password Guesses configuration setting.
-
The default is two guesses.
-
A value of zero (0) will disable password guessing. Any other value instructs the scanner to try the specified number of strings starting from the top of the list of password guesses.
Note that some systems lock out accounts after a set number of failed login attempts, usually three or greater. Setting Password Guesses higher than the default value of 2 will cause account lockouts on such systems, which could be a major inconvenience for the administrators and users of those systems.
First Guess – Fifth Guess (guess settings)
There are two ways the passwords guesses can be specified. The first option is to modify the Password Guess settings for each guess. SAINT supports up to 5 guesses. The default list of password guesses is:
-
(null password)
-
%l (password same as login name)
-
password (the word "password")
-
%b (login name backwards)
-
%l1 (login name followed by the digit "1")
Password Dictionary (password_dictionary)
The Dictionary option is the second option, which allows a more thorough password assessment. To use this option, type or paste a list of password strings, separated by line breaks, into the text box, or click on the folder icon to populate the text box with one of the built-in password dictionaries. This option overrides the First Guess through Fifth Guess settings. All of the strings in the file are tried against each account, regardless of the Password Guesses setting.
Password Delay (password_delay)
If more than two guesses are desired, the Password Delay option can help you avoid lockouts by separating the login attempts by a specified number of seconds. Set the delay greater than the lockout counter resets time, in seconds. Note that using this setting with a dictionary attack could result in a scan which takes a very long time to complete.
Password Policy Length (pwpolicy_length)
This option allows you to customize the password policy checks to assess a target against your defined minimal string length. If a target system does not enforce a policy that is at least as strict as the specified settings, then a vulnerability is reported. Note that authentication is typically required in order to perform these checks.
Password Policy History (pwpolicy_history)
This option allows you to customize the password policy checks to assess a target against your defined value for the number of previous passwords that can’t be re-used. If a target system does not enforce a policy that is at least as strict as the specified settings, then a vulnerability is reported. Note that authentication is typically required in order to perform these checks.
Password Policy Max Age (pwpolicy_max_age)
This option allows you to customize the password policy checks to assess a target against your defined value for the maximum number of days a user is permitted before changing their password. If a target system does not enforce a policy that is at least as strict as the specified settings, then a vulnerability is reported. Note that authentication is typically required in order to perform these checks.
Password Policy Min Age (pwpolicy_min_age)
This option allows you to customize the password policy checks to assess a target against your defined value for the minimum number of days before a user is permitted to change their password. If a target system does not enforce a policy that is at least as strict as the specified settings, then a vulnerability is reported. Note that authentication is typically required in order to perform these checks.
Password Policy Lockout (pwpolicy_lockout)
This option allows you to customize the password policy checks to assess a target against your defined value for the number of failed attempts before password lockout. If a target system does not enforce a policy that is at least as strict as the specified settings, then a vulnerability is reported. Note that authentication is typically required in order to perform these checks.
E-mail Notifications
These configuration options support sending email messages and content when scanning is completed. This configuration setting defines default mail server settings, addressing and content templates to be used for all scan jobs. Email notification settings can also be defined locally, at Job setup time, based on job-specific workflows.
Send Email (send_email)
The value is flag to define whether email notifications are permitted for scan jobs.
Send_email (1–Yes; 0–No)
Mail Server (mail_server)
This configuration field stores the IP address of a mail relay server. If this option is left blank, the alert will be sent directly to the mail server for the recipient's email domain. If that server cannot be resolved or reached for some reason, then an IP address for a mail relay server can be specified. If it is specified, then alerts will be sent through that server.
From Email (from_email)
This field stores the “from” e-mail address. If not value is specified, the default “From” email address is root at the domain of the local host.
From Email Display Name (from_email_display_name)
You may also specify the default display name for the “from” email address. The default display name is “SAINT”.
Email Trend Length (email_trend_length)
Trend analysis reports will analyze and report the last one to ten data sets, or all data sets. The default trend value for emailed reports can be set in this field. The default value is zero.
Email Attachment Name (attachment_name)
Enter a default attachment name for attachments, if applicable. For example, “SAINT Scan Result”.
Email Group Settings
This setting defines the parameters for each email you wish to execute at the conclusion of scan Jobs. Each e-mail can include multiple comma-separated addresses.
-
Email Address (email_address) - You must provide one or more email addresses to which the message will be sent. If you specify %job_owner% instead of an email address, the message will be sent to the email address of the job owner.
-
Send Report (send_report) – Select the report template to be used for the email group. For example, Executive Report.
-
Report Format (send_report_format) – Select the format of the report to be sent. For example, PDF. Note that since the HTML and Frameless HTML report formats are made up of multiple files, these reports are sent in a tar archive. To view the results from the mail client, extract the files and view index.html in a browser.
-
Report Attachment Name (send_report_attachment_name) – Enter a default attachment name. For example, “Last PCI Scan results”.
-
Subject (send_report_subject) – Enter a default report subject for the e-mail group. When the subject is “default,” the subject of the email will be "Your SAINT scan has finished for session: <your job>."
-
Zip Report (send_report_zip) - Check this box if you want the report to be sent in a zip file. This could be useful for reducing the size, getting through email filters, or password protection.
-
Zip Password (send_report_zip_password) - If this field is filled in and the Zip Report option is checked, the recipient will be required to enter the same password when opening or extracting the report from the zip file.
File Content Search
File content checking, if enabled (default is Off), scans file systems or web sites to locate potentially sensitive information, such as credit card numbers, U.S. social security numbers, Mexican CURP codes, Canadian social insurance numbers, and default passwords. Report output for these types of results will then provide guidance, (e.g., result output, location, row number) for investigation and remediation. This capability also includes features to identify files and file types (e.g., .avi, .mp3), and find files of interest by matching their names as well as their contents, and potentially speeding up the (often lengthy) search process by quickly skipping files known to be either safe (whitelist) or suspicious (blacklist) by their names alone. These configuration settings also include directories that should not be scanned or descended into, file types/extensions to search through, Perl style regular expressions used to match file content to, and a timeout value that sets the maximum scan time.
Note: This feature requires that the kernel supports the cifs filesystem. To determine this, you can do a cat /proc/filesystems and look for the word cifs.
FCS Enabled (fcs_enabled)
Default: Off. Set this field to On to enable file content scanning on the target's file system for the patterns specified by FCS Objective. Authentication is required when using this option.
Fcs_enabled (0-Off; 1-On)
WCS Enabled (wcs_enabled)
Default: Off. Set this field to On to enable web content scanning. Use this option to search the content of web pages for the patterns specified by FCS Objective over HTTP or HTTPS. If both FCS and WCS are enabled, content scanning will be performed both on the file system and over HTTP or HTTPS.
Apply Luhn to Custom Patterns (fcs_apply_luhn_to_custom_patterns)
Default: Off. Set this field to On to enable application of the Luhn algorithm to custom search patterns for FCS on Windows and *NIX, and for WCS. The Luhn algorithm is a simple checksum formula used to validate a variety of identification numbers, including most credit card numbers. The Luhn algorithm is already applied to search results that match the PCN and Canadian CIN numbers FCS objectives. To enable custom search patterns, the pattern should be entered in FCS Patterns and the FCS Objective should be empty or contain 'custom'.
FCS Dirs to Skip (fcs_disabled dir)
This configuration field contains target directories that are to be excluded for file content scanning. List all excluded directories here as a comma separated list.
This option only affects the file content search, not the web content search. Use the Web Dirs to Skip option if you wish to control which directories are included in the web content search.
FCS File Types (fcs_file_types)
This field contains the files and file types (e.g., .avi, .mp3) to be included in the file content scans on Windows systems by matching their names as well as their content. This option only affects the file content
search, not the web content search.
FCS Patterns (fcs_patterns)
This field defines the file content patterns used in content scan probes if the custom keyword is present in FCS Objectives, or if FCS Objectives is empty. SAINT’s content scanning engine uses Perl regular expressions to perform these pattern searches. The default content scan parameters include patterns for common strings such as credit card data, social security numbers and others, as described above. Additionally, other patterns may also be included to support scanning for content that meets local needs. For example, patterns that match student IDs or patient IDs in publicly accessible systems that may expose sensitive information and should be identified and removed. The following illustrates one example of a complex pattern typical of this type of content:
\b\d{4}-[A-Z]{2}-AA\d{4}\b – pattern that matches a string that includes a combination of numbers, dashes and letters, as in an example student identifier of 2014-CS-AA0004
Use a Pipe (|} separator to append the additional pattern into the default string parameters:
\b[1-6](?:\d[ -]*){12,15}\b|\b\d{3}[ -]+\d{2}[ -]+\d{4}\b|\b\d{4}-[A-Z]{2}-AA\d{4}\b
Blacklist Filename Regex (fcs_blacklist_filename_regex)
Enter file names in this field to define specific files that are known to be suspicious (blacklist) by their names alone, and should be included in content scan results, regardless of their content. Defining specific files can help focus scans and potentially speed up scan duration that can often be lengthy, based on target lists and content size.
FCS Whitelist Filename Regex (fcs_whitelist_filename_regex)
Enter file names in this field to define specific files that are known to be safe (white list) by their names alone, and should be excluded in content scan results, regardless of their content. Defining specific files can help focus scans and potentially speed up scan duration that can often be lengthy, based on target lists and content size.
FCS Whitelist Reverse Effect (fcs_whiltelist_reverse_effect)
Default: No. Checking this box reverses the affect of the white list scans, to ensure white listed files are included in content scanning.
Fcs_whiltelist_reverse_effect (0-No; 1-Yes)
FCS NIX File Types (fcs_nix_file_types)
This field contains the files and file types (e.g., .avi, .mp3) to be included in the file content scans on *NIX systems by matching their names as well as their content. This option only affects the file content search, not the web content search.
FCS Objective (fcs_objective)
This option specifies the type of information for which to search when FCS or WCS is enabled. It should be a comma-separated list of case-sensitive keywords without any spaces. The recognized keywords are as follows:
-
PCN – Payment Card Number
-
USA_SSN – USA Social Security Number
-
CAN_SIN – Canadian Social Insurance Number
-
MEX_CURP - Mexican CURP Code - unique identity code for both citizens and residents of Mexico
-
custom – Patterns found in FCS Patterns setting
Machine Search Timeout (machinsearch_timeout)
Timeout value (in seconds) that sets the maximum scan time.
Anti-virus
Anti Virus Max Days Old (av_days_old)
Number of days since last run that anti-virus scans should be considered out-of-date?
TCP
Firewalls present some complications that require special attention by SAINT's TCP port scans. Therefore, a number of options have been created to help effectively scan through firewalls. Since some ordinary targets may have firewalls enabled by default, these options are used in all scans. However, they should only be changed if it is necessary to fine-tune the scanner for unusual firewall environments.
If Nmap is being used for your port scan and you wish to tune the port scan parameters, see the use_nmap_tcp configuration setting. The fw_timeout and fw_loadlimit and fw_delay options are only observed if Nmap is not available or the use Nmap option is not set, and possibly for some auxiliary port scans which use SAINT’s native TCP scanner.
When using Security Suite for TCP port scans and modifying these values, keep in mind that the overall TCP port scan timeout (fw_timeout) may need to be modified accordingly. The scan engine calculates the maximum amount of time which the TCP port scan may require based on the current settings, and sets the overall port scan timeout to this value when the scan begins.
Secs Before Dropping Connection Req (fw_timeout)
This value defines the number of seconds before dropping connection requests. This allows the scanner to retry or give up on ports that are blocked by a firewall after a few seconds rather than hanging on them indefinitely. While the port scan proceeds, the scanner will measure the response time for any open ports it finds, and use those measurements to dynamically adjust the timeout setting to maximize performance.
Max Concurrent Requests (fw_loadlimit)
This value defines the maximum number of concurrent connection requests. This prevents the scanner from overloading the system with waiting connection requests.
Seconds Between Ports (fw_delay)
This value specifies the number of seconds to wait between each port during TCP port scans. It is usually only necessary to raise this when scanning through a firewall which detects port scans above a certain threshold and blocks further connections from the scanning host.
Note that this setting only controls the delay used during the port scan phase of the scan. If you also need to introduce a delay between HTTP requests in the later phases, see HTTP Delay.
TCP Port Limit (tcp_port_limit)
This value specifies the maximum number of TCP ports we expect to find open on any target. If greater than this number of open TCP ports are detected, the port scanner assumes the ports aren’t really open unless their output differs from the rest of the ports. This is useful for reducing false positives when a firewall is present which intercepts and accepts many or all TCP connection requests destined for the target.
UDP Timed-out Port Limit (udp_timedout_port_limit)
Due to the nature of the UDP protocol, UDP port scanners often can’t distinguish between open ports and filtered ports, leading to false positives. To mitigate this, SAINT’s UDP port scanner assumes that if many consecutive scanned ports time out, it’s more likely that they’re all filtered than open, so it doesn’t report them. This value specifies the number of consecutive timed out UDP ports after which SAINT will make this assumption. If more than this many consecutive ports (from the list of ports being scanned) time out, then the ports aren’t reported in the scan results.
Use NMAP TCP (use_nmap_tcp)
Nmap offers many advantages over SAINT’s native port scanner, including support for SYN scans, advanced timing algorithms and additional configuration options. The performance benefits are also achieved when scanning through firewalls. Therefore, SAINT enables you to use Nmap for the main TCP and UDP port scan components of the vulnerability scan. SAINT’s built-in scan engine will be for TCP port scans if this box is not checked..
Use_nmap_tcp (0-No; 1-Yes; Default: Yes)
Use NMAP UDP (use_nmap_udp)
Setting value to Yes uses NMAP for UDP scans.
Use_nmap_udp (0-No; 1-Yes.; Default: No)
NMAP for TCP Ports to scan (nmap_flags_tcp)
The Nmap TCP flag setting specifies the command-line arguments which are passed to Nmap for TCP port scans. These arguments allow you to control the scan type, timing aggressiveness, and more. Note that you do not need to specify the port range here. SAINT does that for you.
NMAP for UDP Ports to scan (nmap_flags_udp)
The Nmap UDP flag setting specifies the command-line arguments which are passed to Nmap for UDP port scans. These arguments allow you to control the scan type, timing aggressiveness, and more. Note that you do not need to specify the port range here. SAINT does that for you.
Nmap Host Type Certainty ($nmap_os_certainty)
Regardless of whether Use Nmap TCP is selected, the scan may use Nmap to fingerprint the host type if no more reliable methods are available for a target. If Nmap doesn’t find an exact match, it may report one or more guesses, of which SAINT will report the guess with the highest certainty. The Nmap Host Type Certainty option specifies the minimum certainty for Nmap host type guesses. Only guesses with this certainty or higher will be reported by SAINT. Increasing this value may help reduce inaccurate host type results but may increase the number of targets with no host type reported at all. Setting this to 100 will cause only exact matches to be reported.
Max Connections Per Port (fw_count)
Default: 2 – Occasionally, due to problems or congestion on your network or the target’s network, there may be some amount of packet loss during the scan. If a connection request to an open port is lost, then SAINT could miss the port. To mitigate this problem, it may be desirable to retry the connection for ports which do not respond. This option defines a maximum number of connection attempts and specifies the number of times SAINT should try to connect to each port in the event that there was no response to any previous attempts on that port. Since high numbered ports are less likely to be open than low numbered ports, it might not be worth the time it takes to retry the connection on every port.
Note: If Nmap is being used for your port scan and you wish to tune the port scan parameters, see the use_nmap_tcp configuration setting. The fw_count is only observed if Nmap is not available or the use Nmap option is not set, and possibly for some auxiliary port scans which use SAINT’s native TCP scanner.
Retry Upon Timeout (fw_retry_port_max)
If Nmap is being used for your port scan and you wish to tune the port scan parameters, see the use_nmap_tcp configuration setting. The fw_retry_port_max is only observed if Nmap is not available or the use Nmap option is not set, and possibly for some auxiliary port scans which use SAINT’s native TCP scanner.
Authentication
Use NTLMV2 (use_ntlmv2)
Microsoft Windows operating systems implement a number of different authentication protocols. In its default configuration, the system accepts both the older and the newer protocols. However, some targets may be configured to accept only NTLMv2 authentication, or equivalently, have the LMCompatibility registry setting set to level 5. To successfully authenticate to these targets, enable NTLMv2 authentication.
Use_ntlmv2 (0-No; 1-Yes; Default: No)
Workstation Name (workstation_name)
This value specifies the NetBIOS name to use for the SAINT host when authenticating to Windows targets.
Allow Insecure LDAP
This setting configures the scanner to allow unencrypted LDAP authentication. This should only be enabled if an Active Directory scan is needed (e.g., for the mobile device scan policy) and SSL is not enabled for the LDAP service or the SSL certificate is unavailable, and you wish to accept the risk of using insecure authentication. See Authenticating to Windows Targets for more information.
Cookie Lifetime (cookie_lifetime)
When you record your web application credentials using the standard or advanced authentication proxy, two things are saved: the authentication cookies for the current login session, and the HTTP requests which were used to establish that session. The latter can be used to generate a script which repeats the authentication steps and generates new cookies. This is useful in scans scheduled to run in the future, when the original cookies may have expired.
Whether to use the cookies saved by the proxy or to run the script which generates new cookies depends on the age of the scan job as compared to the Cookie Lifetime setting. This setting specifies the amount of time the cookies saved by the proxy can be considered valid, in minutes. If a scan begins before this amount of time has passed since the job was created, the original cookies are used. Otherwise, the script will repeat the authentication steps to generate new cookies.
Ephemeral Encryption Key (use_ephemeral_cred_key)
When you enter default credentials during the authentication step of the scan job wizard, those credentials are encrypted using an AES-256 encryption key. Either of two different encryption keys can be used for this purpose: a permanent key which is stored on disk, or an ephemeral key which is stored only in the manager’s memory. The default is to use the permanent key. That allows the scan to use the original credentials every time it runs, even for recurring scans and scans that run in the future. However, using the permanent key may be undesirable in some cases, such as when the local security policy requires encryption keys to be isolated from the data they are used to encrypt.
When the Ephemeral Encryption Key option is checked, the credentials are encrypted using the ephemeral key which is stored only in the manager’s memory. This mitigates the issues surrounding storage of the encryption key on disk. However, the credentials will not be available after the manager restarts. Therefore, it is not a useful option for credentialed scans which run in the future.
Note that this option only pertains to default credentials which are stored with scan jobs, not to credentials stored in the Credentials Manager.
Network Information
Target Netmask (target_netmask)
To test whether a host could be an amplifier for a smurf or fraggle attack, the scanner needs to know its network and broadcast addresses. On a Class C subnet, which is the most common type, the first three octets of these addresses are the same as the host's IP address, and the fourth octet is 0 and 255, respectively. In the general case, the network address is determined by setting all of the host bits (the bits not included in the netmask) to 0, and the broadcast address is determined by setting the host bits to 1.
By default, 255.255.255.0, 255.255.255.128, and 255.255.255.192 are all used as netmasks in the smurf and fraggle checks. If you know that your target network uses a different netmask, change the Netmask setting to the target's netmask. Be sure you know what you are doing if you go below 255.255.255.0 (e.g. 255.255.254.0), or you could potentially scan a Class C network other than your own.
SNMP Communities (snmp_communities)
The Simple Network Management Protocol (SNMP) runs on routers and switches, as well as some printers, servers, and workstations, for the purpose of communicating configuration and status information. SNMP access is controlled using communities. A community string identifies the community, and can be thought of as the password for SNMP access.
SNMP access to targets is helpful because it provides configuration information that could be used for improved host type detection and vulnerability detection. The SNMP Community Strings configuration setting is a comma-separated list of community strings that the scanner uses to gain SNMP access. If the community strings on the targets are known, they should be placed in this variable. It is not necessary or recommended to include default strings such as "public" and "private". Passing these values is considered a security vulnerability in and of themselves, and the scanner already checks for them.
Performance Consideration: Each string listed in the SNMP community strings setting is tried for every SNMP-enabled target that is scanned. Thus, very long lists of strings may take more time and could cause the SNMP probe to time out. For improved efficiency, community strings which exist only on a certain device should be specified in the config/SNMP_communities.pl file instead of here. See that file for examples.
Process Control
Configuration settings in this section control various performance settings that affect the overall performance of SAINT probes and processes. These include probe timeout values and the number of open threads used for concurrent scanning of targets.
Timeout (timeout)
Default: (1) – Medium. Certain network probes will "hang" or continue to try to contact the remote host for a very long time with no response. To prevent this from slowing down the overall scan, each probe is run with a timeout value which tells the probe to terminate itself after that many seconds have passed. There are four options for this setting:
- Medium, the default setting, will set this time period to the number of seconds typically needed for each probe. This is appropriate for most situations.
- Short will cut the timeout in half for each probe. Be forewarned that this could lead to missed vulnerabilities due to probes timing out too soon! Only use Short in situations where speed is more important than achieving complete results.
- Long will double the timeout for each probe. Use this setting if you want to be extra cautious about not missing any vulnerabilities due to timeouts.
- Extra Long will quadruple the timeouts.
Timeout Override (timeout_override)
Although the Timeout setting discussed above gives you the ability to adjust all probe timeouts equally, there may be situations where the timeout for a specific probe needs to be adjusted separately from the others. The Timeout Override setting allows this. To override the timeout value of one or more specific probes, enter a comma-separated list of probe:value pairs where value can be a percentage by which to change the probe's timeout or an absolute number of seconds. Example: http.saint:150%,registry.saint:360. Using absolute numbers isn't recommended since it won't automatically scale up when the probe gets bigger.
When editing this setting, beware that reducing timeout values could lead to missed vulnerabilities. Timeouts are only intended to be used as a safeguard against hung probes preventing scan completion. Setting them too low could result in terminating probes which aren’t hung, in which case one or more checks may never be executed, leading to unreliable results. To prevent this from happening, the scan engine will raise the timeout settings to the minimum acceptable value if you attempt to set them too low. When editing the HTTP/HTTPS and HTTP/HTTPS Form timeouts, note that the HTTP Connection Timeout discussed below may be a better option than changing the overall probe timeouts.
Max Threads (maximum_threads)
To increase the speed of a scan, SAINT scanners can run more than one probe at a time. The maximum number of probes that will run at a time is controlled by this setting. This value should be low for machines which are overloaded or which do not have much memory, but can be set higher to achieve faster scans on machines which have the resources available. Be careful with this value, because a value which is too high could cause the scanner to quickly use up large amounts of memory.
-
The default setting is 0, which causes SAINT algorithms to choose an optimal value between 1 and 20 for each scan based on the processor speed and amount of available memory.
-
To disable multitasking entirely, set this value to 1.
HTTP Connection Timeout (http_connection_timeout)
SAINT’s HTTP and HTTPS probes include many checks, each of which establishes one or more individual connections to the target. The HTTP Connection Timeout setting specifies the number of seconds after which to close each connection if no response is received from the target. The default is 10 seconds. This setting allows you to tune your website scans with greater precision than you could using the overall probe timeouts discussed below. As with the overall probe timeouts, however, this setting is intended only to prevent hung connections from causing delays, and setting it too low could lead to missed vulnerabilities.
Results
The following settings control what is done with the data after the scan completes, such as sending it to syslog or exporting it to other products.
Export Results to Splunk
Select this checkbox to automatically transmit all scan results to the Splunk installation configured in System Options. (See Systems Options/Splunk).
Export Results to Cisco FireSIGHT
Check this box to export the results to Cisco FireSIGHT automatically when the scan completes. The Cisco FireSIGHT settings must be properly configured in order for the export to succeed. (See System Options/Cisco FireSIGHT.)
Syslog Level (syslog_level)
Besides receiving your scan results by e-mail, you may also wish to have your results sent to syslog. This has the advantage of allowing vulnerability alerts to be routed to the appropriate system through an existing syslog facility. When this option is enabled, your results will be sent to syslog when the scan finishes. Using this feature requires the syslog daemon already to be running on the host running Security Suite.
Options for sending scan output to syslog, and to indicate which events you would like to be logged, are as follows:
-
Do not send results to syslog
-
Log critical problems only
-
Log critical problems and areas of concern
-
Log all vulnerabilities
-
Log all vulnerabilities and services
Syslog_level (Default: 0-do not send results to syslog; 1-critical problems only; 2-critical problems and areas of concern; 3-all vulnerabilities; 4-all vulnerabilities and services
Syslog Format (syslog_format_type)
This setting controls the format of the syslog message. There are two options. The first option, Custom Format, allows you to specify your own message format. See Syslog Custom Format for further information. The second option, LEEF, can be used to export scan results to IBM QRadar via the syslog facility upon scan completion. Once exported, the scan results can be monitored in QRadar along with the rest of your organization’s security events. If LEEF is chosen, the system’s syslog function should be configured to send logs to QRadar for the facility and priority selected in the following options.
Syslog Priority (syslog_priority)
The priority is one of two syslog parameters used to determine how syslog handles the events. Valid values are as follows:
-
emerg
-
alert
-
crit
-
err
-
warning
-
notice (default)
-
info
-
debug
Syslog Facility (syslog_facility)
The facility is another syslog parameter used to determine how syslog handles the events. Valid values are as follows:
-
auth
-
security
-
user (default)
-
local0-local7
Syslog Custom Format (syslog_format)
The syslog entry format determines the format of the log messages. Each message will appear as specified, with keywords (e.g., “target”) replaced by the corresponding data. Possible keywords are: job_id, scan_id, session, target, service, severity, tutorial, text, cve, id, max_cvss, pci_compliance. This setting is only used if the Syslog Format setting above is set to Custom Format.
Save Files on Node When Finished (save_files_on_finish)
This setting determines whether the scan data, status file, and verbose output file are kept on the scan node after the scan finishes. It generally isn't necessary to keep these files on the node after the scan finishes, but they could be helpful for troubleshooting. If this box is checked, the files are saved permanently on the node. Otherwise, they are removed after they have been sent to the manager.
Save Files on Node When Stopped (save_files_on_stop)
This setting determines whether the scan data, status file, and verbose output file are kept on the scan node if the scan is stopped. If this box is checked, the files are saved permanently on the node. Otherwise, they are removed when a scan is stopped. Warning: This box must be checked in order for the scan to be resumed after it is stopped.
Reduce facts (reduce_facts)
If this option is enabled, certain internal facts which are only used by the scan engine will not be sent to the manager. This may improve processing performance, but will drop some data that may be useful for troubleshooting.
CVSS Version Order (cvss_version_order)
This option specifies which CVSS versions to use for rating vulnerability severity in the analytics screens, dashboards, and reports. The currently supported CVSS versions are 2.0, 3.0, 3.1, and 4.0. Specify a comma-separated list of CVSS versions to use. The first version from this list which has an NVD entry for the vulnerability will be used. If there is no NVD entry, SAINT sets its own score using the first version on this list. This option only affects non-version-specific CVSS columns. It has no effect on version-specific columns such as CVSSv3, which always shows version 3.0 or 3.1. This option is unused in PCI ASV scans and replaced by PCI CVSS Version Order (see below).
PCI CVSS Version Order(pci_cvss_version_order)
This option is the same as CVSS Version Order (see above), but is only used with the PCI external scan policy. The default (3.1,3.0,2.0) is specified by ASV Program Guide 4.0r2 section 6.2.1.
Configuration Scanning
Oval Results Format (oval_results_format)
This configuration defines the system characteristics retrieved from OVAL scans.
Oval_results_format (0-No system characteristics; 1-System characteristics (default); 2-Thin results)
Cover Page Images
This option allows you to
customize the images on the cover page of the configuration scan HTML report. The default images use SAINT branding and colors. You can see the currently selected images by clicking on the link beside the option. To change an image, click on the button beside the input and choose an image file to upload. Then click on Save. To reset an image back to the default, click on the reset (trash can icon) beside the link to the image. From the scan wizard, simply enter the name of an image file located in saint/config/cis-cat/custom.
The four customizable images are:
- Background (210 x 1280): the left sidebar background on the cover page.
- Logo (433 x 62): the logo which appears in the top right corner of the cover page.
- Subtitle background (885 x 190): the background under the subtitle. This should be a dark background for the white text to be visible.
- Footer (725 x 64): the image at the bottom of the cover page.
Report Formats
This option allows you to choose which outpout formats the configuration scan will produce. The default options are HTML, which is a detailed human-readable report, CSV (comma-separated),and JSON non-pass, which contains data about the controls which failed. Other options are JSON full, which contains data about all controls, and text, which describes all controls and results in plain text form. The OVAL results will be available in XML format regardless of which report formats are selected.
Skip Schema Validation
If benchmark or OVAL content is causing XML Validation errors during a scan, enable this to give the scan a chance to run.
Tunneling
Tunneling allows SAINT's scanners to securely scan a private network from a public IP address by sending all packets through a designated host on the private network. For example, suppose 192.168.1.2, 192.168.1.3, and 192.168.1.4 are targets on a private network. The scanner, 198.51.100.2, is located on the Internet and cannot access the private network.
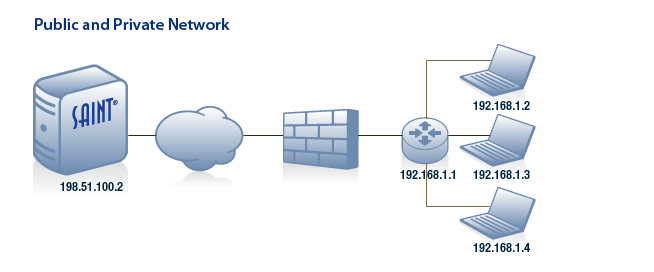 .
.
With SAINT’s tunneling option, an encrypted tunnel is formed between the scanner and a chosen host on the private network. The tunnel uses Triple DES encryption with a 168-bit key. The chosen host bridges the tunnel with its physical network interface, forming a VPN. In this example, 192.168.1.3 is the chosen host. Now, the scanner can scan the targets on the private network through 192.168.1.3. The private IP address 192.168.1.5 is assigned to the scanner, so the scan probes originate from that IP address even though the scanner is not physically on the private network.
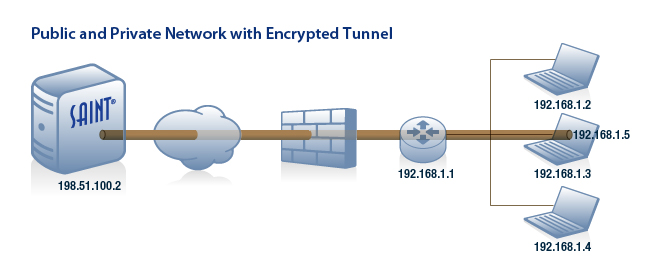
Scanner IP Address
Setting this option tells the manager to establish a tunnel, and specifies the IP address to assign to the scanner on the private network. Any unused IP address in the private network’s subnet may be used. Scans of targets on the private network will originate from this IP address.
Netmask
This option specifies the netmask of the private network’s subnet. It should be the same as the netmask of the chosen host on the private network. This netmask determines which IP addresses should be accessed through the tunnel. For example, if the above option is 192.168.1.5 and this option is 255.255.255.0, then probes destined for any addresses beginning with 192.168.1 will be routed through the tunnel. Note that these options are for configuring the tunnel interface only, and do not imply that the entire subnet will be scanned. Only the targets selected in the scan wizard are included in the scan.
VPN Port
This option specifies the TCP port number to be used by the VPN tunnel. The scanner will listen for a connection from the chosen host on this port. Traffic on the specified port should be allowed outbound through the private network's firewall, and inbound through the scanner's firewall. The same port number should be entered when prompted by the VPN Tunnel Connector installer. If this option is left blank, a port number between 50000 and 60000 will be chosen at random.
VPN Encryption Key
This option specifies the pre-shared VPN encryption key. It should be a 64-digit hexadecimal string, representing a 192-bit Triple-DES key and a 64-bit initialization vector. The same key should be entered when prompted by the VPN Tunnel Connector installer. If this option is left blank, a key will be generated at random.
Static Routes
In some cases, the private network will extend beyond the chosen host’s subnet. Referring to the previous example, now suppose that the 192.168.2 subnet also sits behind the 192.168.1.1 gateway router.
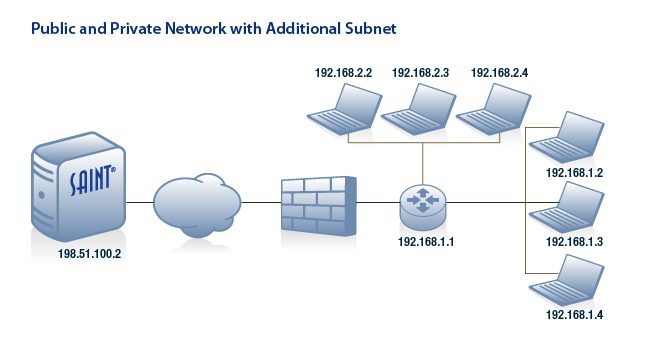
In this case, in order to scan targets 192.168.2.2, 192.168.2.3, and 192.168.2.4, a static route must be specified, which tells the scanner to reach those targets through the tunnel, routed through the 192.168.1.1 gateway.
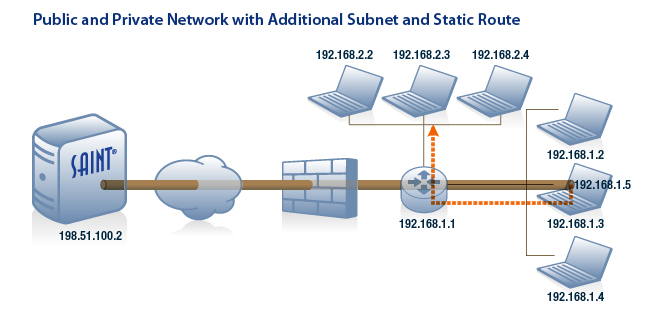
Static routes are specified as <network>/<netmask>:<gateway>. In the above example, that would be 192.168.2.0/255.255.255.0:192.168.1.1. Multiple static routes may be specified in a list separated by semi-colons if necessary. For example: 192.168.2.0/255.255.255.0:192.168.1.1;192.168.3.0/255.255.255.0:192.168.1.1
Bridge Setup
The above scan configuration options are used to configure the scanner’s side of the tunnel. However, establishing a tunnel also requires some steps on the targets’ side of the tunnel. These steps are explained in a dialog box which appears after you set the above options in the scan wizard. To enable the tunnel:
-
Choose the host on the private network which will act as the bridge. Any physical Windows or Linux host on the private network may be chosen. Virtual machines might not work.
-
Select the operating system of the chosen host from the drop-down menu in the dialog box. Be sure to choose the correct architecture (i.e., 32-bit vs. 64-bit), since 32-bit compatibility mode may not work on 64-bit systems in this case.
-
If the chosen host’s operating system is Linux, install the following packages if they are not already installed:
-
bridge-utils
-
tunctl (Red Hat/CentOS 5-6 only)
-
uml-utilities (Ubuntu only)
-
-
Click on the button in the dialog box to download the VPN Connector program. Note that the Linux program is customized with the correct VPN server address, port, and encryption key for your scan job, so it must be downloaded again for every new job. Since the program contains the encryption key, it is highly recommended that it be transferred securely. (A warning will be displayed if your HTTP connection is insecure. If you see this warning, see use SSL for instructions on enabling SSL encryption in the web interface.) When downloading the Windows version, be sure to save the parameters shown in the information box. You’ll need these parameters during installation. See the next step.
-
Run the downloaded VPN Connector program on the chosen host. If you choose Schedule Immediately in the scan wizard, then the program must be run before clicking Finish in the scan wizard. Otherwise, it may be run any time before the scan is scheduled to begin. Note that there may be a momentary connectivity loss when the bridge is created.
Linux: The VPN Connector is a standalone executable program. Simply run the program on the Linux system.
Windows: The VPN Connector comes as a self-extracting executable which installs a Windows service, a desktop application allowing you to control and configure the service, and the TAP-Windows interface driver if not already installed. The installer will prompt you to enter the following parameters:
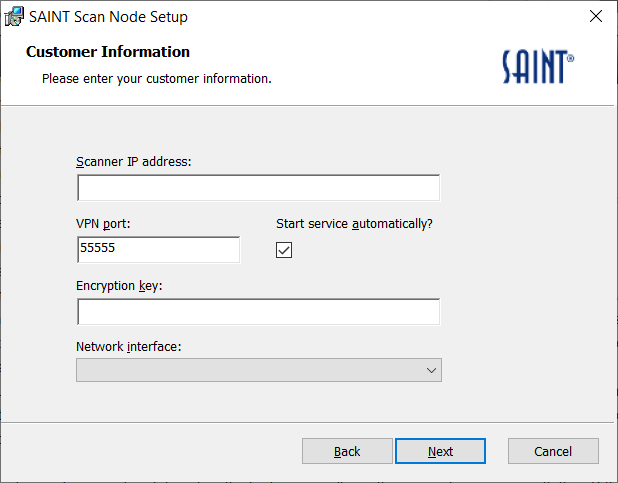
At this step in the installation, enter the following information:-
Scanner IP Address. The public IP address of the scanner. If you chose the local node in step 2 of the scan wizard, this is normally the same IP address as the manager. If you chose a remote node, enter the public IP address of the remote node.
-
VPN Port. The VPN port number which was shown in the information box below the download button when you downloaded the installer.
-
Start Service Automatically? Whether you want the VPN Connector service to start automatically after installation and every time the computer starts. If you uncheck this box, use the Windows VPN Connection Manager to start the service before the scan runs.
-
Encryption Key. The encryption key which was shown in the information box below the download button when you downloaded the installer.
-
Network Interface. The network interface to bridge. Choose the network interface for the network which has the scan targets.
-
Upon execution, the connector program will first create the bridge interface and add the TAP interface and the primary Ethernet interface to the bridge. Note that there may be a momentary connectivity loss during this time, and on Windows the bridge interface may attempt to obtain new network configuration information using DHCP. After the bridge interface has been configured, the program will attempt to establish the tunnel connection. If the scanner is not yet listening for the connection, the connector program will retry periodically until the connection is accepted. Upon success, the program will output a message indicating that the connection has been established. If it is unsuccessful, see the error output from the scanner for a description of the problem.
If you are an advanced user and wish to set up the bridge yourself, run the connector program with the –B flag, which will skip the bridge setup and just attempt to establish the connection. If you wish to use a different Ethernet interface than the default, specify the desired interface using the –e flag. In Linux, use the interface’s device name (e.g. eth1). In Windows, use the interface’s GUID, which can be obtained from Local Area Connection > Properties > Configure > Details > Device class guid. Run the program with the –h flag to see the full list of command-line options.
Windows VPN Connector Manager
The Windows installer will install a desktop application which can be used to control, configure, and monitor the SAINT VPN Connector service. To use this application:
-
Find the SAINT VPN Connector Manager on the Windows start menu.

-
Right click on the SAINT VPN Connector Manager option and choose Run as administrator.


-
If you chose to run the service automatically when you installed it, then the service will already be running, and the Stop and Restart buttons can be used to stop or restart it. When the service is stopped, you can use the Start button to start it.

-
Choose Settings from the Edit menu if you need to change the scanner IP address, VPN port, encryption key, or network interface.
-
Choose Open Log from the File menu to see the messages output by the VPN Connector service.
Workarounds
Skip Form Checks (skip_form_checks)
This options determines whether to skip checks against detected HTML form parameters. This option may be useful if excessive form submissions cause problems on the target. However, it will omit many generic web application checks such as SQL injection and cross-site scripting, so it should be used with caution.
Don't Use nslookup (dont_use_nslookup)
Check this box if DNS (Internet domain name service) is not available.
Dont_use_nslookup (0=Use nslookup; 1=(Default) Don’t use nslookup)
Disable Reverse DNS (disable_reverse_dns)
SAINT scanners attempt to determine the fully qualified host name (host.domain) of each primary target using reverse DNS. This ensures that the scan provides consistent results by always using each target's correct registered host name, if available. However, this behavior may be undesirable if you need to scan a target using a host name which is different from that target's registered host name, e.g., for scanning virtual web servers. This behavior may also be undesirable if reverse DNS service is slow or unavailable. The Skip DNS Lookup option controls whether the reverse DNS lookup is performed for primary targets. There are four available settings for this configuration option.
-
0 - Perform reverse DNS lookups on all targets. (Default setting).
-
1 - Disable reverse DNS lookups on any targets. This setting is useful if the DNS servers are slow or unavailable on the scanning host.
-
2 - Perform reverse DNS lookups on targets specified by IP address, but not on targets specified by host name. This is useful when scanning virtual web servers, because it allows IP addresses to be resolved into meaningful host names without affecting the name of the virtual web server.
-
3 - Perform reverse DNS lookups on all targets, and if a host name resolves to a different host name, to scan both host names. This is also useful for scanning virtual web servers, if a more thorough scan is desired.
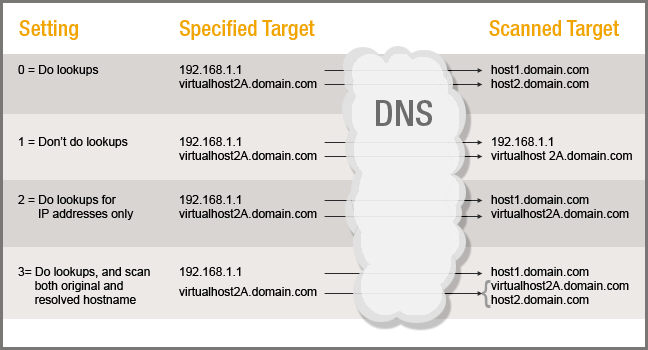
Use Samba (use_samba)
If this option is enabled, scans will use the operating system's Samba tools (net and rpcclient) instead of SAINT's native SMB implementation for Windows checks. This may be useful if SAINT's protocol support is incompatible with the target, but may result in a slower scan. (Note: this setting has no effect on Windows file checks, which always use smbclient.)
Start Remote Registry (start_remote_registry)
If this option is enabled, the scanner will attempt to start the remote registry service on the target if it's not already running. Enabling this option could help Windows authentication succeed against targets that don't start the remote registry service by default. If the scanner starts the service, it will also stop it at the end of the scan.
Scan Failure Notification
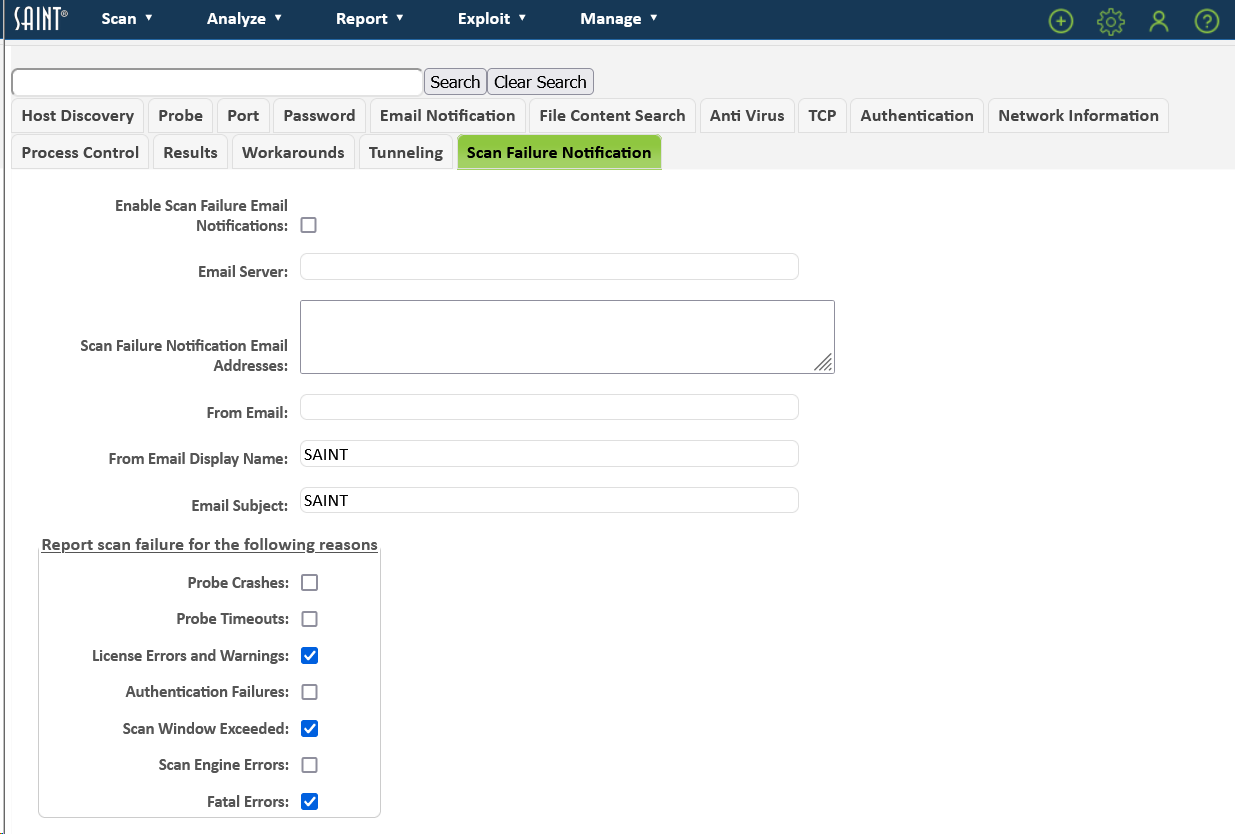
Enable Scan Failure Email Notifications
Sends an email to the listed email addresses if a scan fails for the selected reasons.
Email Server
The mail server address. (optional)
Scan Failure Notification Email Addresses
Space-separated list of email addresses to send the notification to.
From Email
The email address that the notification comes from. (optional)
From Email Display Name
The name of the email sender.
Email Subject
The subject of the email.
Report Scan Failure for the following reasons
-
Probe Crashes – Message is included when a scan completes and probes crashed.
-
Probe Timeouts – Message is included when a scan completes and probes timed out.
-
License Errors and Warnings – Message is included when there are license issues during a scan.
-
Authentication Failures – Message is included when authentication fails for any service that it is attempted on.
-
Scan Window Exceeded – Message is included when a scan window is defined for a job and the scan is paused due to the window being exceeded.
-
Scan Engine Errors and Fatal Errors – Message is included in rare cases where an issue prevents a scan from running.
Exploit Options
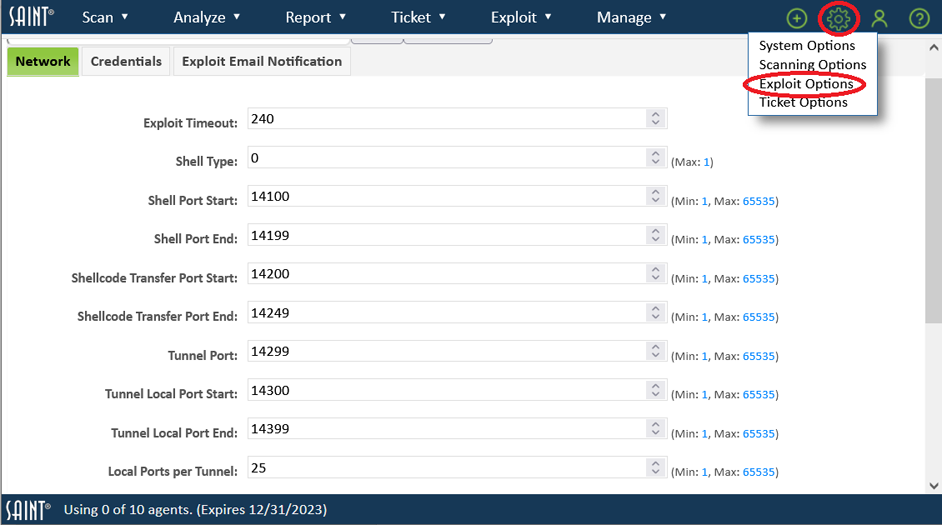
Network
Most exploits work by injecting machine code, known as a payload, into a vulnerable process. The payload runs a command shell which is redirected to a socket. A TCP connection to the command shell is then established, allowing command execution.
Shell Type (shelltype)
There are two ways in which the shell connection can be established. Most exploits can use either of these two methods. Which one to use is specified by the port shelltype option.
-
0 – (Default) reverse port, is for the target to connect back to the manager. This method is useful when the target is behind a firewall which may deny some incoming connections, because the connection originates from the target.
-
1 – Bind port, is for the manager to connect to the target. This method may be preferable when Security Suite is behind a firewall which could deny the target's attempt to connect back.
Shell Port Start (shell_port_start)
The shell port is the TCP port upon which the command shell either listens for a connection (when using a bind port) or connects back to the manager (when using a reverse port). Most exploits allow the user to select the shell port that the payload will use. This is useful for working around firewall blocks which may only allow connections on certain ports.
Since only one process can bind to the same port on the same computer at a time, SAINT allows you to specify a range of shell ports. An unused port from this range is selected at random when you run an exploit, but can be overridden on the exploit's run form. During automated penetration tests, the exploits will use different port numbers within the range to avoid potential conflicts.
The shell_port_start field specifies the start of the range of shell ports.
Shell Port End (shell_port_end)
The shell_port_end field specifies the end of the range described above.
Shellcode Transfer Port Start (shellcode_transfer_port_start)
Some exploits need to connect back and retrieve shellcode from the manager. A range of ports, separate from the range described above, is used for such shellcode transfers. Again, an unused port from this range is selected at random when you run an exploit, and different port numbers from within the range will be used during automated penetration tests.
The shellcode_transfer_port_start field specifies the start of the range of shellcode transfer ports.
Shellcode Transfer Port End (shellcode_transfer_port_end)
The shellcode transfer_port_end field specifies the end of the range described above.
Tunnel Port (tunnel_port)
Port used for tunneling.
Tunnel Local Port Start (tunnel_localport_start)
This port setting is the first port in the port range used by the localhost for tunneling.
Tunnel Local Port End (tunnel_localport_end)
This port setting is the last port in the port range used by the localhost for tunneling.
Local Ports per Tunnel (localports_per_tunnel)
Connect-back Address V4 (connectback_addr)
The connect-back address is used whenever an exploit needs to connect back to SAINT such as for reverse port exploits, exploit servers or file transfers. The default connect-back address used is the address of the system’s network interface, which is acceptable in most cases. However, there may be cases where the target must use a different IP address to connect back to the manager. For example, due to Network Address Translation (NAT).
To set the connect-back address, enter the manager’s IP address as recognized by the target. If it is the same as the manager’s actual IP address, leave this setting blank, and the default will be used.
Connect-back Address V6 (connectback_add6)
This connect-back address is used for the same purpose as the connect back address previous described, but specific to IPv6 environments.
Mail Server Domain (mail_server_domain)
FTPD Port (ftpd_port)
SAINT installations contain an internal File Manager utility, for the purposes of file transfers during the execution of exploits. There are two configuration settings which affect the operation of this utility. The first is the FTP daemon port. When a file download request is made and the manager attempts to use FTP to transfer the file, it starts a listener on the specified port. The target system then connects to the port using its native FTP client and sends the file. Note that this setting has no effect if the target is a Windows system because the Windows FTP client only supports file transfers on port 21. SAINT may also use TFTP or SMB for some connections, in which case this setting has no effect.
Download Timeout (download_timeout)
This configuration option is the second setting that affects the operation of the File Manager utility. This value sets is the download timeout for file transfers. The File Manager will wait the specified number of seconds for a response from the target before giving up on a download request.
Credentials
Some exploits require authentication credentials to a service on the target host in order to work. This is typical if a vulnerability affects a specific function which is only available after a user has logged in. SAINT currently allows you to specify login credentials for the FTP, POP, and IMAP services, plus the IMAP post office name and the e-mail domain, if applicable. Enter a valid user name and password for any service to enable authenticated exploits for that service.
IMAP User (imap_user)
User ID for the imap login credentials. Default: guest
IMAP Password (imap_password)
Password for the imap login credentials.
IMAP Post Office (imap_post_office)
IMAP post office name of the target mail server. Default: imap
POP User (pop_user)
User ID for the POP login credentials. Default: guest
POP Password (pop_password)
Password for the POP login credentials.
FTP User (ftp_user)
User ID for the FTP login credentials. Default: anonymous
FTP Password (ftp_password)
Password for the FTP login credentials.
Exploit E-mail Notifications
Sometimes it will be beneficial to enable e-mail notifications for when a new exploit connection is received. In the cases where you are running a background exploit tool, such as the Flash Drive AutoPlay Tool, or performing any number of client exploits, you most likely won't get any connections instantly. The following configuration options are provided to configure e-mail notification options, specific to exploit execution.
Exploit Email Server (exp_notify_email_server)
This configuration field stores the IP address of a mail relay server. If this option is left blank, the alert will be sent directly to the mail server for the recipient's e-mail domain. If that server cannot be resolved or reached for some reason, then an IP address for a mail relay server can be specified. If it is specified, then alerts will be sent through that server.
Exploit Email Recipient 1 (exp_notify_to_email1)
Recipient email address to receive notifications from the execution of exploits.
Exploit Email Recipient 2 (exp_notify_to_email2)
Recipient email address to receive notifications from the execution of exploits.
Exploit Email Recipient 3 (exp_notify_to_email3)
Recipient email address to receive notifications from the execution of exploits.
Notify on New Connections (notify_on_new_connections)
Values: Yes/No. Default: No.
Ticket Options
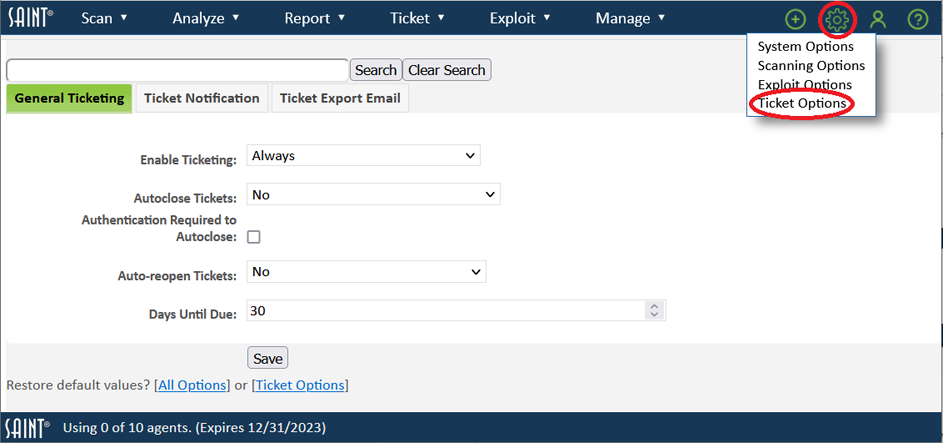
General Ticketing
Enable Ticketing
This option enables or disables generation of tickets as a result of vulnerabilities detected by a vulnerability scan. The default for enable_ticketing is for ticketing always to be enabled. If this setting is changed to yes but allow override, then tickets will be generated by default, but users can disable ticketing on a per-job basis by setting Create Tickets to no when creating or editing the job. (See Select a Ticket Rule Set for a Job.) Similarly, if this setting is changed to no but allow override, then tickets are not generated by default, but users can enable ticketing when creating or editing the job. If this setting is changed to never, then generation of tickets is always disabled. When yes but export to another system is set, tickets will not be created in SAINT but instead sent to another system via email. This allows tickets to be exported to third-party ticketing systems.
Autoclose Tickets
Open tickets can be closed automatically as a result of a vulnerability scan where the previously found vulnerability on a host does not recur. This option has 3 possible settings:
-
No: Default for autoclose_tickets - do not autoclose tickets.
-
Yes, regardless of scan level: Select this setting to auto-close tickets on a host where the vulnerability does not recur, regardless of the type of scan policy level. Note, different scan policies may find different vulnerabilities. Auto-closing tickets is most useful when you use a consistent scan policy across scans.
-
Yes, only after Full Vulnerability scan: Auto-close tickets on a host where the vulnerability does not recur, but only after a Full Vulnerability scan.
Authentication Required to Autoclose
This option can be Off (default) or On. If the setting is On, open tickets will only be auto-closed on hosts where primary authentication succeeded (e.g., registry login for Windows hosts, SSH login for *nix hosts). The default setting for autoclose_tickets_auth_required is No.
Auto-reopen Tickets
Closed tickets can be automatically reopened as the result of a vulnerability scan. The options are:
- The default for auto_reopen_tickets is No - do not auto-reopen tickets.
-
Yes, as New: Auto-reopen tickets so they have the status of New with no assignee.
-
Yes, as previous assignee: Auto-reopen tickets so that, if they had a previous assignee, they will have the status of Assigned and the same assignee as before. If the closed ticket had no assignee, it will be reopened with status New and no assignee.
Days Until Due
Tickets are automatically assigned a due date at the time of ticket creation. The default for days_until_due is 30 days past the creation date.
Ticket Notification
Mail Server
The value for the ticket_notify_mail_server is the address of the relay mail server to be used for sending ticket-related notifications. This setting is optional. If the mail server is not provided, the system will try to determine the mail server for each recipient's domain.
From Email
The ticket_notify_from_email value is the From: email address that is used as the sender for ticket-related e-mail notifications. If this option is left blank, root is used as the user name.
From Email Display Name
The ticket_notify_from_email_display_name configuration setting is the display name of the sender, used for all ticket related e-mail notifications. The default value is “SAINT”.
Enable Ticket Assignment Notification
The enable_ticket_assignment_notify setting indicates whether an e-mail notification should be sent to a user when the user is assigned tickets. The default is Off.
Days Before Ticket Due to Send Reminder
The Ticket reminder days before due configuration setting is the number of days before a ticket is due to send an e-mail reminder (blank=do not send reminder; 0=due today). The setting may also be a comma-separated list of numbers, e.g., ‘0,3,7’ means to send a reminder on the due date, once within 3 days of the due date, and once within 7 days of the due date. The default is blank, so reminders are not sent.
Enable Past Due Ticket Reminders
The Enable past due ticket reminders configuration setting indicates whether a daily e-mail reminder should be sent to a user when tickets assigned to the user are past due. The default is Off.
Override Default Base URL
The Ticket base URL configuration setting contains the base URL to use for hyperlinks within ticket notification e-mails, e.g., http://mysainthost:1414. Security Suite’s default base URL is set the first time the admin user logs in. This setting may be useful when hyperlinks in ticket notification e-mails must use the external host name or IP address instead of internal.
Ticket Export Email
This section describes how a user can configure SAINT to use a 3rd party ticketing system, rather than SAINT’s integrated ticketing workflows, to send scan results via email-based records to manage response and remediation workflows. The configuration settings in this form will enable a user to configure the communication to the specific ticketing system, as well as a descriptive subject and body. This export workflow will work for any product (ZenDesk, ServiceNow, etc.) that accepts emails to generate a new ticket. Note that this process will send scan record information to generate a 3rd party ticket, but will not control or auto-update 3rd party tickets for status.
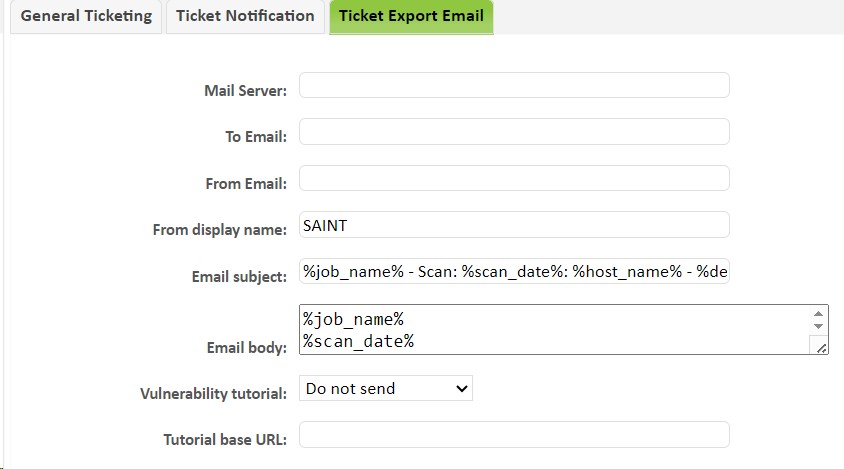
The options under this tab are used when exporting tickets to third-party ticket systems. (See Enable Ticketing).
Mail Server
Address of relay mail server (optional).
To Email
The email address used by the ticketing system to receive tickets.
From Email
The email address from which the ticket is sent. Default = root@
From Display Name
The display name of the from email address. Default = SAINT
Email Subject
The subject of the email (see Macros for formatting options). This field can be overridden by using ticket rule sets.
Email Body
The email message (see Macros for formatting options).
Vulnerability Tutorial
Whether or not to send the tutorial as an attachment. Use the %tutorial_url% macro in the message body if you want a URL provided instead.
Tutorial base URL
When sending the tutorial as a hyperlink, this will override the default URL of the SAINT installation. This option may be useful when hyperlinks to SAINT should use the external host name or IP address instead of internal.
Macros
Macros are used to define where ticket fields should be added in the email. The following macros are available:
|
%job_name% |
The name of the scan job. |
|
%scan_date% |
The date which the scan occurred on |
|
%description% |
The vulnerability description. |
|
%host_ip% |
The IP address on which the vulnerability was discovered. |
|
%host_name% |
The host name on which the vulnerability was discovered. |
|
%sys_class% |
The system class of the target host. |
|
%sys_type% |
The system type of the target host. |
|
%service% |
The service which the vulnerability was discovered on. |
|
%cve_list% |
A comma separated list of CVEs associated with the vulnerability. |
|
%max_cvss_score% |
The CVSS score of all CVEs associated with the vulnerability. |
|
%check_id% |
The SAINT check_id of the vulnerability. |
|
%severity_color% |
The SAINT severity color of the vulnerability (Red,Yellow,Brown) |
|
%severity_category% |
The SAINT severity category of the vulnerability (Concernt,Critical,Potential) |
|
%severity_description% |
The SAINT severity description of the vulnerability |
|
%assigned_to% |
The firstname, lastname, and username of the assignee when using ticket rule sets. |
|
%due_on% |
The due date of the ticket. |
|
%created_on% |
The creation date of the ticket. |
|
%tech_details% |
The SAINT technical details showing evidence of the vulnerability’s existence. |
|
%tutorial_url% |
A URL which can be used to access the relevant tutorial sections in the SAINT UI. |
|
!AssetTagName! |
AssetTagName can be replaced with the tag_name of any asset tag. For example, !CPE! could be replaced with cpe:/o:microsoft:windows_7 if the asset associated with the vulnerability has that asset tag. |
Email Subject Macro Example:
%job_name% - Scan: %scan_date%: %host_name% - %description%
My Test Job - Scan: 2018-12-06 08:38:51: 10.124.0.31 - Possible vulnerability in Microsoft Terminal Server
Email Body Macro Example:
[THEJOBNAME]%job_name%
%scan_date%
%description%
%host_ip%
%host_name%
%sys_class%
%sys_type%
%service%
%cve_list%
%max_cvss_score%
%check_id%
(%severity_category%) %severity_description%
[ASSIGNEE]%assigned_to%
%due_on%
%created_on%
%tech_details%
!CPE!
[THEJOBNAME]My Test Job
2018-12-06 08:38:51
SSL/TLS server supports short block sizes (SWEET32 attack)
10.124.0.3
10.124.0.3
WINDOWS
Windows 7 SP1
ftp
CVE-2016-2183,CVE-2016-2184
5.0
misc_tls_sweet32
(Critical) user shell access
[ASSIGNEE] Administrator (admin)
2019-01-05 05:00:00
2018-12-06
Server accepted SSLv3 64-bit block size cipher: TLS_RSA_WITH_3DES_EDE_CBC_SHA
cpe:/o:microsoft:windows_7