Reporting
The report menu provides access to a wide variety of scanned vulnerability report types—compliance reports applicable to many of today’s industry standards and security controls; and capabilities for creating customized reports and reusable report types tailored to your specific needs. These reports can be generated, displayed, and saved in numerous report formats such as HTML, PDF, XML, and CSV.
Reports can then be viewed, printed and emailed by selecting the applicable option for a report record, as well as viewing and modifying report permissions, or deleting reports that are no longer needed.

The report menu provides access to six components:
-
Reports page for viewing existing reports
-
Scan Report Types page (templates) for accessing details of pre-defined and custom scanning report templates
-
Exploit Report Types page for accessing details of pre-defined and custom exploit report templates
-
PCI Attestations page is accedible either under the Report tab on the main menu bar, or by clicking on the link in the email notificaiton that is generated when the report is submitted.
-
PCI Identities page for managing the identity information for users and organizations that must report under PCI
-
Configuration Reports page for generating and accessing reports created from benchmark assessments
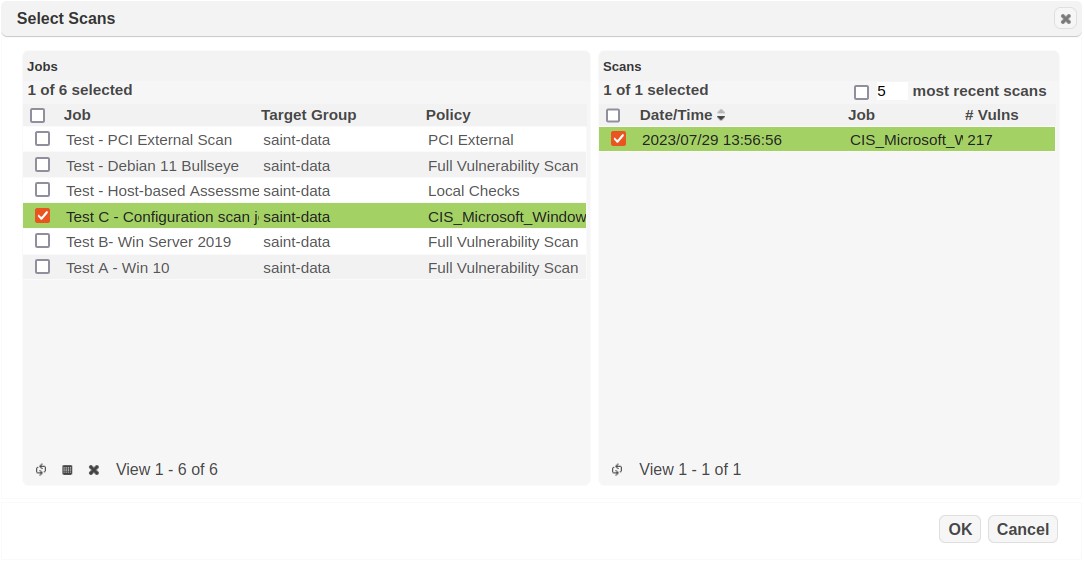
Selecting Data for Reports
There are two ways to select data for reporting:
-
Option 1 – use the Select Data Set option in the Data Filters Option dropdown, by selecting Job and associated scans. The selected scan results can be constrained further by the 'Asset Filter' option to report on a subset of the scanned hosts by their associated Asset Tags and 'Show Exclusions' or 'Hide Exclusions' option for showing or hiding results that have been flagged as Exclusion.
-
Option 2 – select a pre-configured data View from the Data View Options dropdown that already contains the Job(s), Scan(s) and Asset tag filters to be used for the report(s). Selecting a Data View will override any existing settings in the Data Selector or Asset Filter or Show or Hide Exclusion and set values stored by the View.
Reports Page
The Reports page displays all reports stored in the system, including some basic information about the reports: created by (user), creation date, title, report type and stored format (e.g., PDF, HTML). Reports can be launched, edited, or deleted from this view.
Create A Report
To create a new report, choose Create Report from the Grid Actions drop-down menu. This will launch the report creation wizard. The Create Scan Reports section provides the full details about the report creation wizard.
View a Report
To view a previously created report, click on the View button (magnifying glass icon) on the row of the report that you want to view. This will open the report in a new browser tab if the report format is supported by the browser. Typically HTML, PDF, XML, and text can be viewed in the browser. Otherwise, the report will be downloaded.
Download a Report
To download a previously created report, click on the Download button (down arrow icon) on the row of the report that you want to download. Alternatively, select one or more rows and choose Download Reports from the Grid Actions drop-down menu to download all the selected reports. (Note that HTML reports cannot be downloaded because the references to frames and images would be broken.)
If you are downloading one report, you will have the option to zip (compress) the report. If you are downloading more than one report, they are always zipped. If the reports are zipped and you want the zip file to be password protected, enter a zip password. This will require the user to enter the same password in order to view or extract any of the reports contained in the zip file.
Email a Report
To send a previously created report as an email attachment, click on the Email button (envelope icon) on the row of the report that you want to email. Alternatively, select one or more rows and choose Email Reports from the Grid Actions drop-down menu to email all the selected reports. (Note that HTML reports cannot be emailed because the references to frames and images would be broken.) Then enter the recipient email addresses separated by commas, spaces, or line breaks.
If you are emailing one report, you will have the option to zip (compress) the attachment. If you are emailing more than one report, the reports are always zipped. If the reports are zipped, there are two additional options: you may download the zip file in addition to emailing it, and you may enter a zip password. If a zip password is entered, it will require the recipient to enter the same password to view or extract any of the reports contained in the zip file.
If your system requires a mail relay for outgoing mail, enter the address of the mail relay in the Mail Server setting, which can be found under the Email Notification tab in the Scanning Options. This is also where you can go to set the from name and address if desired.
Delete a Report
To delete a report, click on the Delete button (trash can icon) on the row that you want to delete. Alternatively, select one or more rows and choose Delete Reports from the Grid Actions drop-down menu to delete all the selected rows.
Scan Report Types page
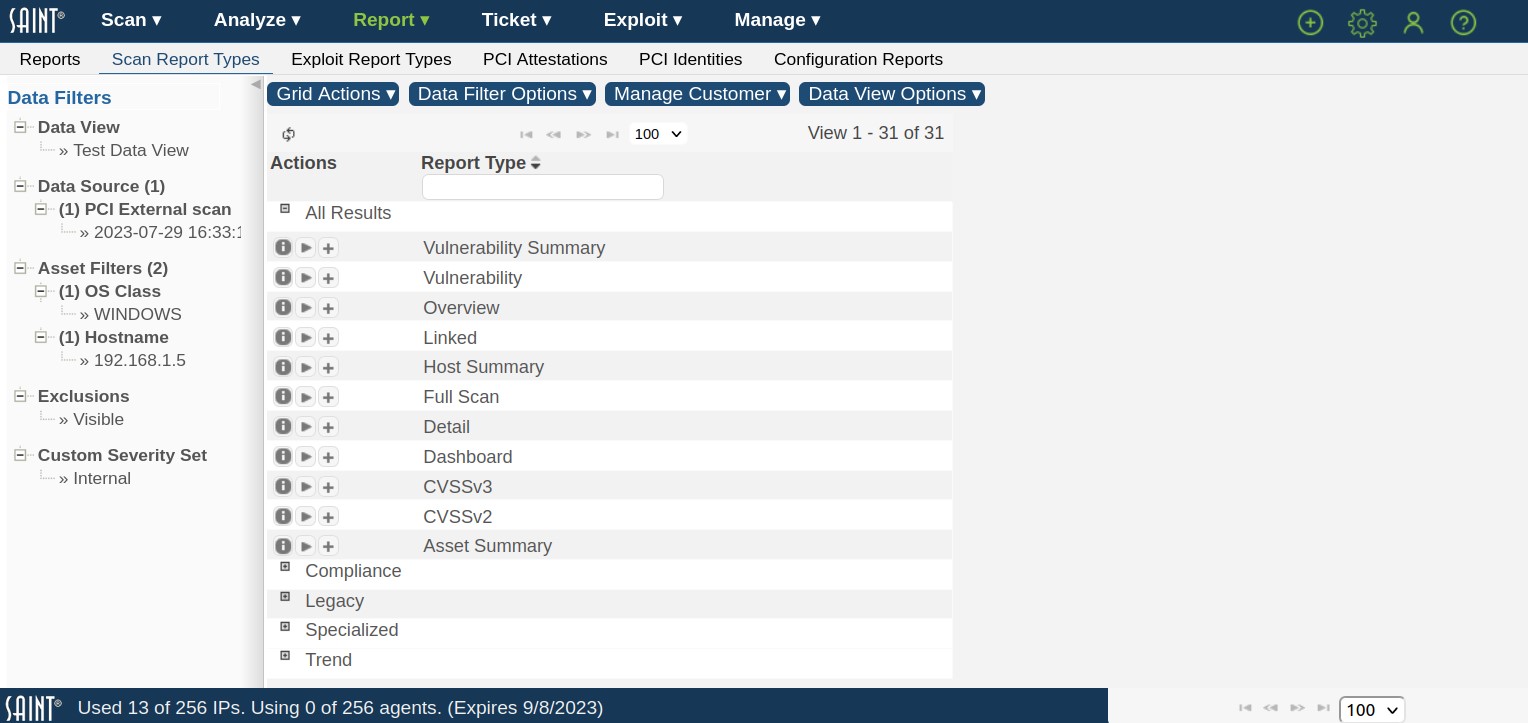
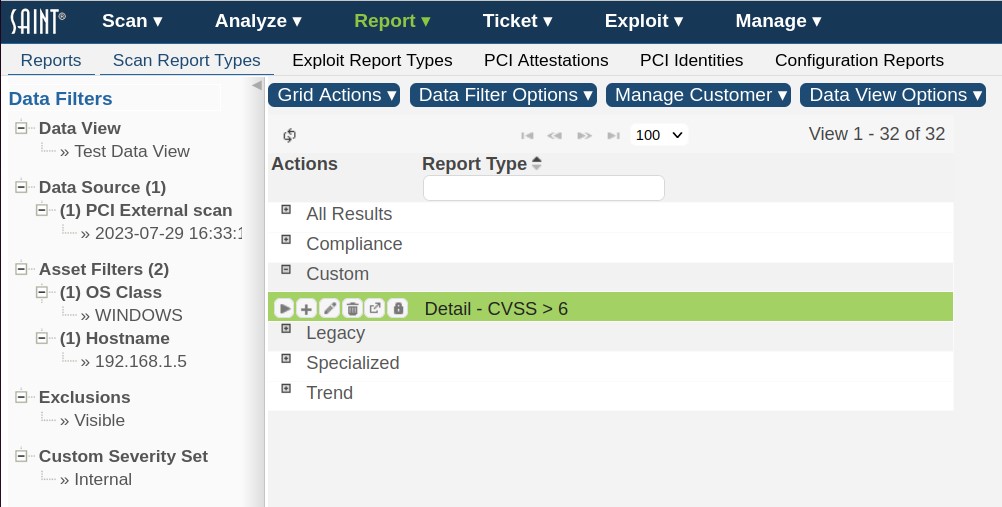
This Scan Report Types page displays a list of available report types (templates) specific to vulnerability and configuration scanning – to include custom report templates. As shown in the example below, you can view all available report types by expanding the All Reports category or expand a selected category to see the available report types for that category.
Search for a Report Type
The report type grid provides a search field below the reports header to quickly locate a report type based on an entered value. For example, locate a report type that supports web crawling (keyword: “web”).
Run a Report based on a selected Report Type
There are multiple ways to launch the New Reports creation wizard. One way is by selecting the applicable Report Type and then selecting the Run Report icon (arrow). This selection will launch the wizard based on the selected report type. A new report can also be executed when reviewing the description of the report type (i) and selecting RUN REPORT from that dialog.
Create a new Report Type using an existing Report Type as a Template
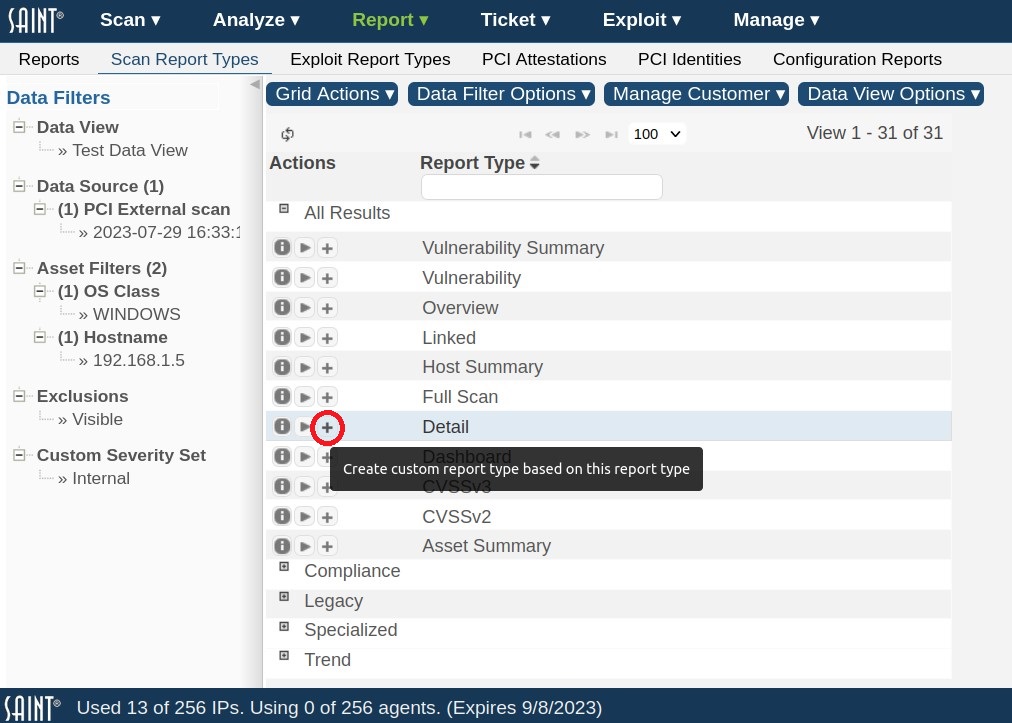
There are two methods for creating custom report templates. First, you can save changes made during report creation within the Job creation wizard. This option can be preferred when creating a report. The second method is to create a custom template by clicking on the “Create custom report type…” action (+) beside the report type in the Scan Report Types data grid. This option can be preferred when building custom report templates for later use, without generating reports. For example, creating report templates with your company logo and required formatting, then using the saved templates for future reports.
Choosing this action will launch the New Report Type wizard. The wizard contains default settings for the 150+ configuration options available in the report engine. To build the custom template, click on a report section (e.g.,Filter by CVSS/PCI) and configure the section as needed.
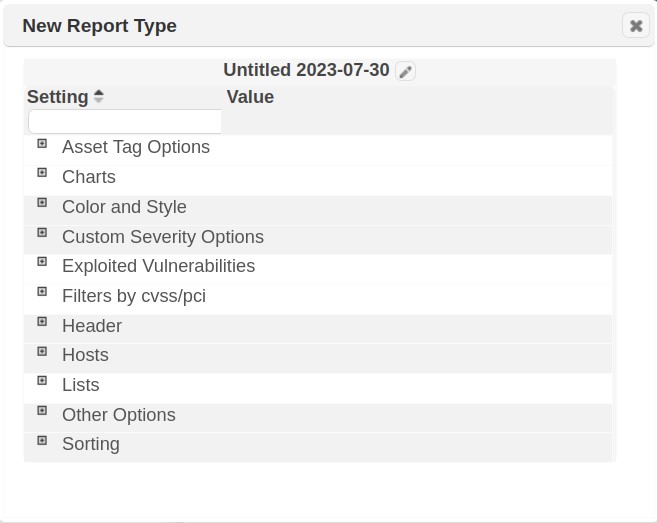
Once these settings are configured, give the new type a name and save your selections.
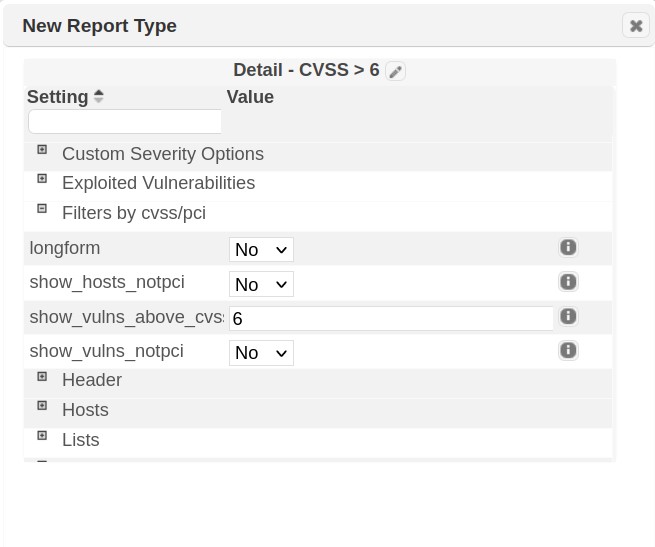
The new report type will be available immediately for use under the applicable Report Types “Custom” category.
Custom report templates can be run, edited, deleted or exported as well as configured for user access (security) by clicking on the applicable action under the Actions column, as shown below.
Exported report types can be saved to a file and then imported into another SAINT installation using the Import option under the Grid Actions menu.
Exploit Report Types
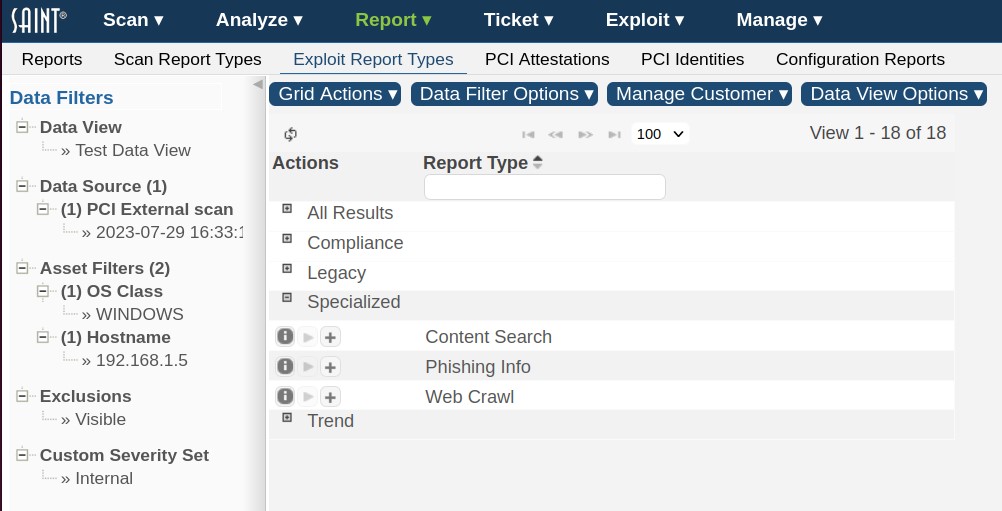
This report page displays a list of available report types (templates) specific to exploit execution. As shown in the example below, you can view all available exploit report types by clicking on the applicable report category's expand (+) button beside the category title, as demonstrated in the following example:
Search for a Report Type
As with the Scan Report Types, the Exploit Report Type data grid header also includes a Search field below the reports header. This allows you to quickly locate a report type by entering a specific value.
Run a Report based on a selected Report Type
There are multiple ways to launch the New Reports Creation wizard to use a custom report template:
-
Click on the global Create option in the upper right corner of the screen. Then select the custom report template in Step one of the wizard.
-
Click Run Report (arrow) icon in the Report Type's Action column for the applicable report type.
-
Click on the Create Reports option in the Report page's Grid Action dropdown and select the custom report template in Step one of the wizard.
Create a new Report Type using an existing Report Type as a template
To create a New Exploit Report Type based on an existing type, select the Plus (+) symbol beside the report type. This selection will launch the New Report type wizard. This wizard contains default settings for the 150+ configuration options available in SAINT’s reporting engine. Note, as shown in the example below, there are a number of report configuration options that are unique to exploit output.
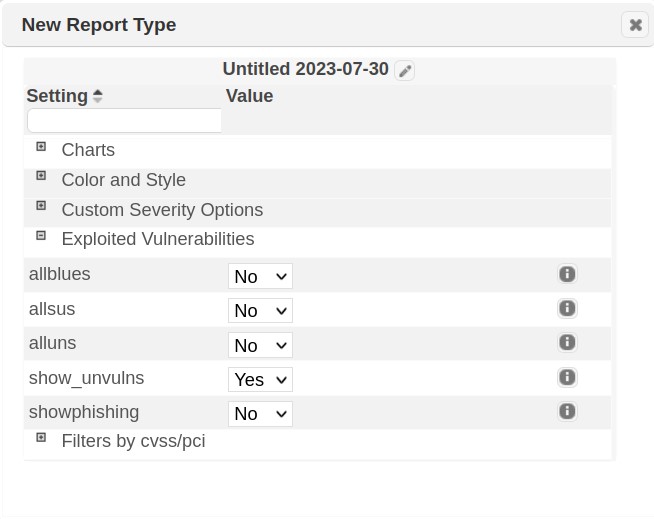
As with creating scan report templates, once these settings are configured, give the new type a name and save your selections.
Your new report type will be available immediately for use under the applicable Exploit Report Types Custom category. You can also run, edit, configure user access and delete a custom exploit report type from this display.
PCI Attestations Page
Note: This page is only available to users with Attestation of Scan Compliance in their license.
After an Attestation of Scan Compliance has been requested (see Request Attestation of Scan Compliance), it will appear on the PCI Attestations page. This page is accessible either under the Report tab on the main menu bar, or by clicking on the link in the email notification that is generated when the request is submitted. Use the drop-down menu at the top of the Status column to choose either open attestation requests, approved attestations, or denied attestations.
PCI Identities
This feature is specific to organizations that provide assessment services or must report under the Payment Card Industry (PCI) Approved Scanning Vendor (ASV) requirements. Users assigned to a role that has the applicable permissions to the PCI Identities feature (view, create, modify, delete) can use this feature to pre-define organizational information required for PCI's ASV scanning report submissions. Two types of identity information are required when submitting ASV reports: 1) ASV identity, and 2) customer identity. The PCI Identities feature provides the ability to create new organization information based on attributes required by the PCI ASV Program Guide, and maintain these records over time for use in the PCI Attestation Report template (default title - ASV Scan Report Attestation of Scan Compliance).
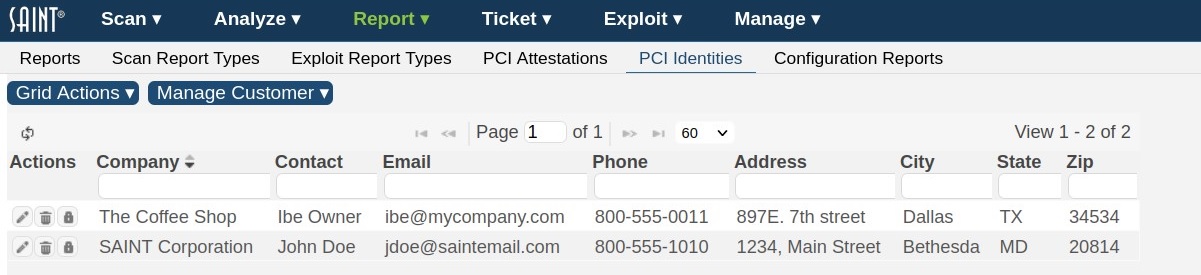
To create a PCI identity for use in the PCI ASV reports:
-
Select Create PCI Identity from the Grid Actions dropdown list
-
Complete the PCI Identity form
-
Click the Create button once all fields have been created
Existing records can be edited by double clicking on the record, highlighting the record, and selecting either the edit option or the edit (pencil) icon. Records can be deleted by highlighting the record and selecting either the delete option or the delete (trash can) icon.
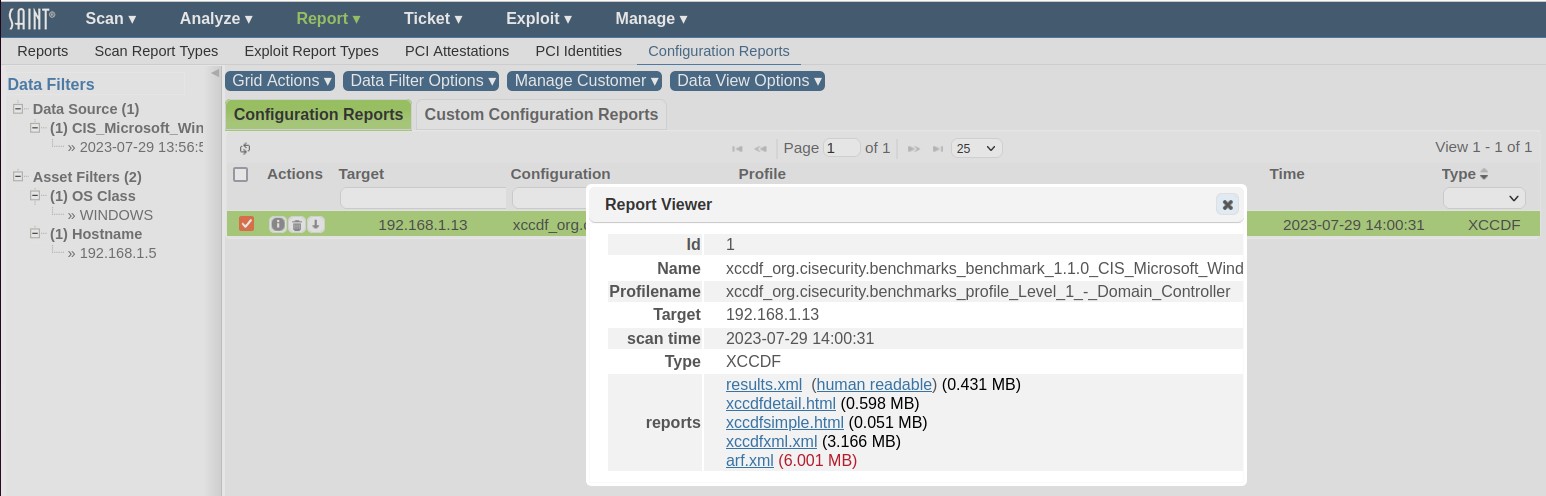
Configuration Reports
This page provides support for all of the SCAP-compliant output and report types required by the SCAP standard and Cyberscope reporting requirements, as well as additional summary and detailed report templates from benchmark assessments and those created from custom benchmarks.
To create a configuration report from an SCAP-compliant report format:
-
Select a scan based on a configuration scan and then choose the View Reports option for a host that was scanned for the benchmark, as illustrated below:
Use the Custom Configuration Reports data grid to create benchmark reports, including Cyberscope compliance output, from SAINT's report templates and the report customization wizard:
-
Navigate to the Configuration Reports – Custom Configuration Reports tab
-
Select the Create Reports option from the Grid Actions dropdown list
-
Give the benchmark report a title
-
Click Next to move to the next section of the report wizard and select option for steps two through four
-
View the summary page of the wizard to validate the customized report configuration
-
Click Finish to generate the report
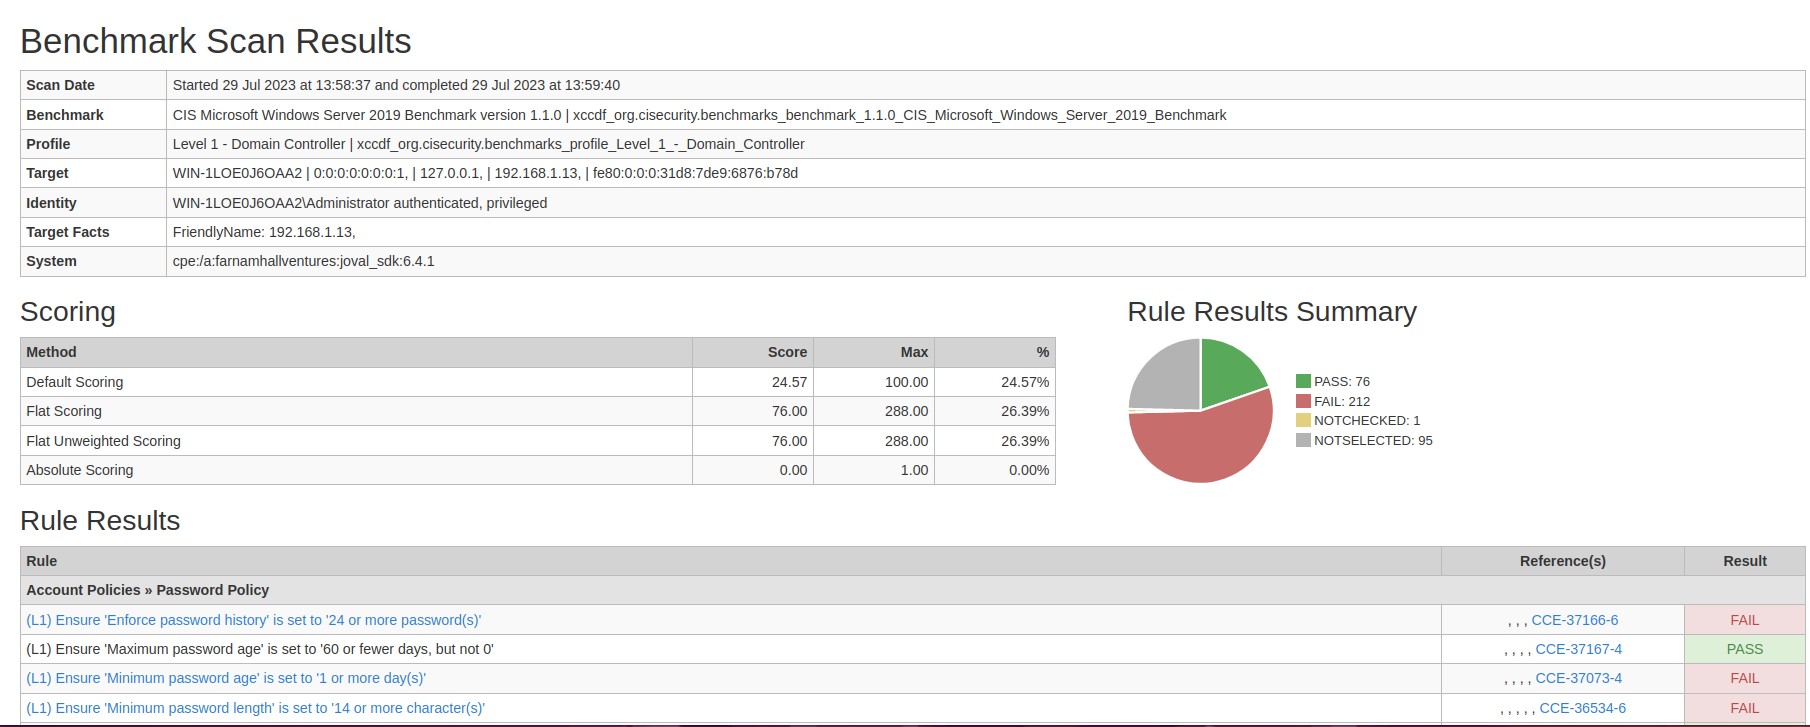
The following is an example of a Detailed Configuration Report:
Navigate to the SCAP section for more details on these SCAP Reports and comprehensive help for generating these reports.
Create Scan Reports
The Report wizard provides a step-based approach to configure and create reports based on vulnerability scans, configuration assessments, penetration tests and individual exploits.
Once you’ve chosen the scan data and data filters from the Data Filters Options, click on the Report option from the global + Create option or select the Create Report option from the Report page's Grid Actions dropdown on the Report page. Either method will launch the New Report creation wizard.
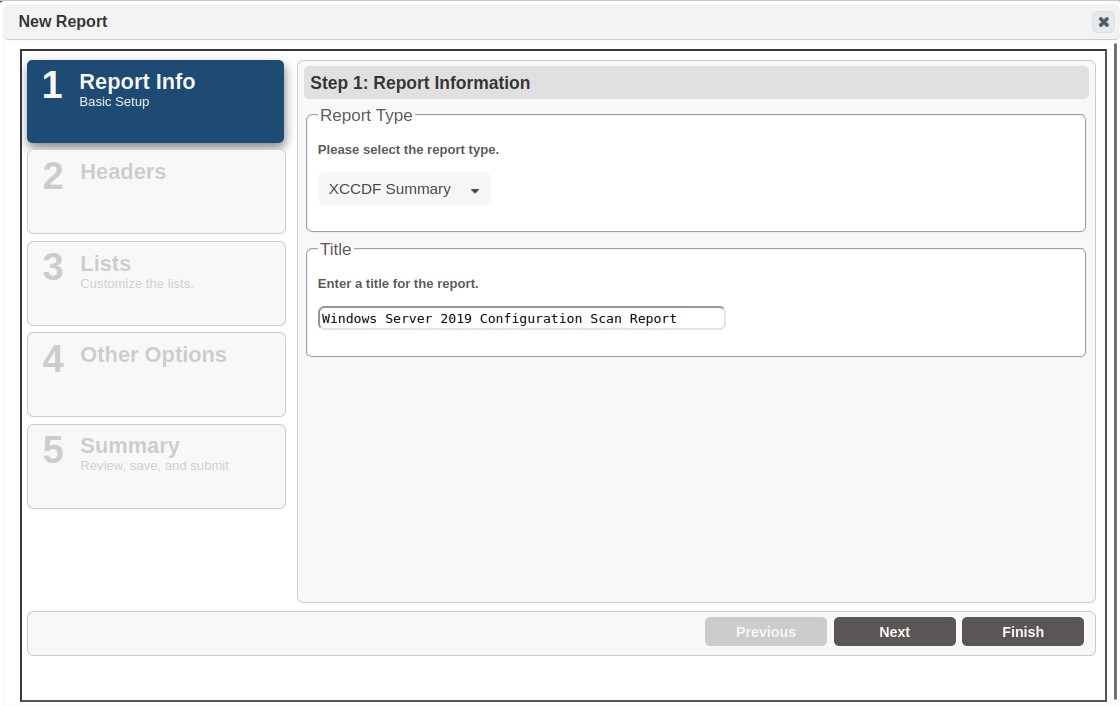
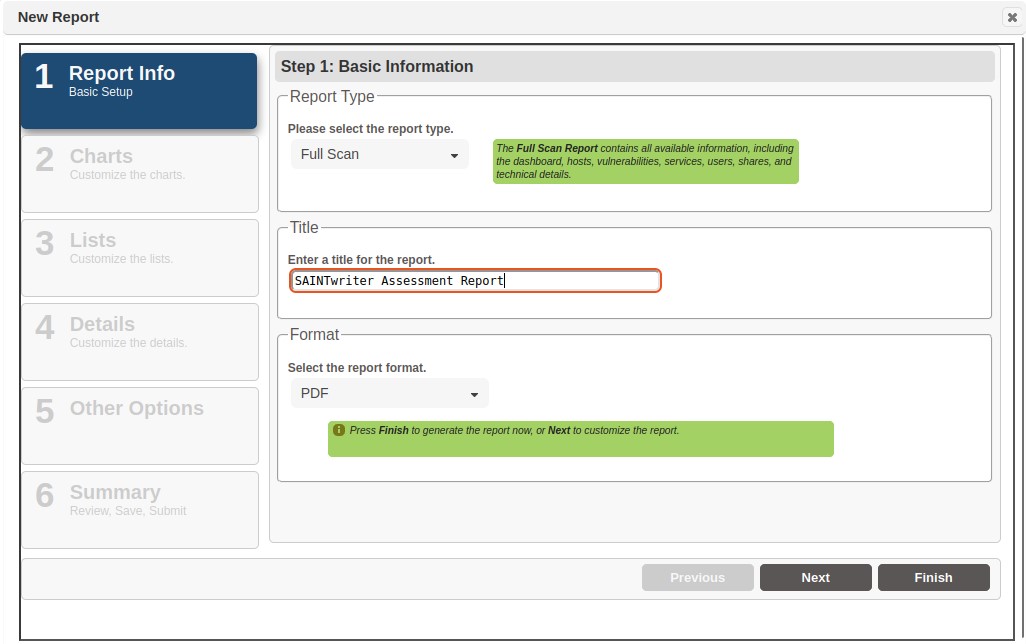
Step 1 – Report Info
Step 1 is to select the report type, report title, and the output format for the report.
Report Types
Report types are specific to the type of results (i.e., scan and exploit), and are categorized by the type or industry segment the format or content is applicable to. Read the descriptions of the pre-configured report types and select the one that best suits your needs. The report types and detailed descriptions are shown below:
All Results
-
CVSS – The CVSS report rates vulnerabilities using CVSS, and contains all available information including charts, tables, hosts, vulnerabilities, services, users, shares, and technical details.
-
Full Scan – The full scan report contains all available information including charts, tables, hosts, vulnerabilities, services, users, shares, and technical details.
-
Vulnerability – The vulnerability report contains all available vulnerability information including charts, tables, hosts, vulnerabilities, and technical details.
-
Dashboard – The dashbord includes charts and graphs which summarize the hosts and vulnerabilities found on the network (Use HTML, PDF, or RTF format.)
-
Overview – The overview report lists hosts, vulnerabilities, services, and associated information. This report is best for planning a remediation strategy, or for importing into spreadsheet or database applications.
-
Linked – The linked report lists vulnerabilities and associated information, linked to an appendix containing technical details on each vulnerability.
-
Detail – The detail report contains technical details on each vulnerability. This report is the most helpful to the administrator responsible for implementing the fixes.
-
Asset Summary – provides a list of all hosts sorted by severity. Includes asset tags and charts.
-
Host Summary – provides a list of all hosts sorted by severity.
-
Vulnerability Summary – provides a list of all vulnerabilities and how many hosts are affected by each one.
-
Risk Report - provides the overall risk posture, risk summary, risk scores for all vulnerabilities and hosts, and technical details. (This report type is only available to customers who have SAINT VRM enabled in their license key.)
-
Risk Forecast Report – provides the overall risk posture and forecast, risk forecast summary, risk forecast scores for all vulnerabilities and hosts, and technical details. (This report type is only available to customers who have SAINT VRM enabled in their license key.)
Trend
-
Trend Analysis – The trend analysis report tracks hosts and vulnerabilities chronologically across multiple data sets. Choose two or more data sets you wish to be included in the trend analysis. Hosts and vulnerabilities will be tracked chronologically across the data sets you choose, producing history charts and status classifications.
-
Risk Trend - The risk trend report tracks hosts, vulnerabilities, and risk posture chronologically across multiple data sets. Choose two or more data sets when using this report type.
Compliance
-
PCI Attestation – The PCI attestation report contains customer and ASV information; the overall ASV Program Guide compliance status along with the number of targets scanned and the number of failing vulnerabilities; and both the customer and ASV attestations.
-
PCI Executive – The PCI executive report indicates whether your network is compliant with the latest PCI ASV Program Guide and shows which hosts fail to comply.
-
PCI Detail – The PCI detail report indicates whether your network is compliant with the latest PCI ASV Program Guide and shows which vulnerabilities fail to comply.
-
PCI Internal – The PCI Internal report provides a background on the internal vulnerability scan requirement outlined in PCI DSS section 11.2.1 and contains all available information including charts, tables, hosts, vulnerabilities, services, users, shares, and technical details.
-
IAVA - The IAVA report shows vulnerabilities detected in the selected dataset, and includes the IAVA number associated with each vulnerability.
-
FISMA – The FISMA report provides a background on FISMA and the security controls that mandate vulnerability and risk management, and reports all available information including charts, tables, hosts, vulnerabilities, services, users, shares, and technical details.
-
HIPAA – The HIPAA report provides a background on HIPAA and the security controls that mandate vulnerability and risk management, and reports all available information including charts, tables, hosts, vulnerabilities, services, users, shares, and technical details.
-
NERC CIP – The NERC CIP report template provides a background on NERC CIP and the security controls that mandate vulnerability and risk management, and reports the results of a vulnerability scan on selected hosts. These reports provide executive level charts, as well as details related to the hosts, services, shares, vulnerability details and remediation guidance.
-
SOX – The SOX report template supports financial organizations’ internal vulnerability and risk management strategies, as well as facilitating provisions in Section 404 of the Sarbanes-Oxley Act, requiring a management report annually on the effectiveness of internal controls for vulnerability management of financial reporting and that external auditors confirm management’s assessment.
-
NESA – The NESA report template provides a background on the Information Assurance Standards specified by the United Arab Emirates National Electronic Security Authority (NESA) and reports all available information, including charts, tables, hosts, vulnerabilities, services, users, shares, and technical details.
-
Cyber Essentials – The Cyber Essentials report template provides a background on the Cyber Essentials standard specified by the UK National Cyber Security Centre and reports all available information, including charts, tables, hosts, vulnerabilities, services, users, shares, and technical details.
-
CMMC - The CMMC template provides a background on the Cybersecurity Maturity Model Certification specified by the U.S. Department of Defense and reports all available information, including charts, tables, hosts, vulnerabilities, services, users, shares, and technical details.
Legacy
-
Full Scan - Legacy –The legacy Full Scan Report contains all available information, including charts, tables, hosts, vulnerabilities, services, users, shares, and technical detais.
-
Vulnerability Legacy – The legacy Full Vulnerability Report contains all available vulnerabiilty information, including charts, tables, hosts, vulnerabilities, and technical detais. This report type is included for backwards capabality.
-
CVSSv2 – The CVSSv2 report rates vulnerabilities using CVSS version 2, and contains all available information including charts, tables, hosts, vulnerabilities, services, users, shares, and technical details.
-
CVSSv3 – The CVSSv3 report rates vulnerabilities using CVSS version 3, and contains all available information including charts, tables, hosts, vulnerabilities, services, users, shares, and technical details.
-
Executive Legacy– The legay Executive Report includes pie charts and bar graphs which summarize the vulnerabiities found on the network. (use HTML or PDF format. With simple HTM format, pie charts are only visibile in Internet Explorer browsers.
-
Trend Legacy – The legacy Trend Analysis Report tracks hosts and vulnerabilities chornologically across multiple data sets.
Custom
-
Customized report types developed internally starting with the default options of one of the pre-configured report types.
Report Title
Enter the name for the new report.
Report Format
Choose from the following report formats:
-
PDF (default) is a convenient format for anyone with a PDF reader. PDF reports appear similar to HTML reports, but are contained in a single file and are rendered the same on any platform.
-
HTML launches the report in the current web browser. This report format uses Portable Network Graphic (PNG) images to graphically display pie charts and bar graphs. It also uses HTML frames to provide a linked table of contents for report navigation.
-
HTML without frames is like the HTML format except that it does not provide a linked table of contents.
-
Simple HTML displays pie charts and bar graphs in-line, not as PNG images. However, the pie charts are only viewable on Internet Explorer.
-
RTF is a convenient format for viewing or editing reports on MIcrosoft Windows systems. RTF reports are similar to HTML and PDF reports in appearance, but are contained in a single file which can be opened in either WordPad or Microsoft Word.
-
XML is useful if the scan data is to be processed by XML-enabled applications.
-
Text is a useful alternative if you intend to view the report on a machine without a web browser.
-
Tab-separated reports are useful for importing into documents, spreadsheets, or databases. These formats are useful with the Technical Overview report.
-
Comma-separated (CSV) is useful for importing into other documents or databases, and can be launched automatically in Microsoft Excel without the need to import.
For quick reporting, this is all that is required. Click the Finish button to generate the report. Typically, browser processes will not automatically launch the saved PDF file within the browser window. You may see a message to verify your actions, as shown below:

For more advanced reporting, continue to Step 2 to view charting options.
Step 2 - Charts
In Step 2, the report wizard provides options to choose from several bar charts, pie charts, table, donut, num, gauge, and stack formats. The following screen shot shows the list of available charts, with a check in the checkboxes that coincide with the default selections.
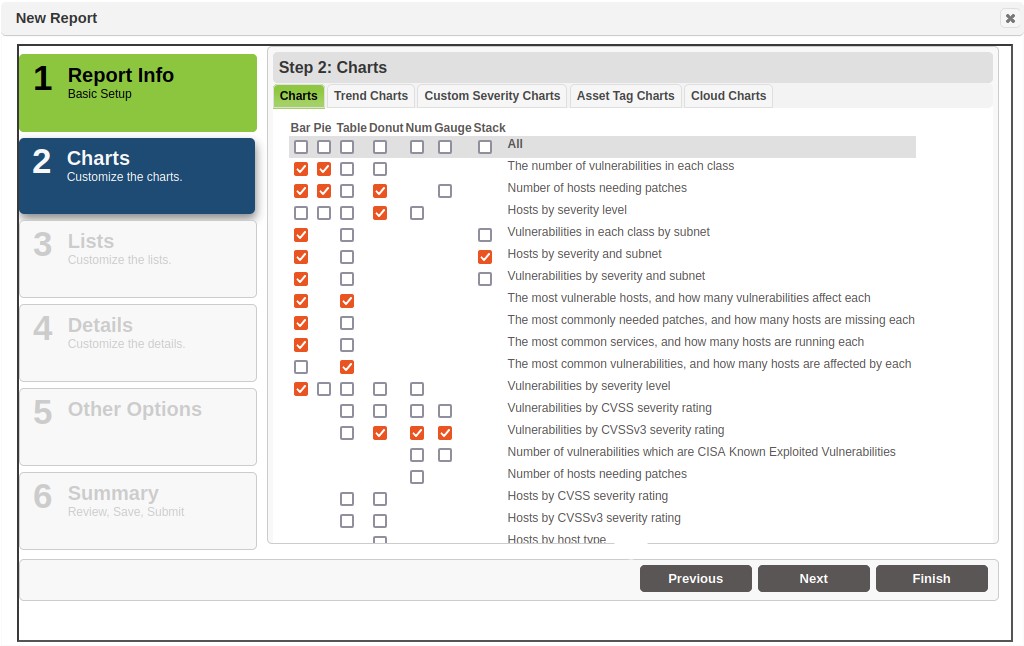
Click on the applicable chart type’s checkbox in the All row to include all charts for this selected type. For example, click the checkbox immediately under the Bar chart type to include all bar charts.
Chart types:
-
The Charts tab provides bar, pie, donut, num, gauge, stack, and table options for visual presentation of scan data at it relates to such high-level rollups as: vulnerability class, severity level, hosts by patch, subnet, and others. These charts aggregate scan results for one or more selected scan results.
-
The Trend Charts option provides pie chart, bar chart, table, donut, num, gauge, and stack checkbox selectors for charting vulnerability trends based on two or more selected data sets.
-
The Asset Tag Charts option provides pie chart, bar chart, table, and donut checkbox selectors for charting host and vulnerability data for the Asset Tags (if applicable) associated with hosts included in the report. When selected, the report will include all applicable asset tags unless specific tags have been excluded in Step 5 Other Options - Advanced Options – Asset Tag Options.
-
The Custom Severity Charts option provides the capability to compute vulnerability results based on severity codes created in the Custom Severity page under the Analyze tab.
-
The Cloud Charts tab provides bar, table, and stack options.
These report chart options provide the capability to add bar charts, pie charts and tables to the defined report, based on any previously assigned custom severities codes.
Click on an unchecked box to add a check for the applicable chart type.
Click on a pre-existing check to uncheck the box and exclude the applicable chart type.
Once you’ve made all chart selections, choose Next to continue to the Lists options. Or select Finish if you are ready to complete the report process; choose to create a custom report type based on your customization; or choose not to save your customization for later use but Finish this process and generate your report.
Step 3 – Lists
Lists are tables which present more specific information on hosts and vulnerabilities. As shown in the sample screen below, the first step is to check the type of lists to be included in the report. The Vulnerability List Columns selection option is also where you will select the Custom Severity column, if you wish to include those assigned custom severity codes to the vulnerability detail records.

The Host List (default list type) includes information about a scanned host target, such as IP address, MAC address, Host Name, Operating System, etc. If checked, you will then use the Host List Columns selector to identify the fields and column order for host information to be included in your report.
Selecting the checkbox for the Vulnerability Summary includes a section with the total number of hosts affected by each vulnerability.
The Vulnerability List information (default list type) includes information about the vulnerabilities, such as CVE, CVSS, severity, description, etc. If checked, you will then use the Vulnerability List Columns selector to identify the fields and column order for vulnerability information to be included in your report.
Once you’ve made all List selections, choose Next to continue to the Details options. Or, select Finish if you are ready to complete the report process; chose to create a custom report type based on your customization; or chose not save your customization for later use but Finish this process and generate your report.
Step 4 – Details
Details, the most in-depth part of the report, contains text from SAINT's tutorials. This is where you choose exactly what parts will and will not be included in the report, and options which affect the way the information is presented.
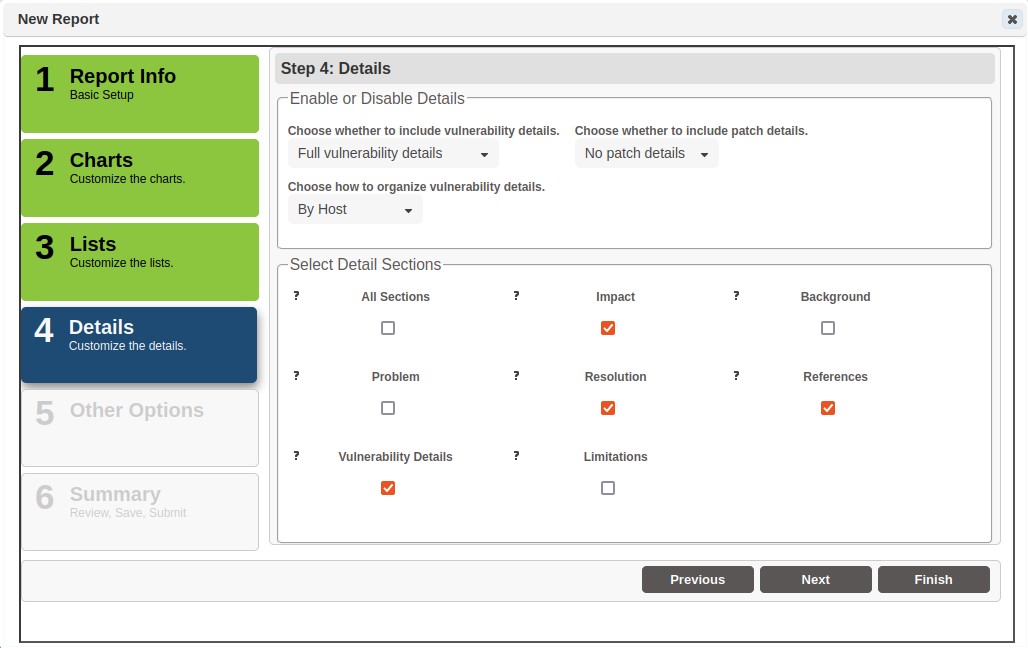
Choose whether to include vulnerability details. This can be full details, links from the vulnerability list, or no vulnerability details in the report.
Organize the details by host or vulnerability.
Select which details sections to include:
-
All Sections – one click selection to include all tutorial content
-
Impact – what the vulnerability could allow an attacker to do
-
Background – information about the affected products, services or configuration modes
-
Problem – details about cause, impact, and attack vectors of the vulnerability
-
Resolutions – information related to fixing or remediating the vulnerability
-
References – links to additional information about the vulnerability
-
Vulnerability Details – Data sent and received or other evidence supporting the detection of the vulnerability
-
Limitations – (Exploit only) information about the reliability, supported platforms for pre-requisites for the exploit
Once you’ve made all Details selections, choose Next to continue to Other Options. Or select Finish if you are ready to complete the report process; choose to create a custom report type based on your customization; or choose not to save your customization for later use but finish this process and generate your report.
Step 5 – Other Options
This section of the report wizard allows you to create a custom introductory paragraph, add additional details about the services, and other non-vulnerability information such as users, shares, and web directories.
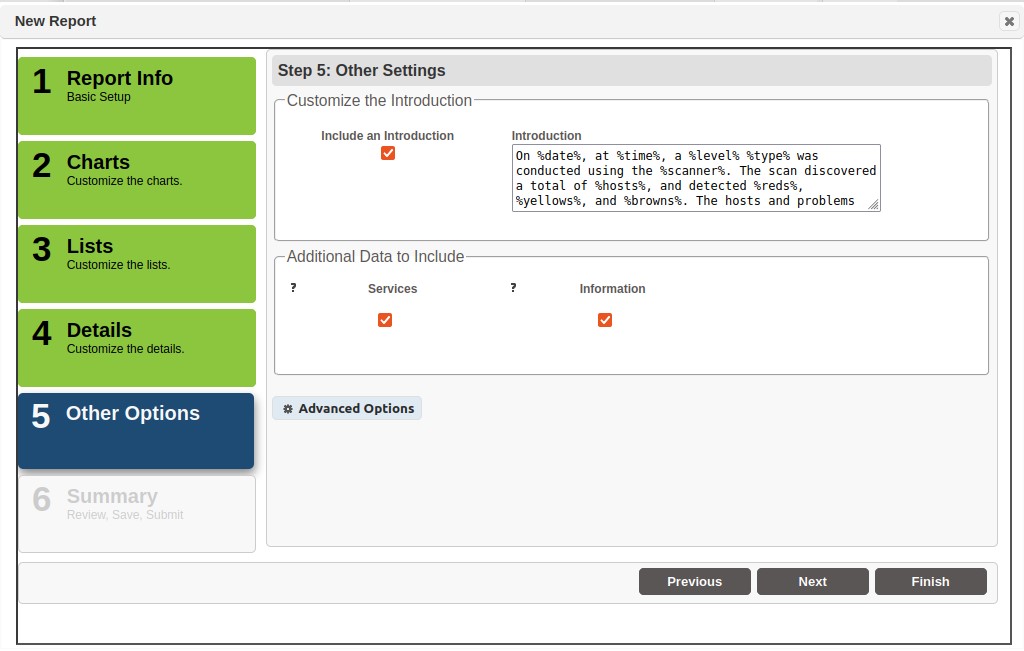
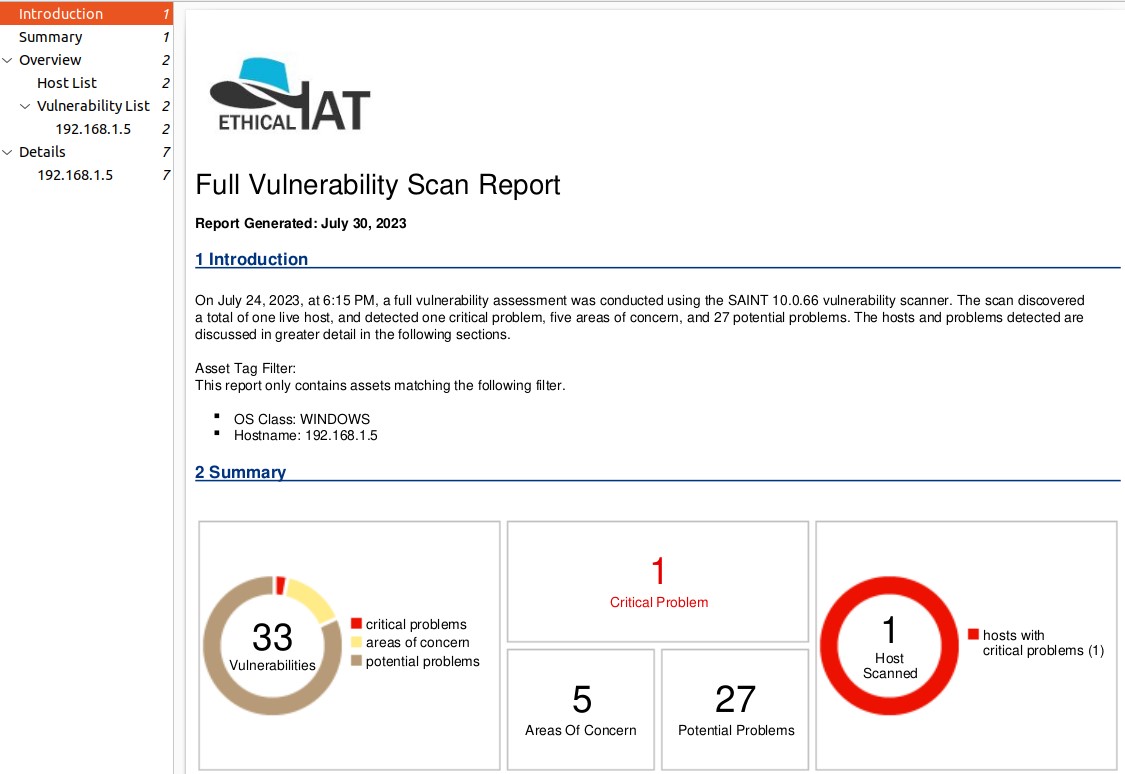
The Include an Introduction option is checked by default, and includes a boilerplate introduction paragraph that describes the type of report, the type of scan, and summary information about the results returned by the scan. Click in the Introductions text area to edit the content. Note that SAINT provides a number of variables that begin and end with the % sign to retrieve and populate the text with the applicable value from the selected scan job.
-
Current date – %date%,
-
Current time – %time%,
-
Scan Level value – %level%
-
Scan Policy – %type%
-
SAINT scanner – %scanner%
-
Number of hosts found during the scan – %hosts%
-
Total number of vulnerabilities classified by SAINT as “critical” – %reds%
-
Total number of vulnerabilities classified by SAINT as “areas of concern” – %yellows%
-
Total number of vulnerabilities classified by SAINT as “potential problem” – %browns%
-
Total number of vulnerabilities classified by custom severity level – %customseverity%
Additional Data to Include
Services – check this box to include the UDP and TCP services running on the host
Information – check this box to include non-vulnerability information found during the scan, such as users, shares, and web directories.
Advanced Options
This section also includes a separate option for configuring advanced report options available in the report engine, including over 300 configuration settings related to chart titles, exploit result filtering, header details, host details, severity code cross-referencing, font sizes and styles, sort options, technical detail and trend settings, vulnerability details, and XML options and tag naming.
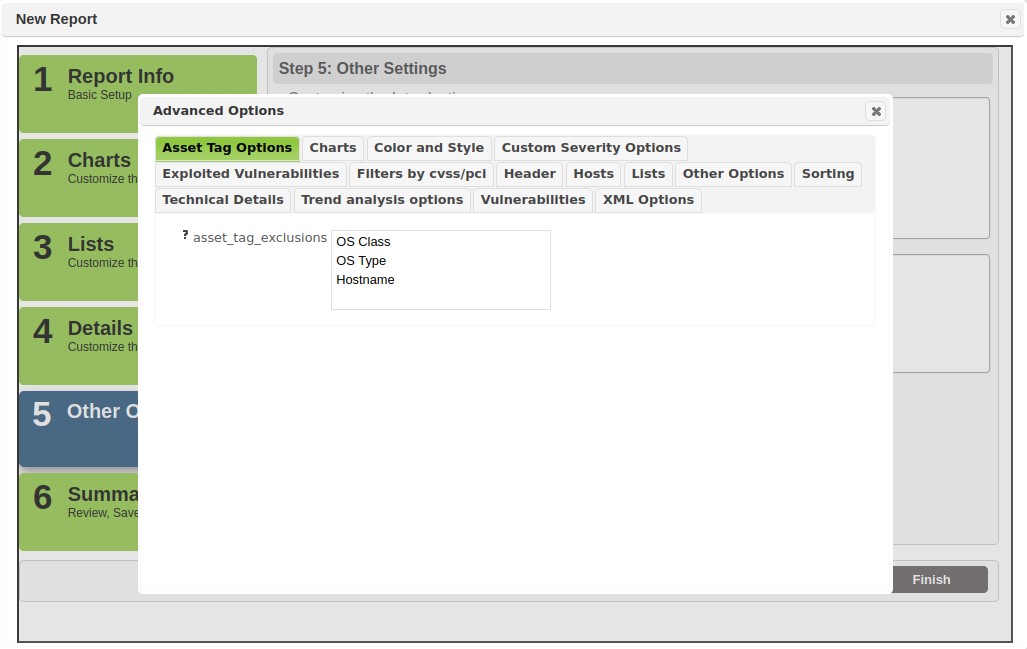
The following are some highlights of advanced configuration options you may find useful:
-
Adding your own image or logo to custom reports
-
-
Scroll down to the "Header" section of Advanced Options.
-
Select Yes in the logo pull down menu.
-
Enter the path of the image you wish to use in the Logo Path field.
-
-
Include Hosts with no Vulnerabilities
-
-
Scroll down to the "Technical Details" section of Advanced Options.
-
Select Yes in the Empty Hosts Detail pull down menu.
-
-
Custom Severity Options
-
-
Scroll down to the "Custom Severity Options" section of Advanced Options.
-
Select the applicable Custom Severity Set to be included in the report.
-
For “custom_severity_no_saint_severity_output – choose “Yes” if you only want to use the custom severity; choose “No” if you want to include both types of severity codes.
-
Check or un-check the custom severity codes you want to include or exclude. The default is the include (check) all severity codes for the selected Custom Severity Set.
-
-
Include IAVA code in report
-
-
Scroll down to the "Lists" section of Advanced Options.
-
Select Yes in the IAVA pull down menu.
-
-
Create custom XML tags of XML output
-
-
Scroll down to the "XML Options" section of Advanced Options.
-
Edit the applicable tag names in the editable form fields.
-
-
Data Set Aggregation
-
-
Scroll down to the Trend Analysis Options section of Advanced Options.
-
Change dataset_aggregate to monthly, quarterly, or yearly.
-
For the purposes of trend analysis, all scans from the same month, quarter, or year will be merged. This is useful if you have multiple recurring scans that need to be analyzed together.
-
Once you’ve made all selections under the Other Options and Advanced Options, choose Next or Finish to validate your settings and run the report.
Step 6 – Summary
This step provides a summary of the report settings, as well as a field to enter a Custom Report Type name if you wish to save any customization as a new report type for later use.
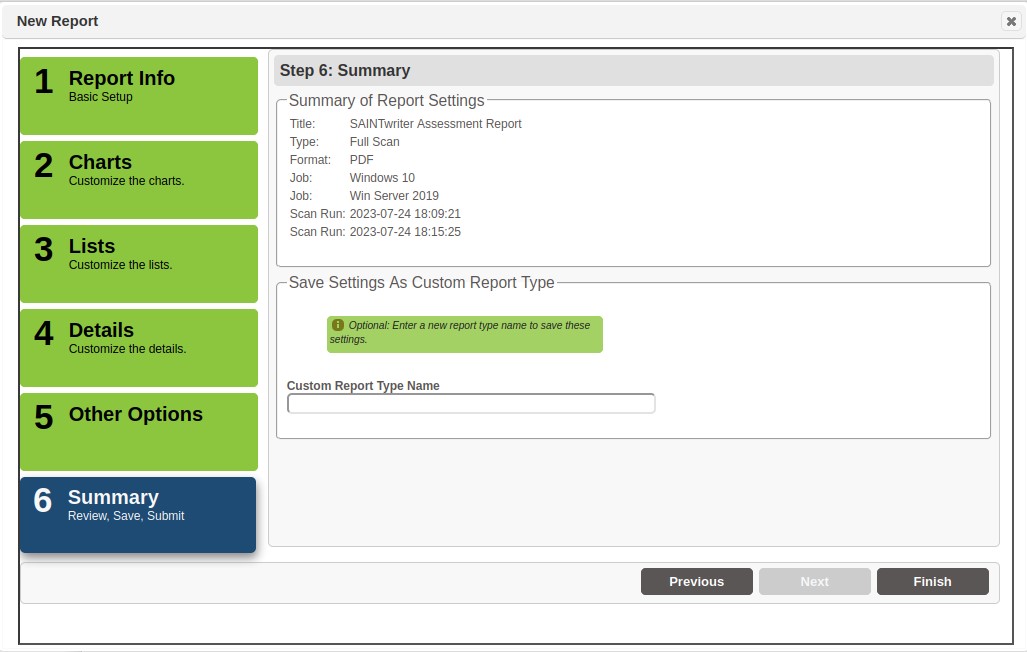
If all settings are OK, select Finish to generate your report.
Create PCI Compliance Reports
SAINT provides a pre-configured PCI External Scan policy that adheres to the ASV Program Guide as it relates to assessing Internet-facing hosts based on external, unauthenticated scanning. SAINT also provides pre-configured report types (templates) that support the generation of a complete PCI ASV compliance report package. Each report type is defined below:
-
Attestation of Scan Compliance – This is the overall summary that shows whether the scan customer’s infrastructure received a passing scan and met the scan validation requirement. (If Attestation of Scan Compliance is enabled in your license, then the Attestation of Scan Compliance can only be generated from the PCI Attestations page, not from the Reports page. See PCI Attestations.)
-
ASV Scan Report Executive Summary – This lists vulnerabilities by components (IP address) and shows whether each IP address scanned received a passing score and met the scan validation requirement. This section shows all vulnerabilities noted for a given IP address, with one line per vulnerability noted. For example, an IP address will show one line when only one vulnerability is noted, but will have five lines if five vulnerabilities are noted, etc.
-
ASV Scan Report Vulnerability Details – This is the overall summary of vulnerabilities that shows compliance status (pass/fail) and details for all vulnerabilities detected. This section of the report is in vulnerability order, showing each affected IP address as a separate line item for a given vulnerability. Whether or not a vulnerability is PCI ASV Program Guide compliant based on a number of criteria, including CVSS base score, severity level, and the type of vulnerability.
Perform the following steps to generate the applicable PCI ASV reports once a scan result has been selected, based on the PCI scan policy. The basic steps are the same for all reports. However, some report features may be disabled based on PCI ASV Program Guide requirements or additional report options may be displayed to support requirements unique to the applicable report type.
Attestation of Scan Compliance report
Step 1 – Report Information
-
Select Compliance – PCI ASV Attestation report type
-
Accept the default report name for modify as text as needed
-
Select your report output format (e.g., PDF)
-
Select Next
Step 2 – Charts
All chart options have been pre-configured based on PCI ASV requirements. There are no chart selections for PCI ASV reports. This step can be skipped when creating this type of report.
Step 3 – Lists
The lists step provides the capability to support the special notes requirement in the final reports. This content is specific to the Executive Report. However, the reports wizard provides access to this capability during the creation of any of the PCI report types. Special notes are automatically created based on the scan data as specified in the PCI ASV Program Guide. The scan customer is required to provide a declaration for each special note. Select the Special Notes button to view any special notes applicable to the scan and add the required declarations for the selected scan results.
Step 4 – Details
All chart options have been pre-configured based on PCI requirements. The detail selections for PCI reports cannot be changed. This step can be skipped when creating this type of report.
Step 5 – Other Options
Attestation Reports require point of contact information for both the customer being assessed and the ASV providing the assessment and attestation process in accordance with the PCI DSS, and the PCI ASV Program Guide.
ASV and Customer Identification
If this information has been created previously through the PCI Identity task in the reports screen, the identity name will be available as an option in the applicable drop down menu for selection. If the identity information has not been created prior to building the report, you can select the New Identity option for the ASV or customer and create the identification information as you create the new report.
ASV Certification Number
The last step in completing the identification information for the attestation report is to enter the ASV Certification Number issued by the PCI SSC.
Please note that this number is not SAINT Corporation’s ASV Certificate Number unless SAINT Corporation is the ASV under contract to provide this service. This attestation for credential is not implied simply as a result of using SAINT’s software or PCI-related scanning and reporting tools.
Select Next to review and validate the report information.
Step 6 – Summary
Validate the report settings are correct. You can also create a custom scan type (template) from these settings by giving this report a Custom Report Type Name.
Select Finish to generate the report and create the custom report type, if applicable.
ASV Scan Report Executive Summary
Step 1 – Report Information
-
Select Compliance – PCI Executive report type
-
Accept the default report name for modify as text as needed
-
Select your report output format (e.g., PDF)
-
Select Next
Step 2 – Charts
All chart options have been pre-configured based on PCI requirements. There are no chart selections for PCI reports. This step can be skipped when creating this type of report.
Step 3 – Lists
This step provides the capability to support the special notes requirement in the final reports. This content is specific to the Executive Report. However, the reports wizard provides access to this capability during the creation of any of the PCI report types. Special notes are automatically created based on the scan data as specified in the PCI ASV Program Guide. The scan customer is required to provide a declaration for each special note. Select the Special Notes button to view any special notes applicable to the scan and add the required declarations for the selected scan results.
Step 4 – Details
All chart options have been pre-configured based on PCI requirements. The detail selections for PCI reports cannot be changed. This step can be skipped when creating this type of report.
Step 5 – Other Options
The PCI ASV Executive Reports require point of contact information for both the customer being assessed and the ASV providing the assessment and attestation process in accordance with the PCI DSS, and the ASV Program Guide.
ASV and Customer Identification
If this information has been created previously through the PCI Identity task in the Reports screen, the identity name will be available as an option in the applicable drop down menu for selection. If the identity information has not been created prior to building the report, you can select the New Identity option for the ASV or customer and create the identification information as you create the new report.
Select Next to review and validate the report information.
Step 6 – Summary
Validate the report settings are correct. You can also create a custom scan type (template) from these settings by giving this report a Custom Report Type Name.
Select Finish to generate the report and create the custom report type, if applicable.
ASV Scan Report Vulnerability Details
Step 1 – Report Information
-
Select Compliance – PCI Detail report type
-
Accept the default report name for modify as text as needed
-
Select your report output format (e.g., PDF)
-
Select Next
Step 2 – Charts
All chart options have been pre-configured based on PCI requirements. There are no chart selections for PCI reports. This step can be skipped when creating this type of report.
Step 3 – Lists
This step provides the capability to support the special notes requirement in the final reports. This content is specific to the Executive Report. However, the reports wizard provides access to this capability during the creation of any of the PCI report types. Special notes are automatically created based on the scan data as specified in the PCI ASV Program Guide. The scan customer is required to provide a declaration for each special note. Select the Special Notes button to view any special notes applicable to the scan and add the required declarations for the selected scan results.
Step 4 – Details
All chart options have been pre-configured based on PCI requirements. The detail selections for PCI reports cannot be changed. This step can be skipped when creating this type of report.
Step 5 – Other Options
The PCI Executive Reports require point of contact information for both the customer being assessed and the ASV providing the assessment and attestation process in accordance with the PCI DSS, and the ASV Program Guide.
ASV and Customer Identification
If this information has been created previously through the PCI Identity task in the Reports screen, the identity name will be available as an option in the applicable drop down menu for selection. If the identity information has not been created prior to building the report, you can select the New Identity option for the ASV or Customer and create the identification information as you create the new report.
Select Next to review and validate the report information.
Step 6 – Summary
Validate the report settings are correct. You can also create a custom scan type (template) from these settings by giving this report a Custom Report Type Name.
Select Finish to generate the report and create the custom report type, if applicable.
PCI Attestations
Note: This page is only available to users with Attestation of Scan Compliance in their license.
After an Attestation of Scan Compliance has been requested (see Request Attestation of Scan Compliance), it will appear on the PCI Attestations page. This page is accessible either under the Report tab on the main menu bar, or by clicking on the link in the e-mail notification that is generated when the request is submitted. Use the drop-down menu at the top of the Status column to choose either open attestation requests, approved attestations, or denied attestations, as shown below.

Approve or Deny Attestation Request
The user who approves or denies the attestation request must have both View Results permission on the scan job, and Issue AoSC permission globally. (See Access Controls and Assign Permissions to Users). To approve or deny an attestation request, use the following steps:
-
View the attestation request details – Click on the Details button (“i” icon). This brings up a dialog with two tabs as shown:
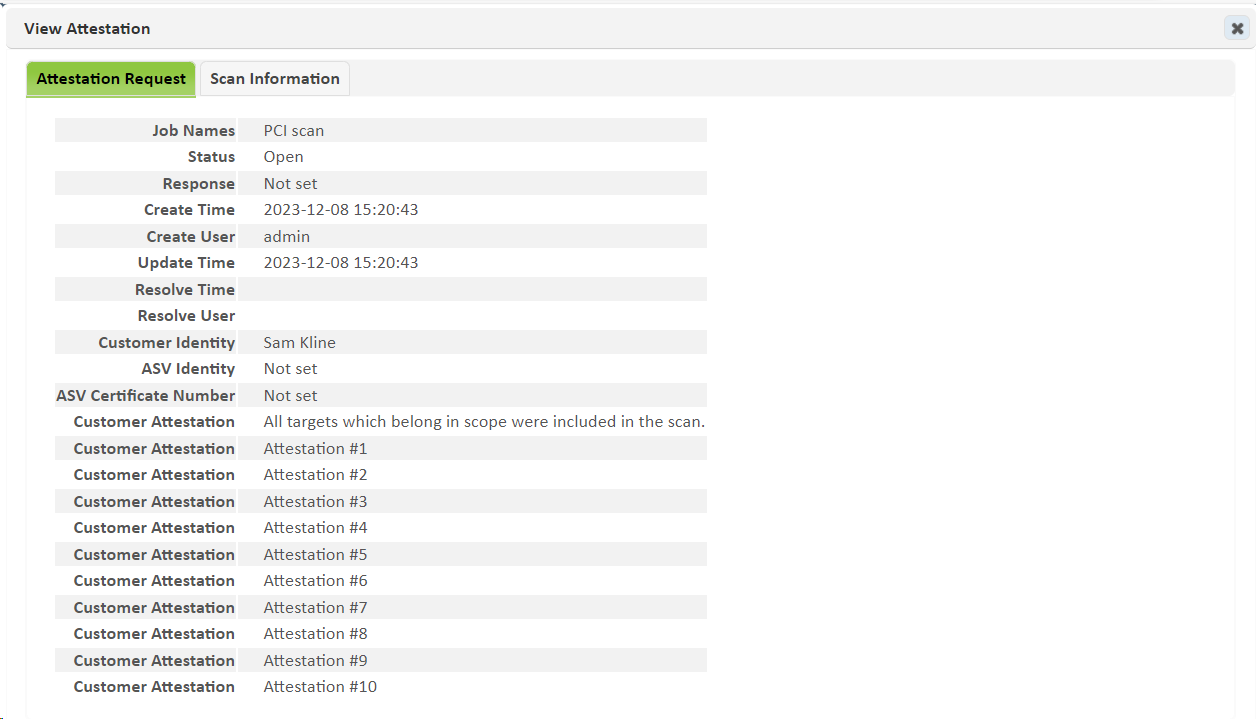
The first tab, Attestation Request, displays information about the attestation request itself, such as the date and time of the request, the user who requested it, and which attestation boxes were checked when the request was submitted. The second tab, Scan Information, shows information about the scan(s) for which the attestation is being requested, such as the scan time and execution history. (If the request includes multiple scans, a pager bar will appear to page through the scan information.) Expand the Execution History section to see the log files for the scan. -
View the PCI reports – Click on the PCI Reports button (document icon). This opens a pop-up menu allowing you to view either the ASV Executive Summary or ASV Detail report. (The Attestation of Scan Compliance is available here only after the attestation request has been approved.)
-
Approve or deny the request – If the scan(s) and corresponding reports meet the requirements outlined in the ASV Program Guide, click on the Approve button (checkmark icon) to approve the attestation request. The first time you approve a request, the following dialog appears:
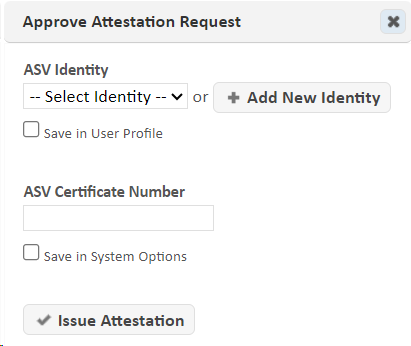
If the above dialog appears:-
Click on Add New Identity or choose an existing identity from the drop-down menu. This specifies the information that goes into the Approved Scanning Vendor Information section of the Attestation of Scan Compliance.
-
Enter the ASV certificate number. (This is an eight-digit number issued by the PCI Security Standards Council.)
-
Optionally, check the Save checkboxes. If you check these boxes, the above dialog won’t reappear, and future requests will be immediately approved when you click on the Approve button.
-
Click on the Issue Attestation button.
-
Approving the request will change the request’s status, add the Attestation of Scan Compliance to the available reports (as well as a zip file with all three reports, and a feedback form), and send an e-mail notification to the requester with a link to the reports.
OR
If the scan(s) and reports do not meet the requirements outlined in the ASV Program Guide, click on the Deny button (X icon) and enter a reason for the denial. This reason will be included in an e-mail notification to the requester, as well as the request’s log.
Delete Attestation Request
To delete an attestation request, go to the Report -> PCI Attestations page, and click on the Delete button (trash can icon) beside the attestation request. To delete multiple requests at once, check the boxes beside the requests, and choose Delete Attestations from the Grid Actions menu.
Attestation Request Log
To view the log for the attestation request, go to the Report -> PCI Attestations page, and click on the Log button (notebook icon) beside the desired attestation request. The log indicates when the request was created, approved, or denied and the reason for the denial.
Bulk Approvals and Denials
To approve or deny multiple attestations at once, go to the Report -> PCI Attestations page, check the boxes beside the desired requests, and choose Approve Attestations or Deny Attestations from the Grid Actions menu.
Create Other Compliance Reports
SAINT provides a number of additional pre-configured scan policies and report types specific to risk management and vulnerability assessment security controls for industry compliance standards such as HIPAA, FISMA, NERC CIP, SOX, and DoD’s IAVA reporting requirements.
Creating compliance reports for non-PCI compliance requirements can be as simple as setting up the scan job, selecting the correct scan “policy” and choosing the applicable report type when the scan is complete. For example, run an vulnerability assessment using the SOX scan policy and then use the pre-configured SOX report template to show the scan results as well as the compliance and security control references that are supported by executing your local risk and vulnerability management scanning program. The reporting logic for these report types has been pre-configured to produce vulnerability scan results based on the associated Scan Policy provided in Step 3 of the Scan Job creation wizard, and provide a boilerplate heading that describes the purpose of the compliance report and shows the mapping to security controls for the applicable industry standards.
Report customization features also allow you to use the default report type as your template and then make modification. For example:
-
Customize the Introduction boilerplate text (Step 5 – Other Options) to support local reporting requirements
-
Add your company logo or custom image to the report as part of Step 5’s Advanced Options – Header section.
-
Save your customizations in Step 6 as a custom report type.
Create the Logo or Header image file for use in Custom Reports
All report templates provide a default logo and report header for all report types, using images bundled with the product. However, you can use your own images to customize the presentation of your reports, following some basic steps. There are two formats to support the two distinct types of output that accept images (HTML and PDF). The following describes the process for creating and using either format as custom images in your reports.
-
First, create an image that is 606 pixels wide by 80 pixels high, in an illustration or image editing program such as Adobe Illustrator, Photoshop or Microsoft Paint.
-
Next, insert/copy your logo or other applicable picture into the 606x80 px image and any other information or background desired for the header.
-
Follow the steps defined below for the format to be supported:
HTML Reports – Save the file as an image file format recognized by a browser. The most often used, and recommended formats are .jpg format (best for photos or gradients); .gif (best for solid colors and lines); bitmap (highest resolution without compression; or .png (a raster image file that uses lossless compression that provides good image quality for web-based output.
PDF Reports – Either flatten all of the image layers and save as a PDF file OR save as an image file (e.g., jpg, gif, bitmap, etc.) and then re-save that image as a PDF in Adobe Acrobat. -
Place the image file(s) in a directory that can be accessed by your browser or place the image on a shared resource for use by others.
Generate a Report using your Logo/Header
After the logo/header file is created, you are ready to generate your custom report. This is done in one of two ways:
-
In the HEADER section of the report setup process, if you are using the Scan Report Types or the Exploit Report Types from the Report menu.
-
In the Advanced Options (Step 5) if you are using the Report wizard.
The following shows an example report creation process using the Report wizard to create a report using your own logo:
-
Select the Job/Scan results you wish to use in your report.
-
Create a new Report.
-
Complete Steps 1 through 4 in the wizard to define the report and the structure for the report content.
-
Click on Step 5 - Other Options.
-
Click on the Advanced Options button.
-
Click on the Header tab.
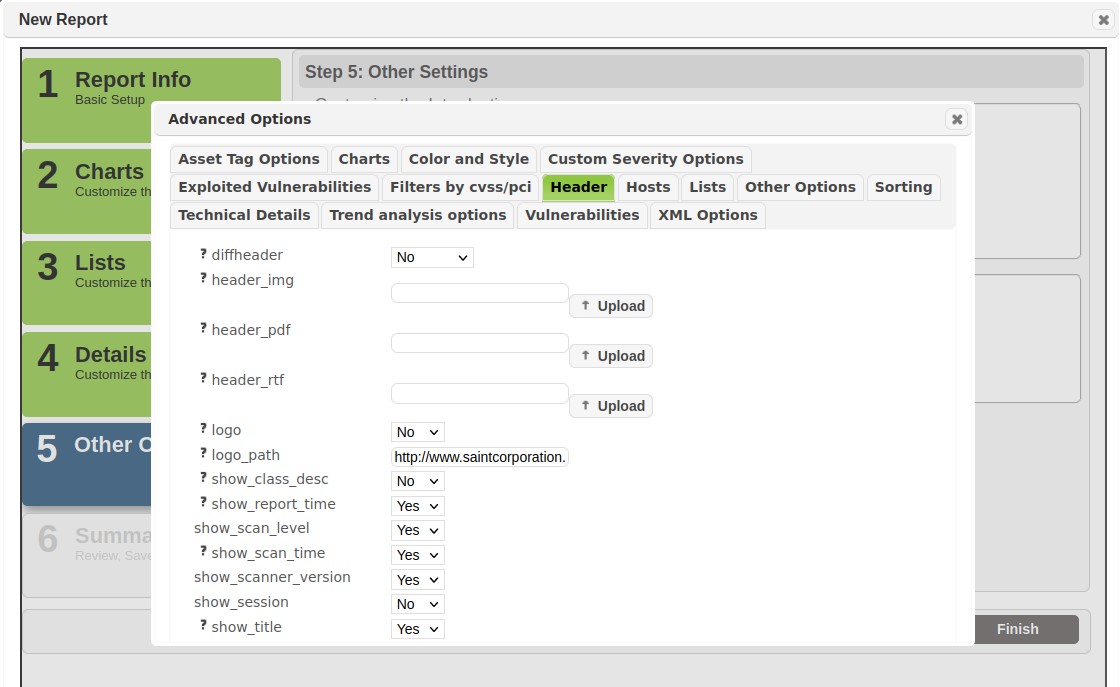
-
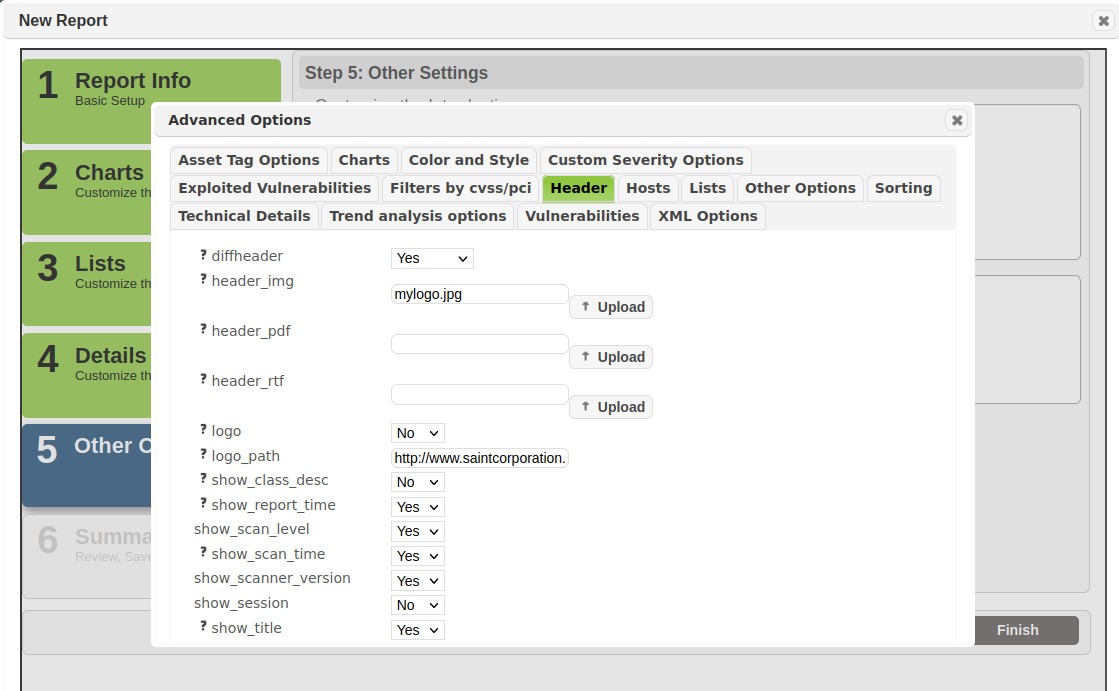
Select YES from the DiffHeader dropdown menu to replace the default image with your custom image.
-
Click the Upload image button for the applicable type of report to be supported:|
• Header image (HTML format)
• PDF image (PDF format) -
Use the Browse… button to locate the 606px by 80px image you wish to use.
-
Click Upload; you will then see a confirmation message that “the selected file has been uploaded.”
-
Close that window to proceed with creating your report. The path and image name should now be visible in the Header section, as shown below:
-
Close the Advanced Options window to continue.
-
Click the Next button to view the summary of your report selections.
-
Click FINISH to generate the report.