Support for Configuration Scanning
NOTE: This capability is licensed as an additional module to the SAINT Security Suite and SAINTCloud® products. Contact your Sales representative for information about adding configuration scanning capabilities to your license.
Summary
The SAINT Security Suite and SAINTCloud provide support for the Security Content Automation Protocol (SCAP) specification as an Authenticated Configuration Scanner (ACS), including the Common Vulnerabilities and Exposures (CVE) option. These SAINT products provide support to the SCAP requirements defined for each of these components, as defined in SP 800-126, Revision 2, the SCAP specification, and verified by compliance testing against the Security Content Automation Protocol (SCAP) Version 1.2 Validation Program Test Requirements (NISTIR 7511, Revision 3), dated January 2013 – including updates as of July 2013. These product capabilities are also backwards compatible with SCAP 1.0/1.1 content.
SAINT provides support for open standards languages, enumerations and metrics that currently include XCCDF, CCE, CPE, CVE, CVSS, AI, ARF and TMSAD of the specification. SAINT also provides support for DISA STIGs, CIS configurations, and the U.S. Government Configuration Baseline (USGCB) by ingesting valid SCAP-expressed data streams and assessing target configurations against these baselines. This capability also includes support for evaluating SCAP content to scan for compliance. SAINT solutions also provide data analysis, links to external authoritative sources of information, policy editing and reporting interfaces to facilitate local policy investigation and analysis. Compliance reporting is provided via pre-defined report templates and custom presentation of output in machine-readable and many human-readable formats, such as HTML, PDF, XML and CSV. Cyberscope report output is also supported using the mandated XML data feed format.
The capabilities provided by this module support platform security configuration assessments, using the Extensible Configuration Checklist Description Format (def: http://scap.nist.gov/specifications/xccdf/)
The basic components of the SCAP module enable you to choose to scan host targets, using SCAP-compliant policies from the Configuration Scanning page under the Scan menu; view detailed results from the pages under the Analyze menu; and view SCAP-compliant output from the Report menu, as well as create more general reports using default report templates.
SCAN Menu — Configuration Scanning
The following shows an example configuration scan page. This page displays all supported XCCDF (configuration) platforms available for use.
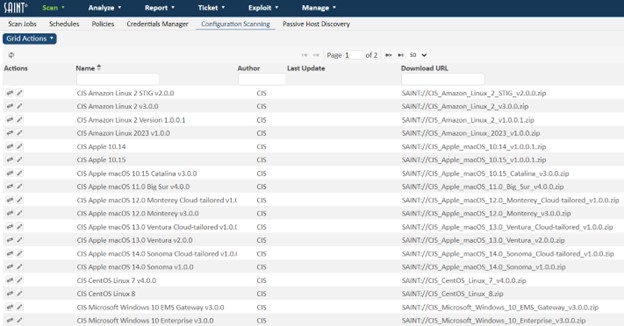
This page provides support for viewing all supported XCCDF configurations; features to import the latest content from the authoritative source or from locally developed content; a policy editor to customize and save policies to support local requirements; and output capabilities to support SCAP and Cyberscope reporting requirements.
Keys to Executing SCAP-related Policies
Scanning hosts for compliance with SCAP-related profiles and policies may require modification of configuration settings, firewall rules or starting required services. Refer to the Target Settings section under Configuration Scanning to learn more and ensure the target network and hosts are properly configured to ensure complete and accurate SCAP assessments.
Running XCCDF Configurations
Importing XCCDF Configuration Profiles
The Configuration Scanning page provides two methods to import configurations that are in XCCDF format and adhere to the SCAP guidelines for running configuration scans.
Method 1 – Import Latest Content from Authoritative Sources
-
From the Configuration Scanning page – Configuration grid, click the Import content (left/right arrow symbol) on the XCCDF configuration you wish to import. This process will retrieve the latest content from the authoritative source and make it available for use.
-
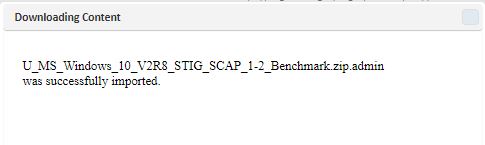
The files will be validated, if necessary, and imported into the repository. Info./Warning/Error messages will appear giving details about the progress and status of the file import.
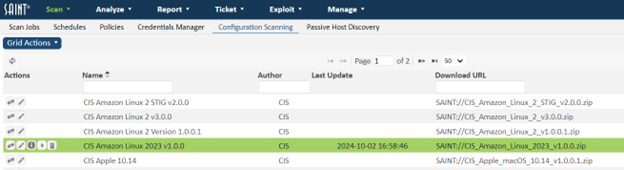
Once the configuration has been downloaded and passed the validation step, the available profile(s) will be available under the configuration. All configurations that contain downloaded profiles will be identified by a right arrow (>) in the left column of the row, as shown below:
-
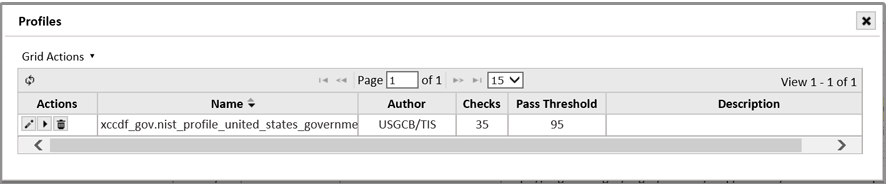
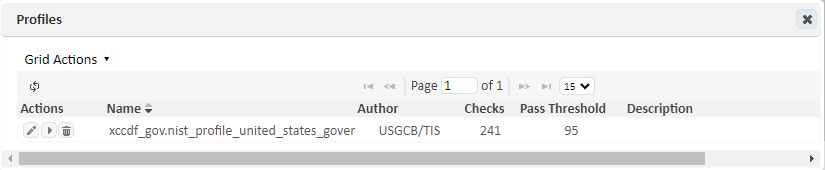
Click the arrow to drill down to view the profiles downloaded from the authoritative source. The following is an example of a profile for the USGCB Windows 7 Firewall configuration, showing there are 35 different checks for this profile:
Method 2 – Upload Content from a Local Drive
You may also manually import configuration content from an external drive by using the Upload Configuration option from the Configuration tab's Grid Actions dropdown. Click this option to open up the upload pop-up and locate the applicable file with the Browse button.
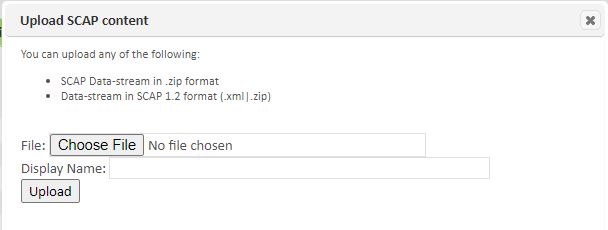
Once you have selected the file, and its path is visible in the File field, click the Upload button to load the Configuration content into the repository. The files will be validated, as necessary. Info./Warning/Error messages will appear giving details about the progress and status of the file import.
The current configuration profile is now available for analysis, executing an assessment in a scan Job or editing to create a custom profile.
Viewing XCCDF Configuration Profiles
-
Ensure that the applicable configuration has been imported.
-
Click on the arrow in the left column for the configuration to show available profiles.
-
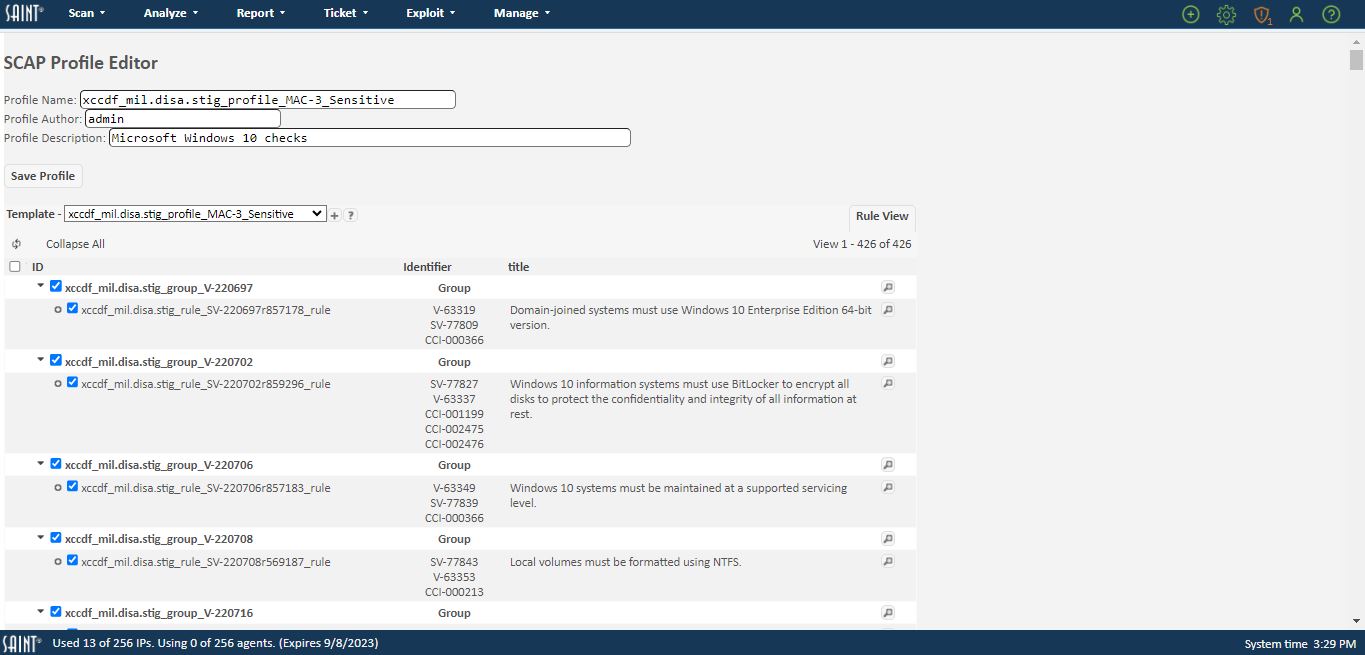
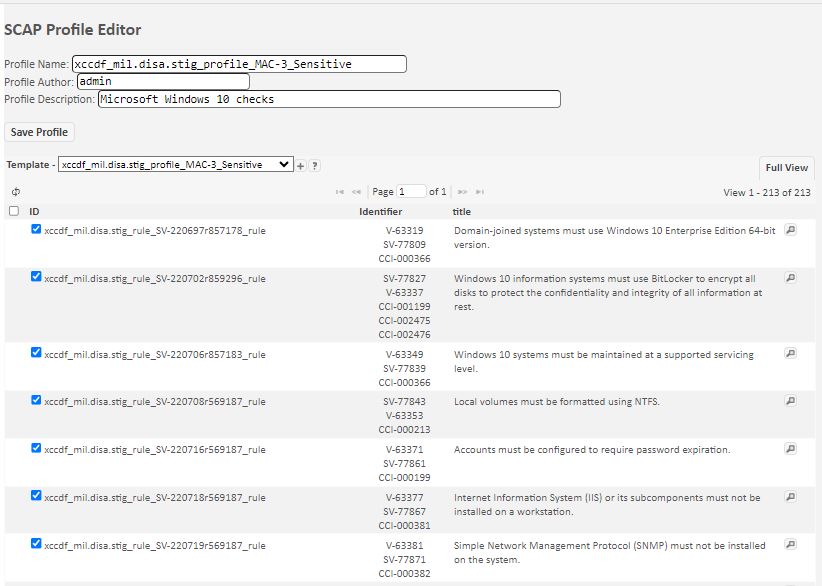
Click on the edit option for the profile (pencil icon) or double click on the profile’s row. This will bring up a grid containing the selected profile. This view is referred to as the “Full View”, and shows specific details about what is being assessed when the profile is run:
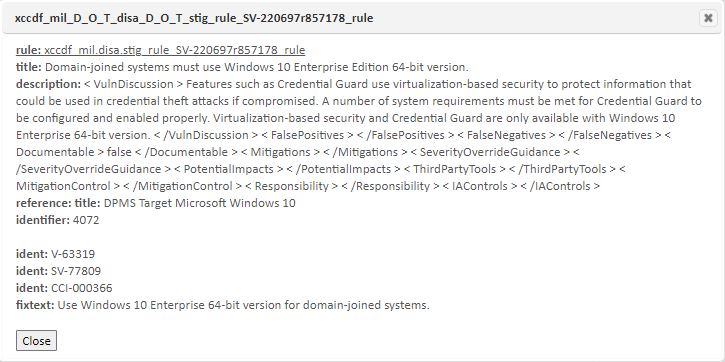
This display enables you to view additional information about groups and rules by double clicking a row or selecting the View option (hour glass) for the row.
Rows that contain editable content will provide an Edit option, as well as display an editable “Value” field in the resulting screen, as shown below:
See the section "Configuration Policy Editor" for more information on how to edit, save and use customized versions of these profiles.
This content can also be displayed by Rule, by clicking the Rule View button in the profile’s grid. The following shows the same profile for the USGCB Windows 7 Firewall configuration as a “Rule View”:
Running XCCDF Configuration Profiles
SCAP data streams that use a CPE-dictionary will scan only targets that meet the criteria of the dictionary (e.g., Windows 7 targets will not be scanned by a configuration designed to scan Windows 2012 R2 systems). A range of targets may be used but only the targets meeting the criteria of the CPE-dictionary will be scanned.
There are two methods for running a scan job using an XCCDF configuration.
Method 1: From the Configuration Scanning page
-
Once you’ve imported the configuration you wish to use, click on the right arrow in the left column to display all profiles.
-
Click the Run (right arrow) icon next to the desired profile. This step will launch the Scan Job wizard, pre-defining the policy based on your selection from the Configuration Scanning page, as shown below:
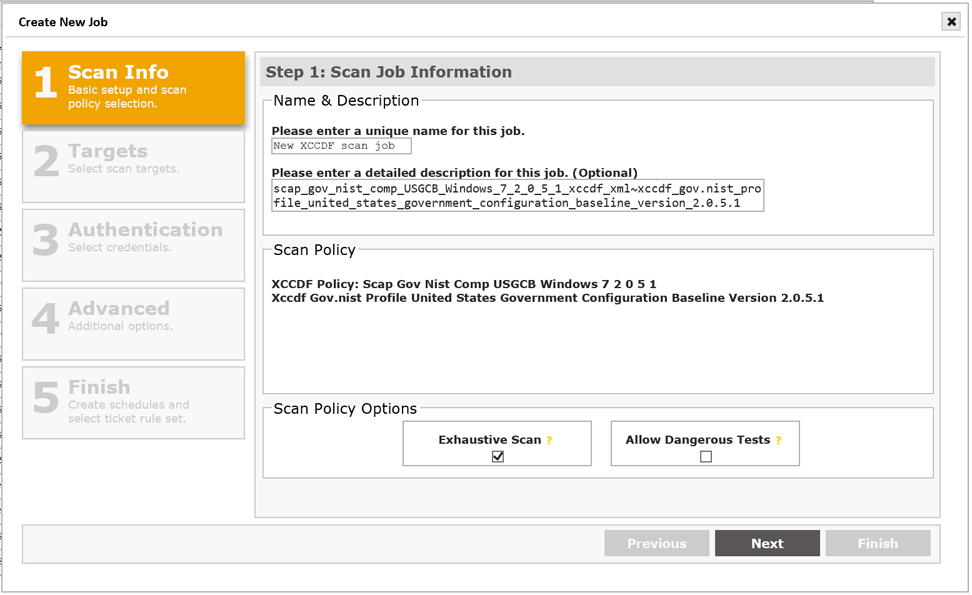
-
Enter a Name and Description for the Job.
-
Click Next.
-
Enter the scan targets in Step 2 of the job wizard.
REMINDER: Target systems must have the following configurations: 1) Remote registry enabled; 2) File and printer sharing enabled; and 3) C$ share must be read/write/executable
See Target Settings for additional instructions. -
Click Next.
-
Enter the credentials for the target platforms. For example, Windows Domain Admin credentials for the Windows 7 Firewalls being scanned in our example. This step is mandatory to accurately assess a host with an XCCDF configuration profile.
-
Click Next.
-
From the Advanced options, define additional scan configuration settings for this scan. The following are some of the most often used for XCCDF profiles.
-
Authentication sub-tab: ensure NTLMv2 is checked if the targets are using NTLMv2
-
SCAP sub-tab: choose whether to run the “dissolvable” Windows SCAP service; edit the XCCDF Header as preferred.
-
-
Click Next
-
Review and verify the summary of the new job, and define the schedule for the job.
-
Click Finish to save the new job and submit it for execution.
The new job will now be present in the Scan status grid under the Scan page:

You can review the running status and progress of a Job at any time by double clicking on the job and reviewing the Scan status page, or individual running scan activity from the Scan grid.
Once the job is complete, this status will be updated and the results available for analysis.
Method 2: From the Job Wizard
-
Click on the global Create - "plus" icon option in the upper right corner of the screen.
-
Select the "Job" to launch the Scan Job wizard.
-
Follow the job setup steps for Steps 1 and 2.
-
In Step 1, select the “XCCDF/Configuration” option from the Select Policy Category dropdown
-
Select and appropriate select configuration option from the list.
-
Select an existing XCCDF profile from the Select Policy dropdown
-
Follow the remainder of the job wizard steps in the same manner as defined for Method 1 for initiating scans for a newly imported profile.
-
Review and verify the summary of the new job, and define the schedule for the job.
-
Click Finish to save the new job and submit it for execution.
Specifying Two or More Values per Variable
SCAP specifications require configurations to provide a mechanism for specifying two or more values for a variable used by one OVAL Definition. XCCDF can be used to run a definition multiple times—each time using a different variable set. For example, two rules are defined in an XCCDF configuration, along with four values. In the first rule, values one and two are exported. In the second rule, values three and four are exported.
Viewing XCCDF Scan Results
There are two methods for viewing and analyzing scan results based on XCCDF Configurations:
Method 1 – View XCCDF Results in SCAP-Compliant Format
-
Navigate to the Configuration Reports page under the Reports Menu.
-
Click on the Select Data Set option under the Data Filter Option dropdown to view the current list of scan Jobs and scan results (scans).
-
Select a scan based on an XCCDF profile.
-
Click on the Configuration Reports tab to view the list of targets assessed for the profile.

-
Click on the View Reports ("i" icon) option to view the current list of SCAP-complaint reports.
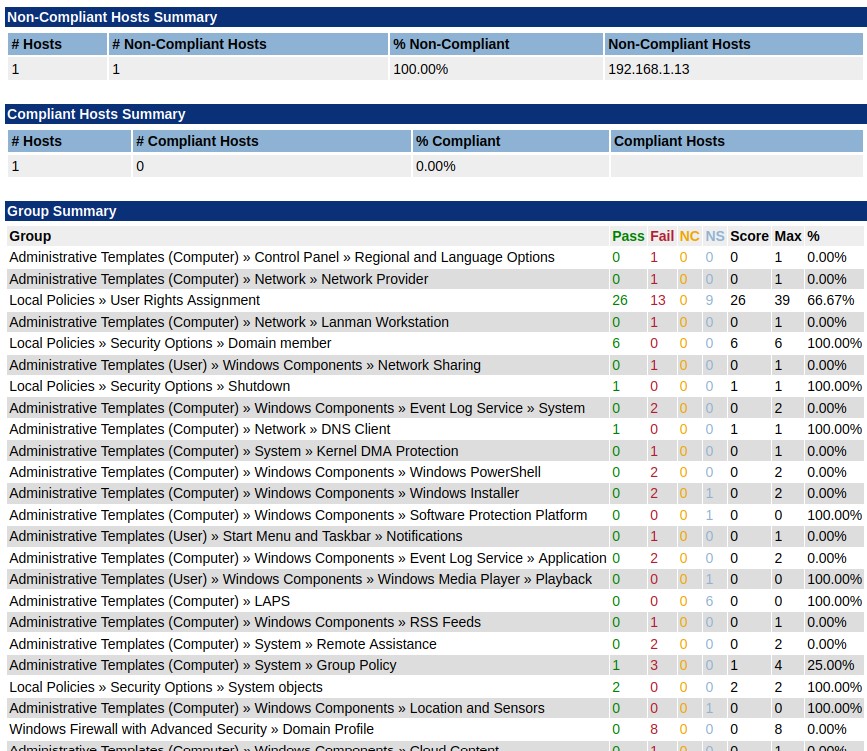
For example, the following shows a portion of the XCCDF Scan Results report to highlight Pass/Fail results for various policy groups:

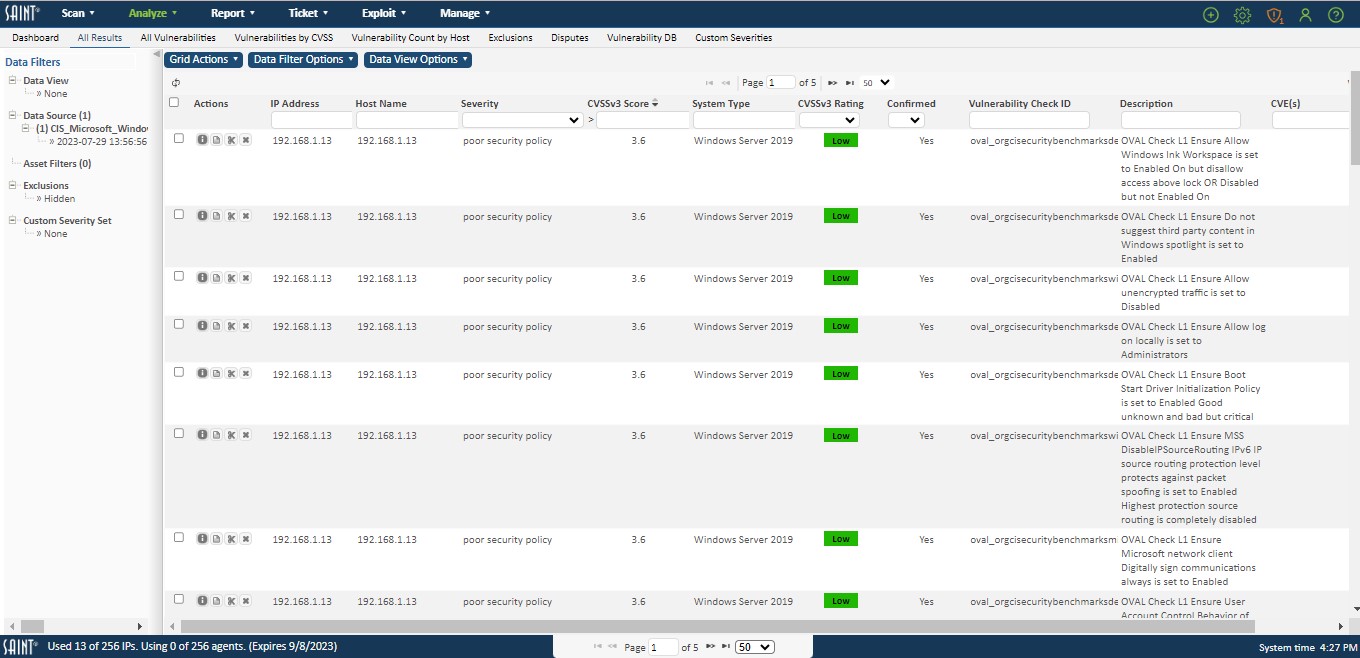
Method 2 – Dashboard, Analyze, and Report Tabs
The Dashboard, Analyze, and Report capabilities can be used to investigate and analyze XCCDF content in the same manner as vulnerability scanning, analysis, and reporting capabilities.

Exporting XCCDF Results
Once an XCCDF configuration assessment has been run, results are available for display and export from the Configuration Reports page. To export XCCDF results:
-
Navigate to the Configuration Reports page.
-
Click on the Configuration Reports tab.
-
If the Target results are not visible in the grid from a prior selection, select a scan based on an XCCDF profile.
-
Once Targets are visible in the data grid, highlight Target(s) to be exported.
-
Click on Download reports (down arrow) in the Action column of the target row.
To extract all applicable scan data, produce an export file and launch a dialog window to view/save the content. -
Click the Save File option.
-
Identify the path to save the export file to.
-
Click OK to save the file.
NOTE: Human readable oval results.xml file can NOT be viewed in Google Chrome after being downloaded, due to a Chrome security restriction on using local transform files. Firefox, Edge or Safari must be used to view the downloaded file.
SCAP Reports – Custom Configuration Report
The custom Configuration Reports grid provides the capability to produce various types of output from XCCDF configuration scans, to Cyberscope reports, multi-target XCCDF summary reports (example shown below).
NOTE: In some cases, hyperlinks to non-SAINT content (such as links to SCAP content on the NIST site) may not work. SAINT maintains hyperlinks to internal content, and links to these other sites, but in some cases, these links have been found to be broken due to incorrect attributes for the URL at the external source. In those instances, the results page will be blank.
The following describes the process for creating an SCAP formatted custom report, using the CyberScope Report output.
CyberScope Report
CyberScope is an application co-developed by the Department of Homeland Security and the Department of Justice to automate and standardize manual and automated inputs of agency data for FISMA compliance reporting for configuration assessments.
Select Scan Data to be Submitted
-
Navigate to the Configuration Reports page under the Reports menu.
-
Click on the Custom Configuration Reports tab to create, view and use reports.
-
Select the XCCDF scans you want to report on to display all Targets scanned and assessed for the selected scans.
-
Click on the Grid Options – Create Reports option from the Custom Configuration Reports tab to begin the process of generating the Report.
Generate the Report
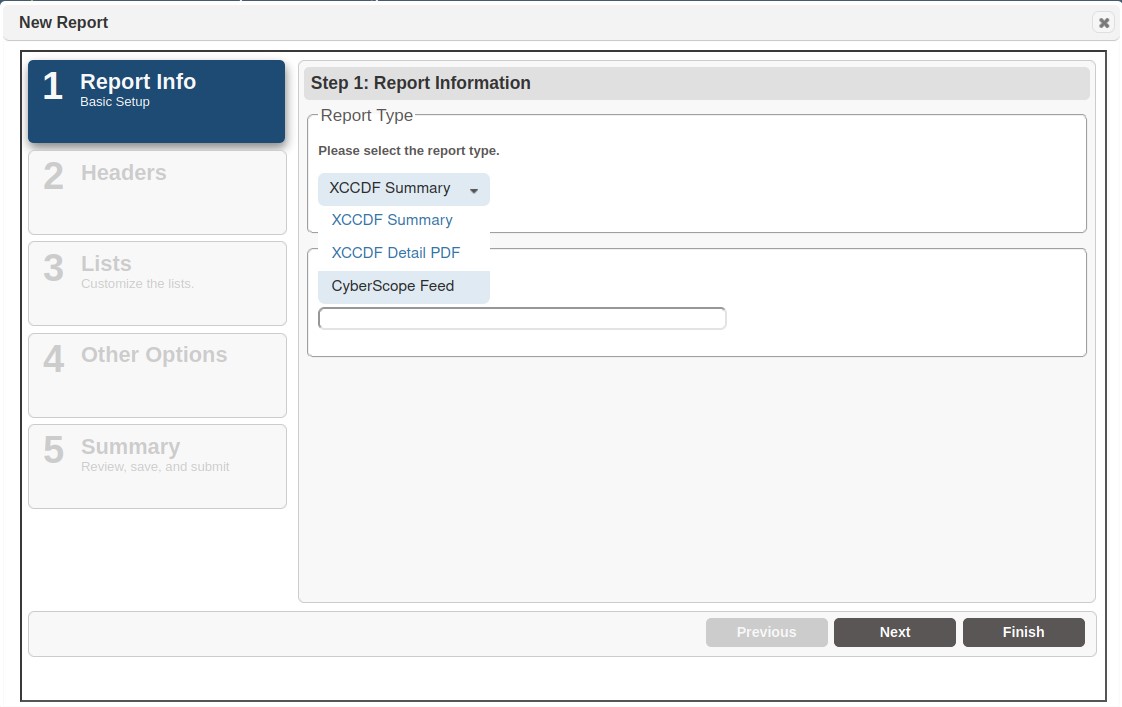
Step 1 – Report Information
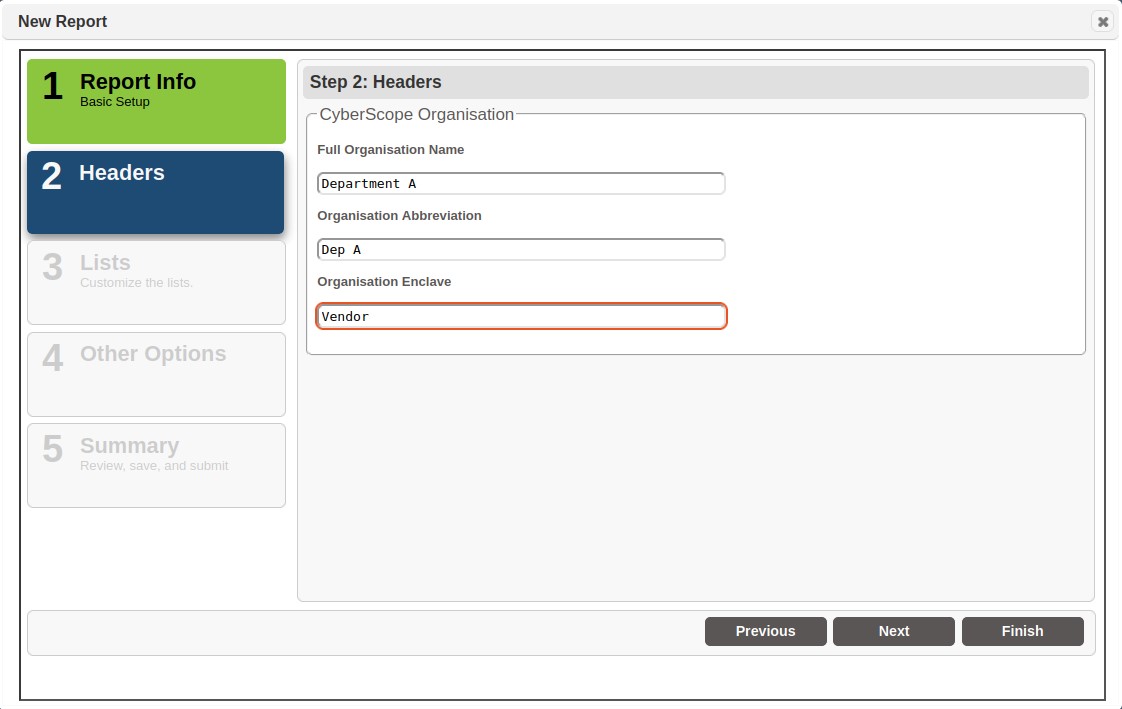
Step 2 – Complete Header Information
The Header step is only relevant to the CyberScope report format. Click Next after completing this content or to progress to the next step.
Step 3 – Configure List Options
Step 3 of the wizard does not apply to this type of report, as there are no editable lists for CyberScope report formats. However, for other types of reports, options can include:
-
Compliant Hosts Summary
-
Non-Compliant Host Summary
-
Group Summary
-
CCEs by Host
-
Hosts by CCE
Click the checkbox for each type of results list to be included in your report.
Click Next to continue.
Step 4 – Apply Exclusions
As with other types of vulnerability output, SAINT analytics and report configurations provide the capability to investigate scan results and identify vulnerabilities that are considered of low priority, potentially false positives or otherwise considered not relevant to including in reports. These types of results are considered “exclusions” and can be identified and flagged in Analyze pages and managed by the Data Filter Options – View/Hide Exclusions option. Step 4 of the SCAP report wizard enables you to set the “Apply Exclusions” flag to ensure those results are not included in the report.
This option is set by default. Uncheck to box to ensure all vulnerability results are included in the report.
Step 5 – Validate Report Details
The last step is to validate the report details, including the scan content being submitted and the Header information to be included in the report. The example shows the summary for the new Cyberscope report.
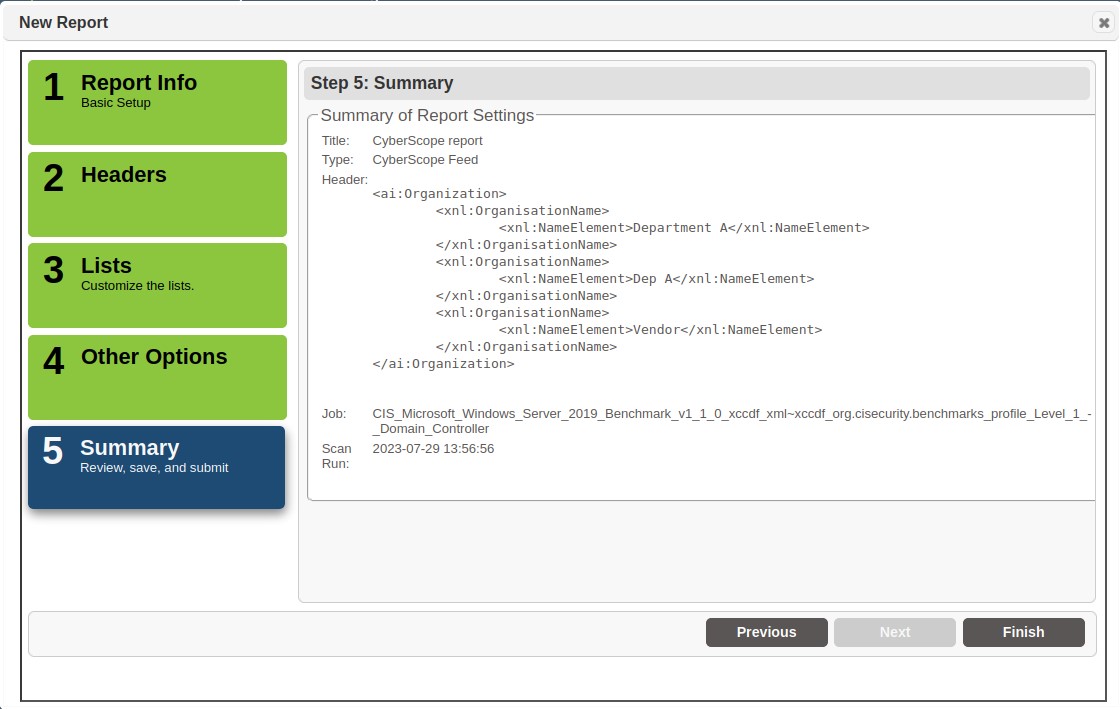
Click the Finish button to generate the report.
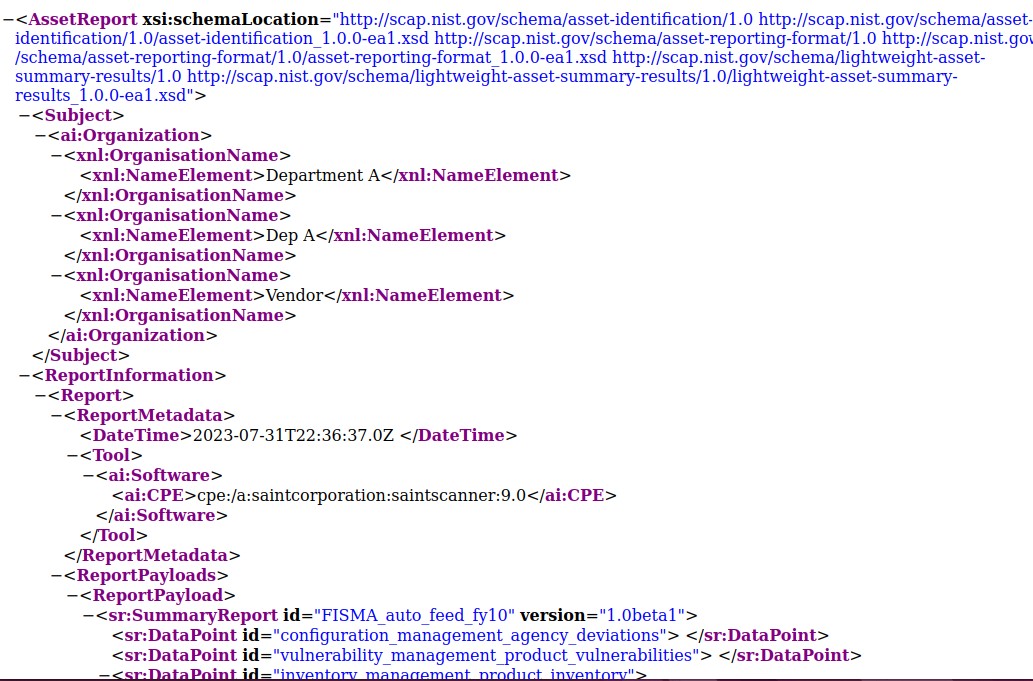
SAINT will generate all required output formats. In the case of Cyberscope, this will also include all XML-formatted products required for the Cyberscope Feed. A snapshot of the example output is shown below:
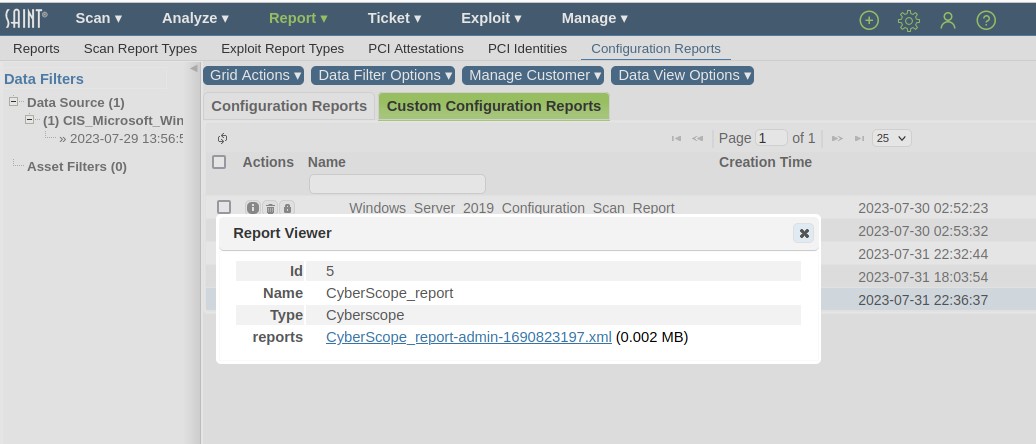
The new report will also be displayed in the Custom Configuration Reports tab.
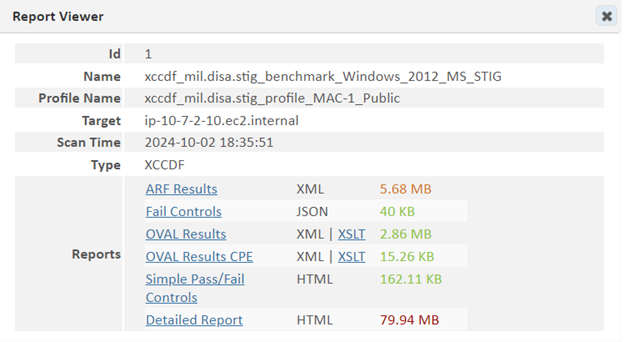
Click on the Report Viewer (magnifying glass) to view the high level details about the report and click on the XML-based reports hyperlink to view the content or save it externally for submission or off-line storage.
Configuration Policy Editor
The Policy Editor provides the capability to edit many of the configuration settings found in Configuration to support creating custom configuration policies. The process for editing, storing and using custom configuration policies is described below.
Creating a Custom Configuration
-
First, ensure you have downloaded a current version (Import or Update content options) using the steps defined in the Importing XCCDF Configuration Profiles section.
-
Click the down arrow option in the left column of the configuration platform you wish to edit. The grid will expand to show all of the available configuration Profiles download from the authoritative source.
-
Launch the policy editor by clicking on the Edit (pencil) option next to the profile you want to use as a template. This step will open the editor and display a blank Title and Description field to describe the custom profile.
The following is a snapshot of a portion of a Windows 7 profile displayed in the editor using the grid's Rule View:
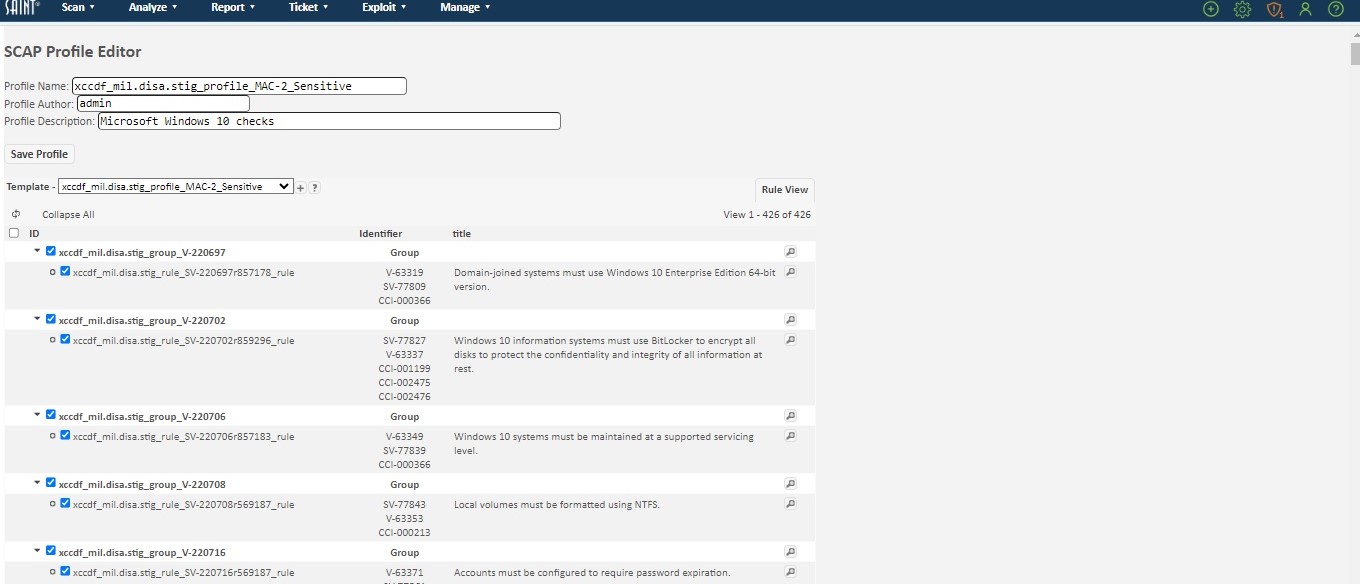
The grid will display a list of all content, both editable and read-only. The policy is broken down into a set of groups and rules. The editor allows you to view detailed descriptions of each group and rule contained in the policy, enable and disable checks (rules), and modify values associated with certain rules. Content that cannot be customized will provide the capability read the details about the configuration item, using the View option. Configurations that can be edited will expose the Edit (pencil) option for the row, as shown below in the highlighted row:

-
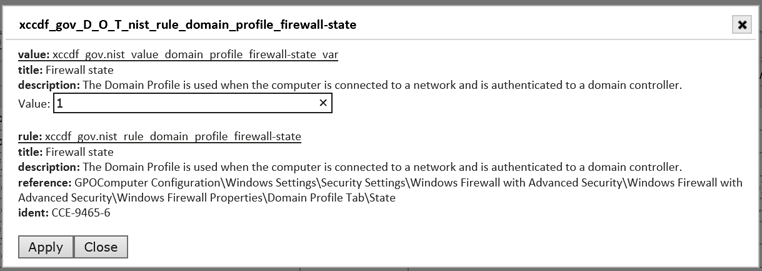
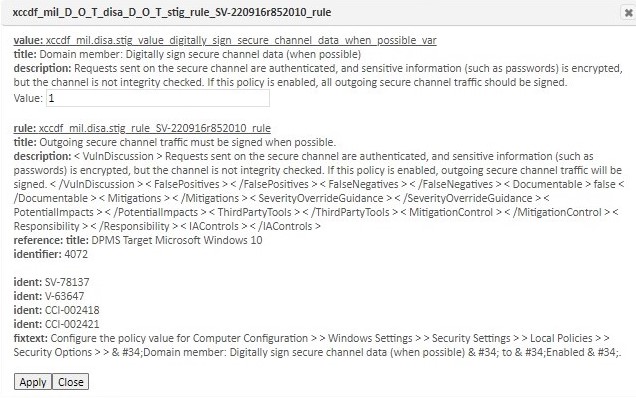
To launch the edit dialog for a Configuration setting, double click or click on the Edit option for the applicable setting.
The following shows the edit dialog for the “Digitally sign secure data” configuration setting.
-
Click in the value field and change the setting to meet your specific requirements.
-
Click Apply to save the setting. A confirmation message will be displayed that the value is applied for this setting. Note, however, that this change will not be final until you save the complete profile.
-
Close the dialog box to return to the Editor page.
-
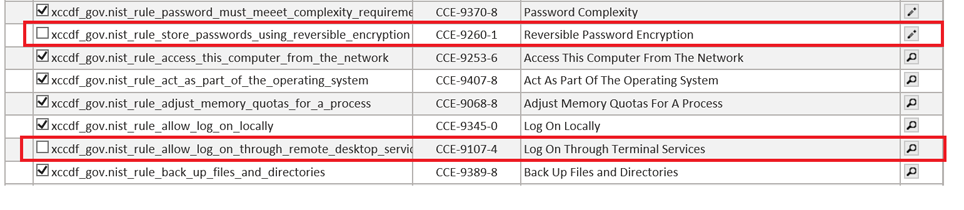
As a convenience, the policy editor also allows you to edit all values at once or in a particular set of groups or rules by using the checkboxes found on the left side of the page. For example, in the following screen shot, we have disabled both “Reverse Password Encryption" and "Log On Through Terminal Services" Rules. This level of customization can be done at the individual configuration level or as a Group by unchecking the checkbox at the Group level.
-
Follow steps 4-8 for other configuration settings until you have completed your work for the new profile.
-
Once you are done, scroll to the bottom of the profile’s grid and click the Save option and refresh the page to show that the new Profile has been saved.
Viewing a Custom Configuration
-
Navigate to the Configuration tab in the Configuration Scanning page
-
Click on a Configuration Platform to view the current list of imported profiles and all locally generated custom profiles. The following shows the Windows 7 profiles, including a custom configuration profile described in the previous section:
-
The custom profile can also viewed in detail, as well as edited, by double clicking the profile or clicking the Edit (pencil) option.
-
The Name and Description can also be edited, in line, by clicking in the cell and changing the text string without launching the editor.
Running a Custom Configuration
Custom Configurations can be run in the same manner as imported configurations either by clicking on the “Run” (right arrow) option for a profile, or selecting it directly in the Scan Wizard (Step 1 – Scan Category: XCCDF/Configuration; Scan Policy: [your custom profile]. See the Scan section and Running XCCDF Configuration Profiles section for more details.