Ticket
The ticket module provides the capability to create and track work assignment tickets, based on vulnerabilities found during scans, to support remediation activities. Tickets are created automatically by the system, based on configuration options defined in the Configuration tab’s System Options – Ticket Options. These settings, as well as interaction with the features and functions of the ticketing module are controlled through Group and User permissions for viewing, modifying, assigning, closing and deleting tickets. The following describes the various features and workflow solutions provided in this module.
Ticket Menu
My Open Tickets
This view is the default view when you select the Ticket tab. The contents of the ticket grid displays Open (Status = New or Deferred) tickets assigned to the logged on user. This view is a convenient way to limit your focus to just your active tickets, and perform all the necessary activities for viewing, updating the status, adding comments, viewing tutorial information, etc. as it relates to responding to remediation work assigned to you for the stated vulnerabilities.
As with other grids in the system, actions for viewing and editing content can be accessed from the row-level action buttons, in-line editing for select values, or from grid-level options found at the top and bottom of the grid. As shown below, the Custom Severity Set selector is also provided when viewing My Open Tickets or All Tickets, to view tickets in relation to locally created severity codes for the applicable vulnerability. Note that the Custom Severity column is not displayed by default, but can be included in the grid by selecting the Custom Severity from Choose Columns under Grid Actions.
To assist in managing tickets, there are two additional views, accessible by clicking the tabs at the top of the grid to see Open tickets assigned to the logged-in user which are either past due, or due within seven days (default value). The number of days can be changed by updating the value in the “Days Until Due” field.

All Tickets
This view shows all tickets which the logged on user has permission to view.

Ticket Rule Sets and Rules
Ticket Rules define how tickets are assigned based on target and vulnerability characteristics such as: a target list, host operating system platforms, type of vulnerability, severity of a vulnerability or even ranges of CVSS score. These rules are packaged in a parent Rule Set and then used at the time of job creation to ensure tickets generated as a result of vulnerabilities detected during a job’s scans are assigned to the proper individual for remediation. Without ticket rules, new tickets are not assigned until they are modified individually or in bulk, through the All Tickets page.
Ticket rules are defined and packaged in Rule Sets to support the creation of one or more rules and apply the collection of rules to scan jobs for resulting vulnerabilities. The following shows an example of a list of Rule Sets in the Ticket Rules page.

The example above, shows two rule sets, with one currently being used in a scan job. Click on the Details (i) option or the Edit (pencil) option to view the Rules defined for a Rule Set. The following shows the rules defined for the Web Server Rules rule set. In this example, a rule was defined for assigning remediation tickets to individuals based on the specific IP address of a web server and CVSS score range for high severity vulnerabilities. A Due Date was also defined for two calendar days from the date the ticket is generated and assigned.

Create a Rule Set
- Click on the Create Ticket Rule Set option from the Grid Actions drop down on the Ticket > Ticket Rules page to display the rule set creation dialog:.

- Click on the edit icon (pencil) to enter a name for the new Rule Set. The default name (as shown above) is the string “Rule Set” plus the rule set’s ID number.
-
At this stage, you can close the edit window and retain the new Rule Set for later use, without ticket rules, or follow steps in the following section to create individual rules.
Edit a Rule Set
-
Navigate to the Ticket > Ticket Rules page menu.
-
Navigate to the Rule Set you wish to edit.
-
Click on the edit icon (pencil) on the Rule Set’s record.
-
The Edit Ticket Rule Set dialog will display and be available for editing the name or rules within the Rule Set.
Clone a Rule Set
The Ticket Rule Set feature provides a way to use existing rule sets as a starting point to create additional rules. For example, a rule set already existing that has every rule that applies to Subnet 10.1.0.0/24 and assigns tickets to User A. Now you need to create the same rules for Subnet 10.4.0.0/24 and assign those tickets to User B. This can be done by cloning an existing Ticket Rule Set and then editing the Rule Set Name and parameters in the Rules.
-
Navigate to the Ticket > Ticket Rules page.
-
Navigate to the Rule Set you wish to clone.
-
Click on the Clone Ticket Rule Set (multi-doc) icon for the Rule Set to be used.
-
The Edit Cloned Ticket Rule Set dialog will display and be available for editing the name or rules within the Rule Set.
-
Change the name of the new Rule Set to ensure it can be uniquely identified in the Rule Set grid.
-
Add, modify or delete rules as needed to create the new Rule Set.
Delete a Rule Set
-
Navigate to the Ticket > Ticket Rules page.
-
Navigate to the Rule Set you wish to delete.
-
Click on the Delete icon (trash can) on the Rule Set’s record.
Deleting a Rule Set will cause jobs currently associated with the Rule Set to no longer be associated with any Rule Set.
Create a Rule
-
Click the Edit (pencil) option on the Ticket Rule set you wish to add the rule to. The Create Ticket Rule dialog will be displayed.
-
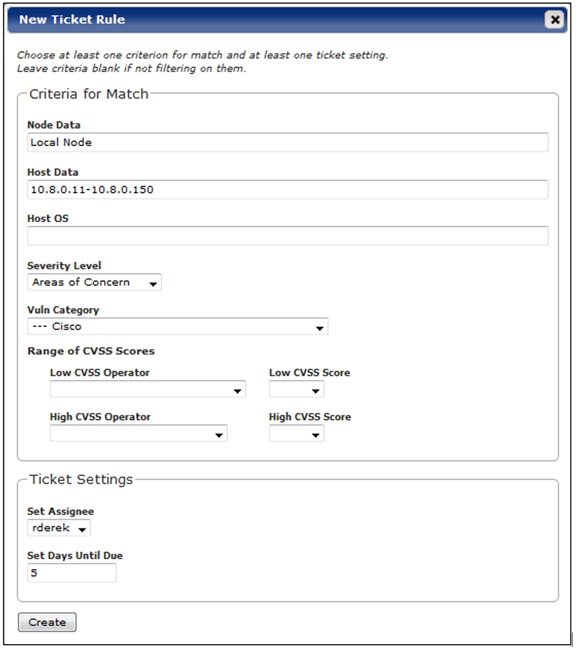
Click on the New Ticket Rule option from the Ticket Rule's Grid Action drop-down to display the New Ticket Rule form:

-
Enter values in each applicable form field, based on your rule criteria. Each of the available options are described as follows:
-
Ticket Criteria – These are the options which control whether the ticket rule will match and apply the rule’s ticket settings (user assignment or days until due). The ticket criteria options are:
-
-
Node Data – The Node Data field contains the literal value of the Scanner Node, or a comma-separate list of values, applicable to a rule. The values may be IPv4/IPv6 addresses, ranges (e.g., 10.0.0.5-10.0.0.9) or CIDR-annotations (e.g., 10.0.00/24). Wildcards (“*” for multiple characters, “?” for a single character) may be used in node names. The Local Node must be identified by its name “Local Node”, not by IP. Leaving this value blank will result in node information being ignored when deciding whether the rule should be applied.
-
Host Data – The Host Data field contains information identifying the target hosts that will be affected by the rule. The data can be a comma-separated list or individual IPv4/IPv6 addresses, DNS names, IP address ranges (e.g., 10.0.0.5-10.0.0.9), or CIDR-notated (e.g., 10.0.0.0/24) hosts. A host DNS name may contain wildcard characters: * matches zero or more characters, ? matches one character.
-
Host OS – The Host OS field allows a user to specify a type of Operating System to be associated with the rule, such as Windows hosts or Linux hosts. This value issued by the rules engine decides whether the rule applies to this host by comparing the value to the system class identified by SAINT for this host. Wildcards (“*” for multiple characters, “?” for a single character) may be used when choosing “Name” as the Host OS.
-
Severity Level – Choosing a Severity Level will control the types of vulnerabilities that will be assigned to a specified user, using SAINT’s Severity levels: Critical Problems; Areas of Concern; Potential Problems. Each rule can contain only one severity level. Create additional rules in the rule set if a rule set should assign tickets based on multiple severity levels.
-
Range of CVSS Scores – CVSS scores reported by SAINT can be “none”, or in the range of 0 to 10, where “none” is considered lower than 0. Note that CVSS scores are decimal numbers, not integers. The available Rules settings are:
-
-
Low CVSS Operator and Low CVSS Score – These settings control the lowest CVSS score in a range. If you wish to control assigning the tickets, by rule, based on one or more CVSS scores. For example, setting the “Low” range to Greater Than 4, specifies CVSS Score of 4.1 as the lowest CVSS score to impact this ticket assignment.
-
High CVSS Operator and High CVSS Score - These values control the highest CVSS score in a range if you wish to control assigning the tickets, by rule, based on one or more CVSS scores. For example, setting the “High” range to Less Than or Equal to 10, specifies CVSS Score of 10 as the highest CVSS score to impact this ticket assignment.
-
-
Vuln Category – Choosing a Vulnerability Category will control the types of vulnerabilities that will be assigned to a specified user, using SAINT’s internal categorization of vulnerabilities. For example, assigning tickets to a specified user for all vulnerabilities categorized as Mail vulnerabilities. Each rule can contain only one category. Create additional rules in the rule set if a rule set should assign tickets based on multiple categories.
-
Asset Tag Filter – To assign tickets based on an assets tags, click the Open Asset Tag Selector link. This will bring up the asset tag selection wizard which allows you to choose the tags attached to hosts to which this rule will be applied. Asset tag filters will only apply to newly created tickets, it is not retroactive.
-
-
Ticket Settings:
-
-
Set Assignee – Select a SAINT User to be assigned the tickets applicable to the rule. An email notification will be sent to the SAINT user’s email address, if defined in the User’s record shown in Manage – Users, and the global Ticket Notifications configuration setting for Email Server is set and Enable Ticket Assignment Notification is checked.
-
Set Days Until Due – The Days Until Due field will define the “due date” for ticket remediation, from the date a vulnerability ticket is generated.
-
-
Ticket Export Settings (only available if Enable Ticketing is set to yes but export to another system):
-
Email subject – Overrides the e-mail subject formatting specified on the Ticket Export Email configuration tab. The same macros are available here. (See Macros.)

-
-
The following shows an example Rule defined to assign new Tickets to a user, when the “Local Node” scanner finds vulnerabilities classified as “Areas of Concern” and categorized as “Cisco” vulnerabilities for hosts in the IP range of “10.8.0.11-10.8.0.150”. New tickets will also have a defined due date of 5 days from the date the ticket is generated.

-
Click the Create button once you’ve verified the rule’s setting.
A confirmation message will be displayed to confirm the Ticket Rule with priority 1 was successfully created. Subsequent tickets created in this rule set will have progressively higher numbers.
-
Click OK to close the confirmation message and view the new rule in the Rule Set:

-
Follow steps 1-4 to add additional Rules to your Rule Set. Or, close the Edit New Ticket Rule dialog to Save the Rule Set for use in future scan jobs.
-
Ticket rules in a rule set may be reordered by drag and drop. The ability to reorder ticket rules is disabled which the displayed rules are filtered via the grid’s toolbar.
Edit a Rule
-
Navigate to the Ticket > Ticket Rules page.
-
Navigate to the Rule Set you wish to edit.
-
Click on the edit icon (pencil) on the Rule Set’s record.
-
The Edit Ticket Rule Set dialog will display and be available for editing rules contained in the Rule Set.
-
Navigate to the rule to be edited. Click on the edit (pencil) icon on the rule to display the rule’s settings.
-
Make the applicable modifications to the ticket rule.
-
Click the Save button to save your changes. Then select OK for the confirmation message.
Delete a Rule
-
Navigate to the Ticket > Ticket Rules page.
-
Navigate to the Rule Set that contains the rule(s) to be deleted.
-
Click on the edit icon (pencil) on the Rule Set’s record.
-
The Edit Ticket Rule Set dialog will display and be available for editing rules contained in the Rule Set.
-
Navigate to the rule to be deleted. Click on the Delete (trash can) icon on the rule to be deleted.
-
Click OK in the Confirmation Message to delete the rule or click Cancel to exit without deleting the rule.
Deleting a rule will impact jobs currently associated with the Rule Set by causing the job to no longer have an associated rule set.
Apply a Ticket Rule Set to Existing Tickets
The ticket rules applied during a scan job only affect newly created tickets. They DO NOT apply to existing tickets. However, existing tickets can still be assigned by applying a ticket Rule Set, using the following steps:
-
Navigate to the Ticket > Ticket Rules page.
-
Navigate to the Rule Set that contains the rule(s) to be applied to existing, unassigned tickets.
-
Click on the Run Ticket Rule Set against New (unassigned) Tickets icon. (This is the run arrow with the light gray background).
-
A confirmation message "Do you really want to apply ticket ruleset x to all new tickets?" will be displayed to confirm the ticket update.
-
Click OK to confirm and update existing unassigned tickets based on the rule set’s rules, or click Cancel to exit without performing the ticket updates.
To verify the existing tickets have been updated:
-
Navigate to the All Tickets page.
-
Search for tickets that were previously unassigned that should have been updated by the rules in the manually applied Rule Set.
-
Verify the assignee field has been updated according to the rules. Note that the ticket due date is not affected by ticket rule sets applied to existing tickets.
Similarly, a ticket rules set can also be applied to all open existing tickets (this includes tickets with any status other than closed, versus unassigned tickets) by selecting the Run Ticket Rule Set against all open Tickets icon (the run arrow with the black background) in step 4 above.
Using the Ticket Grid
View Ticket Details
Select the Information icon (i) on the left of the grid to reveal detailed information about the corresponding ticket. A dialog window (as shown below) will display details about the ticket, including column information not currently visible in the grid, the change history of how the ticket has been modified over time, and comments that have been entered regarding the ticket.

Update a Ticket
Click on the Edit (pencil) icon to display the Update Ticket window. This window displays all ticket fields that can be modified, based on a user’s ticket permission. This window also provides a field for entering comments such as the ongoing progress of the remediation activities, justification for actions or decisions made to support the ticket, or other information you deem valuable in tracking the actions or history about the vulnerability and remediation work.
View Ticket-related Vulnerability Tutorials
Click on the Tutorial (page) icon to gain access to SAINT’s custom-developed tutorial articles applicable to the vulnerability associated with the Ticket. These tutorial articles are the same ones visible through the Analyze tab and Report details that provide information about the vulnerabilities (background, impact, etc.) and information to facilitate remediation activities to reduce your overall risk posture.
An example tutorial related to the "Guessed Account Password” vulnerability is shown below:

Bulk Update
One of the most often used features is the ability to update the status, assignment, due date or comments of multiple tickets, at one time. You can update many tickets “in bulk” by selecting (checking) one or more tickets (even across multiple grid pages) and then click the Bulk Update option from the Grid Actions drop-down. As with other grids, those options are provided to apply the selected action (grid columns; global search; bulk update; CVS/XML exports; etc.) for all selected records.
The example below shows four new tickets being updated to assign them to user bsmith with a comment to expedite::

Complex Search
In addition to being able to search for column-specific values in the grid’s column search boxes, the ticketing grids also provide an additional complex search feature (Grid Actions > Complex Search option) to construct ad hoc queries, for greater power and granularity of search results.
The complex search dialog window, as shown here, provides the following options:

-
The first option allows you to select the scope of your search to include all or any record that contains the prescribed search criteria. The all option is equivalent to logical ‘and’ applied to all conditions in the group. The any option is equivalent to the logical ‘or’ operator.
-
The next option +{} is a subgroup option that will allow you to first pull up a set of values (group), and then further refine the results (subgroup) based on that initial set of values.
-
The option with the + symbol is the Add Rule option to add multiple search criteria (such as TicketID + Status).
-
Below those high level search scoping options, you can define the search parameters for each rule. In the example above, the rule for the TicketID field will be defined to “equal” some defined value.
-
The Reset option is provided to clear all search criteria and begin again.
-
Click the Find button once all search criteria has been defined, to locate ticket records that meet your criteria.
In the following example, this search returns all tickets related to Critical vulnerabilities; are not closed; and reoccurred after they were originally Closed.
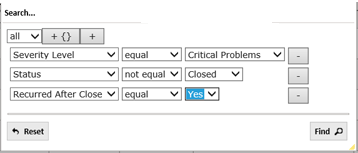
Note that the search conditions remain in place until the page is refreshed or the options are cleared via the Reset button.
Export to CSV or XML
Tickets can be exported from either the My Tickets view or All Tickets view, using the CVS or XML export options from the Grid Actions drop-down list. This functionality is the same as exporting scan results in the Analyze tab grids.
To export tickets, click the applicable CSV or XML option from the Grid Actions drop-down list. The system will display a dialog for saving the generated file to a target path. The export feature will export all columns for all tickets returned in the current view. This provides the flexibility to export all tickets or only a defined subset of the tickets by filtering (limiting) the results by either the complex search or column search features.
Close a Ticket
Closing tickets in the system is done by using the update features, as described above. As a best practice, it is recommended that ticket “close” actions include, not only, the status change to “Closed” but also include comments that provide information such as the actions taken, the targets affected, whether any remediation or validation actions were taken to note risk mitigation or reduction, and other information that can support future research, risk assessments and audits applicable to the organization, assets or supported business functions.
Delete a Ticket
Tickets can be deleted, based on a user’s ticket(s) permissions. Tickets are deleted by clicking on the Delete (trash can) icon for a selected ticket, and choosing OK to the delete confirmation message. Multiple tickets can be deleted in “bulk” in the same manner as a bulk update – by selecting (checkbox) multiple tickets (even across multiple grid pages) and then selecting the Grid Actions > Delete option. As with the single row deletion, the user must choose OK to the delete confirmation message.
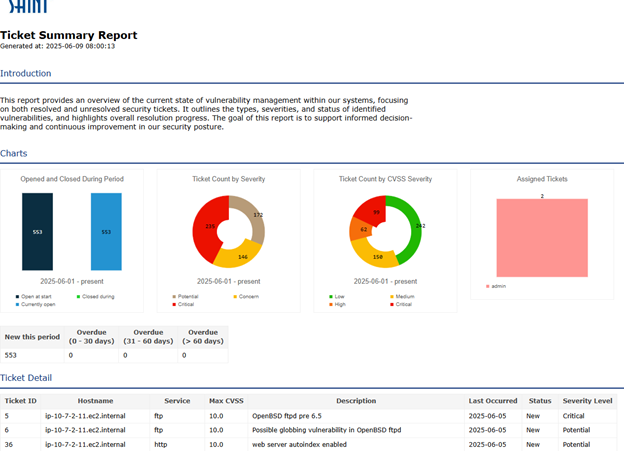
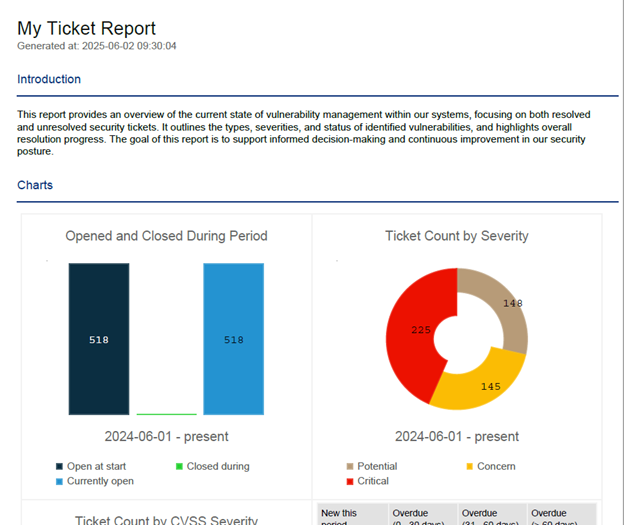
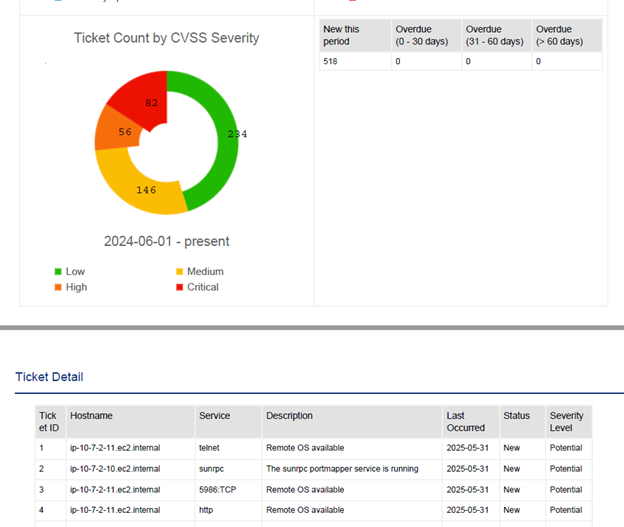
Ticket Reporting
Ticket reports can be generated in PDF, CSV, and HTML format and include information about the overall status of tickets. Ticket reports can be assigned a schedule which will run at specified time intervals, generating a report and emailing it to selected contacts. This feature can be found on the Ticket -> Ticket Reports page.
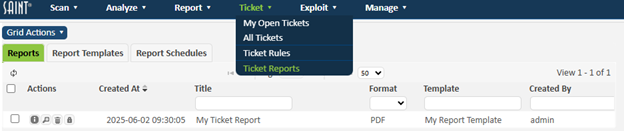
Creating Ticket Reports
To create a ticket report, click on Grid Actions -> Create Report. This will load the report wizard depicted in the following screen shot.
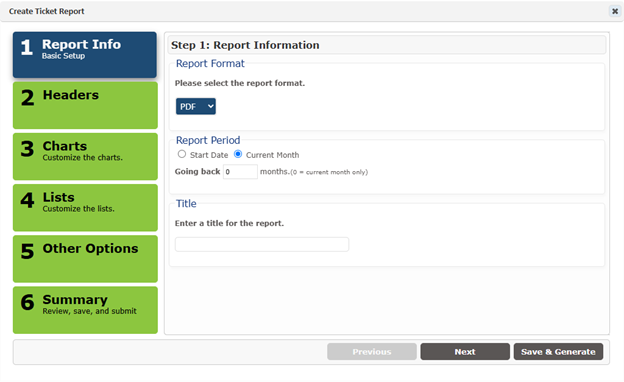
Ticket Report Options
Report Format – This is the format the report will be generated in. The currently supported formats are PDF, CSV, and HTML.
Report Period – This defines how far back the database search will go to collect data for the report. However, note that certain details found in the report will be unaffected by this setting, such as reporting on the number of tickets that were open before the report period started.
Title – The title that will be displayed at the top of the report.
Images – You can choose a banner image and a logo image to be displayed at the top of the report.
Introduction – This paragraph will be displayed as the first section of the report.
Charts – Various charts may be included in the report. To omit a chart, uncheck the box next to the report type.
Lists – A detailed list of tickets can be included in the report. The type of tickets to include may also be chosen. To disable this list, uncheck the checkbox.
Template Name – When a report is created using the wizard, the settings can be saved as a template. The template can be used to generate reports at a future date. If Template Name is omitted, then a template will not be saved.
Editing Ticket Report Templates
To edit an existing report template, go to the Report Templates grid and click on the pencil button of a report template record. From here you can modify all the settings found in the wizard and either save the template by using the Save button or generate a report and save the template by using the Save and Generate button. If the Tempate Name setting is left unchanged then the template will be overwritten. If you give it a new name, a new template will be created from the existing template. See the screenshot below:
Deleting Ticket Reports
To delete a ticket report, use either the trashcan button in the Ticket Reports grid, or the Delete Ticket Report(s) option from the Grid Actions pulldown menu. Deleting a ticket report will not delete the report template.
Deleting Ticket Report Templates
To delete a ticket report template, use either the trashcan button in the Ticket Report Templates grid, or the Delete Ticket Report Template(s) option from the Grid Actions pulldown menu. Deleting a ticket report template will not delete any reports that have been generated by it; however, it will delete any report schedules that are using the template.
Viewing Ticket Reports
To view and download a report that was already generated, click on the magnifying glass button in the Ticket Reports grid next to the associated report record.
Ticket Report Schedules
Ticket report schedules are used to define a recurring time to generate and email ticket reports. Find this feature by going to Ticket -> Ticket Reporting and go to the Report Schedules grid. Schedules are checked every time SAINT starts, and then every five minutes to determine if a report needs to be generated and emailed.

Creating Ticket Report Schedules
From the Grid Actions menu, click on Create Report Schedule. This will bring up the following dialog:
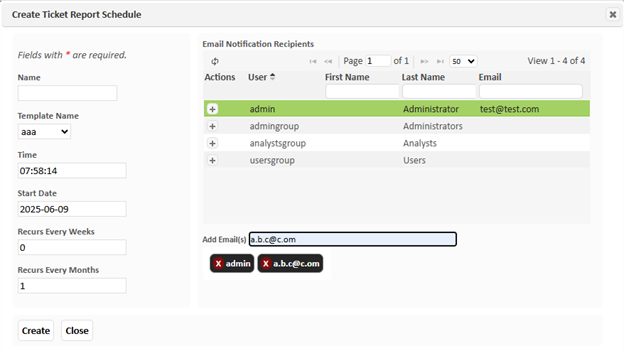
To add emails, you can either click on the plus button next to an existing SAINT user, which will use the user’s email address at run time, and/or input a list of email addresses into the Add Email(s) text box and press enter.
Deleting Ticket Report Schedules
To delete a ticket report schedule, use the trashcan button in the Ticket Report Schedules grid. Deleting a schedule will not delete the report template. However, if you delete a report template that is attached to a schedule, then the schedule will be deleted.
Sample Report Screenshots