Administrator's Guide
System Requirements
The following describes the major system requirements and key third party software dependencies for setting up a SAINT Security Suite environment.
Note that the setup process will automatically prompt you to resolve any missing prerequisites during the initial setup.
It is also highly recommended that administrators run the Check Dependencies option in the Start Menu to verify an environment is configured properly any time there is an issue that hinders the full operation of the product.
Operating Systems
SAINT Security Suite can run on most common Linux distributions that meet required dependencies. The officially supported platforms include:
-
Ubuntu 22.04, or 24.04 LTS
-
Amazon Linux 2
-
Red Hat Enterprise Linux 8, 9, or 10
-
CentOS Stream
-
Rocky Linux 9 or 10
-
AlmaLinux 9 to 10
RDBMS / SQL Database
The installation process includes the option to select one of the following supported RDBMS platforms.
-
MySQL 5.x (or MariaDB*)
-
Postgres 9.1 or higher
* MariaDB is a fork of MySQL. If you choose MySQL during setup, SAINT will install and use whichever fork is packaged by the operating system vendor. (Red Hat and CentOS currently package MariaDB instead of MySQL.) It is recommended that you always use the operating system’s official packages, to ensure compatibility with Python and PHP modules.
Browsers
-
Up-to-date Microsoft Edge
-
Up-to-date Mozilla Firefox
-
Up-to-date Google Chrome
Disk Space
-
Security Suite software and system files – 300 MB to download and install
-
Perl and Web browser – approx. 70 MB
-
Database platform
-
Additional storage space required for scan results and reports
-
Optional utilities: See vendor specifications for disk space requirements of individual utilities.
Note: It is not necessary to reinstall any pre-existing utilities installed on the target platform. Both MySQL and OpenSSL are often provided as part of the regular installation package for Linux. The amount of disk space required varies depending on the operating system, the download format, and amount of data being stored in the database.
Memory
Memory varies depending upon the number of hosts to be scanned, the selected level of multithreading, and other factors. A minimum of 4GB is required—with 8GB RAM recommended for typical installations.. Additional RAM should be considered for optimal performance if there are large-scale scanning requirements.
Oracle Java
Oracle Java 8 is recommended if you are using SAINT for benchmark scanning. On Ubuntu, the Check Dependencies option from the start menu will add the Oracle Java Installer PPA from launchpad.net to install and maintain Oracle Java on the system. For other platforms, download and install Oracle Java 8 from www.java.com/download, and ensure that security updates are applied regularly. (Note: Although OpenJDK packages may be installed by the Check Dependencies option, Oracle Java, not OpenJDK, is recommended for best results from benchmark scans.)
Getting Started
The following describes the routine steps for accessing and downloading licensed software, setting up your license key, and setting up the basic configurations to get started with your first scan.
Accept License and Download Security Suite
There are just a few steps to follow, and then you will be ready to use SAINT capabilities. To see how easy it is to install the SAINT Security Suite free trial, watch our installation video.
-
Log on to mySAINT portal at https://my.saintcorporation.com with the credentials provided in your welcome e-mail.
The mySAINT portal is where you:
-
-
maintain your account
-
get your license key
-
most importantly, get instructions and downloads for installing SAINT Security Suite.
-
-
Change your password (recommended). Click on the Change Password link in the upper-right corner of the portal.
-
Optional. If you are a new user, the mySAINT Assistant automatically opens when you log into the portal. Otherwise, you can open it from the Resources menu. Click on the options in the mySAINT Assistant to be guided to the correct download for your use case. Then follow the installation instructions provided by the Assistant.
If you choose not to use the mySAINT Assistant, continue with the following steps. -
Review the SAINT Installation Guide.
You can use the link above or navigate to it inside mySAINT: select primary navigation link Resources, select Installation Guides, and then SAINT Security Suite Installation Guide. -
Determine which SAINT Security Suite option you wish to download. See the Installation Guide, sections 2 and 3. If you need a virtual machine(VM), install it. We recommend VirtualBox. See the Installation Guide, section 3.2.
-
Import the SAINT/Ubuntu open virtual application (OVA) file. See the Installation Guide, section 3.4:
Ubuntu ID: saintadmin
Ubuntu PW: SAINT!!! -
Log into SAINT Security Suite at one of these links:
Username: admin
Password: admin-
http://127.0.0.1:1414
-
https://127.0.0.1:1414
-
-
Time to SCAN!
If you have any problems, call us immediately. We want you to have a great experience!
Software Installation
For all installations, ensure you've validated all requirements specified in the System Requirements section before continuing. SAINT Security Suite can be installed natively on most Linux-based platforms, and as a pre-configured Virtual Machine (VM). Refer to the Installation Quick Start Guide found under Resources – Installation Guides for detailed assistance on supported platforms and installation assistance. Use the SAINT Amazon Machine Image Guide for assistance on setting up a pre-configured AMI on AWS.
Using a SAINT Virtual Machine After Setup
Using a pre-configured Virtual Machine is one of the more common deployments for SAINT Security Suite. Once the VM is downloaded to the target location:
-
Run the Virtual Machine from either VMware or Oracle Virtualbox.
-
Login to the Desktop using the SAINTadmin account and password provided in your Welcome email.
Once you have successfully logged into the VM’s desktop, SAINT Security Suite can be started and accessed using the same steps as Starting Security Suite from a native installation.
Starting SAINT Security Suite
The following describes how to start Security Suite and use the various menu options found during start-up.
Launch SAINT Security Suite
The first step is to click on the SAINT icon ![]() or click on SAINT Security Suite from the application menu or desktop hyperlink created during the installation. Starting the SAINT Security Suite first requires you to log in with administrative privileges. This is similar to the way Windows and other modern operating systems validate your credentials and permission to install and run applications on the host. The following example shows logging in from an Ubuntu operating system:
or click on SAINT Security Suite from the application menu or desktop hyperlink created during the installation. Starting the SAINT Security Suite first requires you to log in with administrative privileges. This is similar to the way Windows and other modern operating systems validate your credentials and permission to install and run applications on the host. The following example shows logging in from an Ubuntu operating system:

If your Linux system has no desktop environment, then run the following from the command line:
cd /usr/share/saint; sudo bin/startmenu
Choose your Start-up Option
Once your credentials have been validated, the startup process will launch the MAIN MENU that displays the various configuration and startup options.
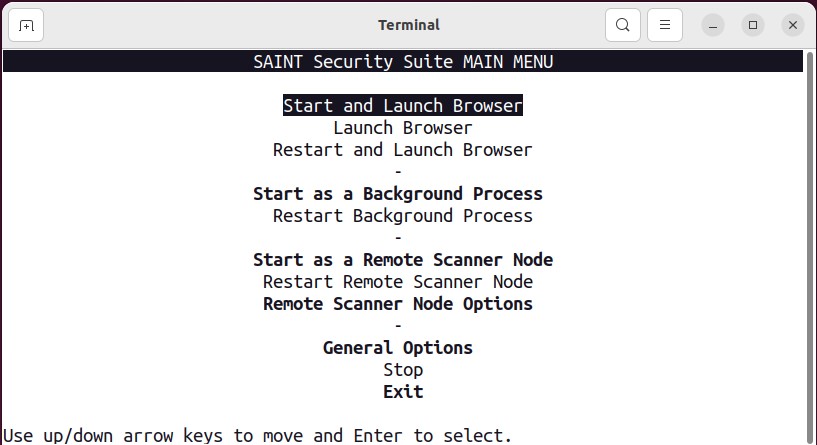
SAINT Security Suite can be run in a number of ways. Upon the initial installation and setup, the following startup MAIN MENU will be displayed. You must select the option that describes how you want the software to be started. Making a selection here will be stored and used on subsequent startup processes. The MAIN MENU will be displayed again if you wish to restart, stop, or change how the software is started.
Start and Launch Browser
The first option is to start the software and launch a browser to support direct access on the installed host; or even from a remote location if the host can access the installed host. This option is most typically used for standalone, desktop installations or even server installations where access to the user interface will be directly on the installed host.
Start and Launch Browser – starts SAINT Security Suite in a browser window on the installed host..
Launch Browser – this option will be available if the software has already been started and is still running in the background. Select this option just to open a browser on the installed host.
Restart and Launch Browser – this option will stop and restart the software, check for any product updates, and launch the user interface in a browser window.
Start and Run as a Background Process
SAINT Security Suite can be started to run as a background process, without launching the browser. This is typical of a shared environment where access will be done from various desktop browsers or via command line access from remote hosts.
Start as a Background Process – this option starts all processes but does not launch the browser-based user interface.
Restart Background Process – this option will stop and restart the software and check for any product updates. This option does NOT launch the user interface in a browser window.
Note: In some operating systems, the port will have to be open for a connection to be established. By default, SAINT Security Suite uses port 1414 for the web browser. The default URL for the web interface is: <https://<address>:1414>, where <address> is the IP address or registered hostname of the system running the product..
Start and Run as a Remote Scanner Node
The third option is to start SAINT Security Suite as a remote scanner node, to support a distributed, multi-scanner node environment. In this configuration, the initial setup will include steps to connect this installation to a separate installation acting as the central “manager.”
Start as a Remote Scanner Node – starts all SAINT Security Suite processes, checks for any product updates, and initiates a secure connection to the “manager” installation. This process does not launch the browser-based user interface. The following describes the steps required to configure the remote scanner node the first time you start up the installation to Start as a Remote Scanner Node:
-
Scroll down and click the Enter key on the Start as a Remote Scanner Node option
-
Enter the fixed IP address of the SAINT Security Suite installation acting as the “manager”
-
Click Return or the down arrow key
-
Click OK to save the change and return to the MAIN MENU
-
Click on the Start as a Remote Scanner Node option to start the scanner node and make a secure connection to the “Manager.” You should now see the new node listed in the connected nodes in the Manage tab – Manage Node page through the “manager” installation.
Note: The Scanner Node Connection Port and Scanner Node Connection String are already set by default for all installations. However, you can change these default settings in the Configuration tab – System Options – Nodes tab in the “manager” installation. If you have changed these settings, navigate to the Remote Scanner Node Options menu (described below) and update those settings before returning to the MAIN MENU and starting the scanner node.
Restart Remote Scanner Node – this option will stop and restart the software, check for any product updates, and re-initiate a secure connection to the “manager” installation. This step does not launch the user interface in a browser window.
Remote Scanner Node Options – select this option to configure the installation as a remote scanner “node” and configure a secure connection to a separate installation acting as a central “manager.” The following describes the node options in more detail:
-
Manager Address – This configuration setting contains the fixed IP address of the Security Suite installation acting as the manager that will control communication and scan activity on the scanner node.
-
Scanner Node Connection Port – This configuration setting contains the TCP port on the manager that the node will use to connect. This configuration setting is defined through the user interface, in the Configuration tab > System Options submenu, by clicking on the Nodes tab.
-
Scanner Node Connection String – The node will send this string to the manager when it connects. This string must match the connection string configured through the Configuration > System Options > Nodes screen in the manager. If this option is left blank in the manager, then no connection string is required.
-
Scanner Node ID – This option provides the node ID string for remote scanner nodes to connect to the manager. The node ID string must be 32 characters, consisting of digits and lowercase letters. Empty strings will create a new ID.
-
Check Software Dependencies – This option checks the installation host for third party software dependencies or other system requirements, to ensure the software can be installed and configured properly on the host. Note that the SAINT Security Suite VM deployment option is automatically released with all valid dependencies; and all Installer processes automatically perform these operations during the installation. However, this step may need to be run manually if there are any issues or problems with the software or modifications to the host environment affecting the product.
-
Back to Main Menu – This option closes the Options menu and returns to the MAIN MENU.
-
Exit – Click this option to close the MAIN MENU.
General Options
These options support modifying configuration settings related to web ports and control over remote host access, as well as manually checking your system for valid third party dependencies or other system-related settings.
-
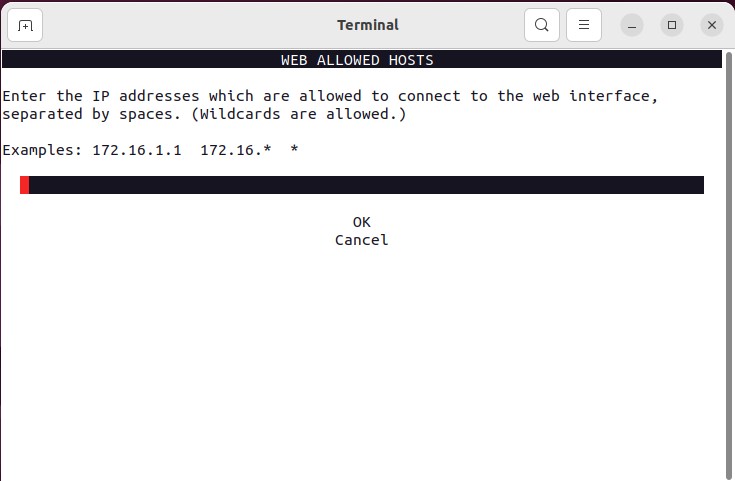
Web Allowed Hosts – This configuration setting stores the hosts that are authorized to connect to the application. The default is ALL (*). However, you can use this setting to enter comma delimited IP addresses to limit access to only authorized hosts, if needed. This configuration setting is also available in the Configuration tab > System Options submenu, by clicking on the Web Server tab.
-
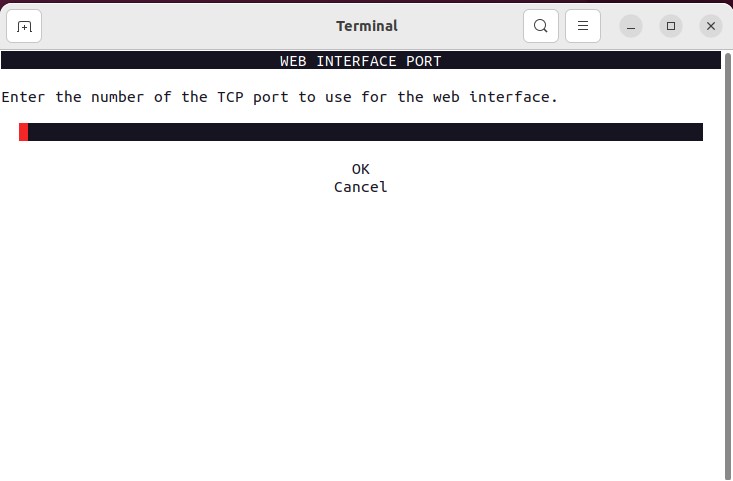
Web Port – This configuration setting stores the TCP/IP port that the web server listens on. This configuration setting is also available in the Configuration tab > System Options submenu, by clicking on the Web Server tab.
-
Check Software Dependencies – This option checks the installation host for third party software dependencies or other system requirements, to ensure the software can be installed and configured properly on the host. Note that the VM deployment option is automatically released with all valid dependencies; and all Installer processes automatically perform these operations during installation. However, this step may need to be run manually if there are any issues or problems with the software or modifications to the host environment affecting the product.
-
Transmit Logs to Support – This option will send the software’s log files as well as some relevant operating system information to the SAINT support team. Use this option only if instructed to do so by the SAINT support team.
-
Back to Main Menu – This option closes the options menu and returns to the MAIN MENU.
-
Exit – Click this option to close the MAIN MENU.
Stop
Whether you run SAINT Security Suite by launching the browser or run strictly in background mode or as a remote mode, the software runs as a background process so scans can continue to be scheduled and executed, even when the browser is closed on the host. This option allows you to manually stop the product, to include any running background processes. This option will only be available for selection if SAINT Security Suite is currently running.
Exit
Select this option to quit the startup process and close the startup menu. Use the Up/Down arrow keys to move and Enter key to select.
What if a Service or Required Configuration Setting is Not Found on Startup?
There may be instances during the startup process where a system configuration value or service is not found or should be validated prior to startup. For example, one common configuration setting is related to allowing you control over the hosts that should be allowed to connect to the web-based application. If this prompt is displayed, enter/verify the explicit IP addresses of specific hosts (if you wish to restrict access down to that level) or enter/verify * to indicate remote access from any potential host and then select OK to continue. The latter is the most common use-case.
Another possible setting is to define the TCP port to use for allowing the web interface. SAINT uses Port 1414 by default, but this can be changed if local policies dictate. Enter/verify the port number in this field and choose OK to continue.
Database startup for a SAINT Security Suite installation using a locally installed database – SAINT Security Suite supports either a MySQL or PostreSQL database backend for application configurations and scan content. In the standard setup, the target database is installed on the same host as the software. In most *nix-based platforms, the database service is started automatically and managed by the installation and startup processes. However, in some instances (particularly RedHat, CentOS and Fedora) this service is not always started at the same time the OS is launched. SAINT Security Suite provides a check on startup to verify whether this service is up or not on the local host, and will provide a prompt if the host’s database service is not running. If you are using the standard setup, with the database on the same host as the software, you should enter y (Yes) at the prompt to start the service.
For an installation using an external database – As described in the installation guide, SAINT Security Suite’s architecture also supports the use of a remotely installed database. If this installation connects to a remote database, enter n (No) at the database startup message if SAINT Security Suite is using a database on a separate host. In that case, the startup process will not perform this check, and responsibility for ensuring the external database is running will be that of a local administrator.
Database credentials -- When the SAINT manager runs for the first time, it creates a database and a database user with the username and password which you provide. In order for the SAINT manager to be able to perform needed functions, it must be able to access the database using these credentials. Therefore, the credentials are stored in the configuration files for both the saint_manager daemon (manager.ini) and the web application (main.php). If you want to encrypt the database password in these files, run the following command on the manager host after the database is initialized: cd/usr/share/saint; sudo scripts/encrypt_db_pass.py. This command will encrypt the password in both configuration files using AES-256 encryption. It may result in a slightly slower experience when using the web application.
Accepting the License Agreement
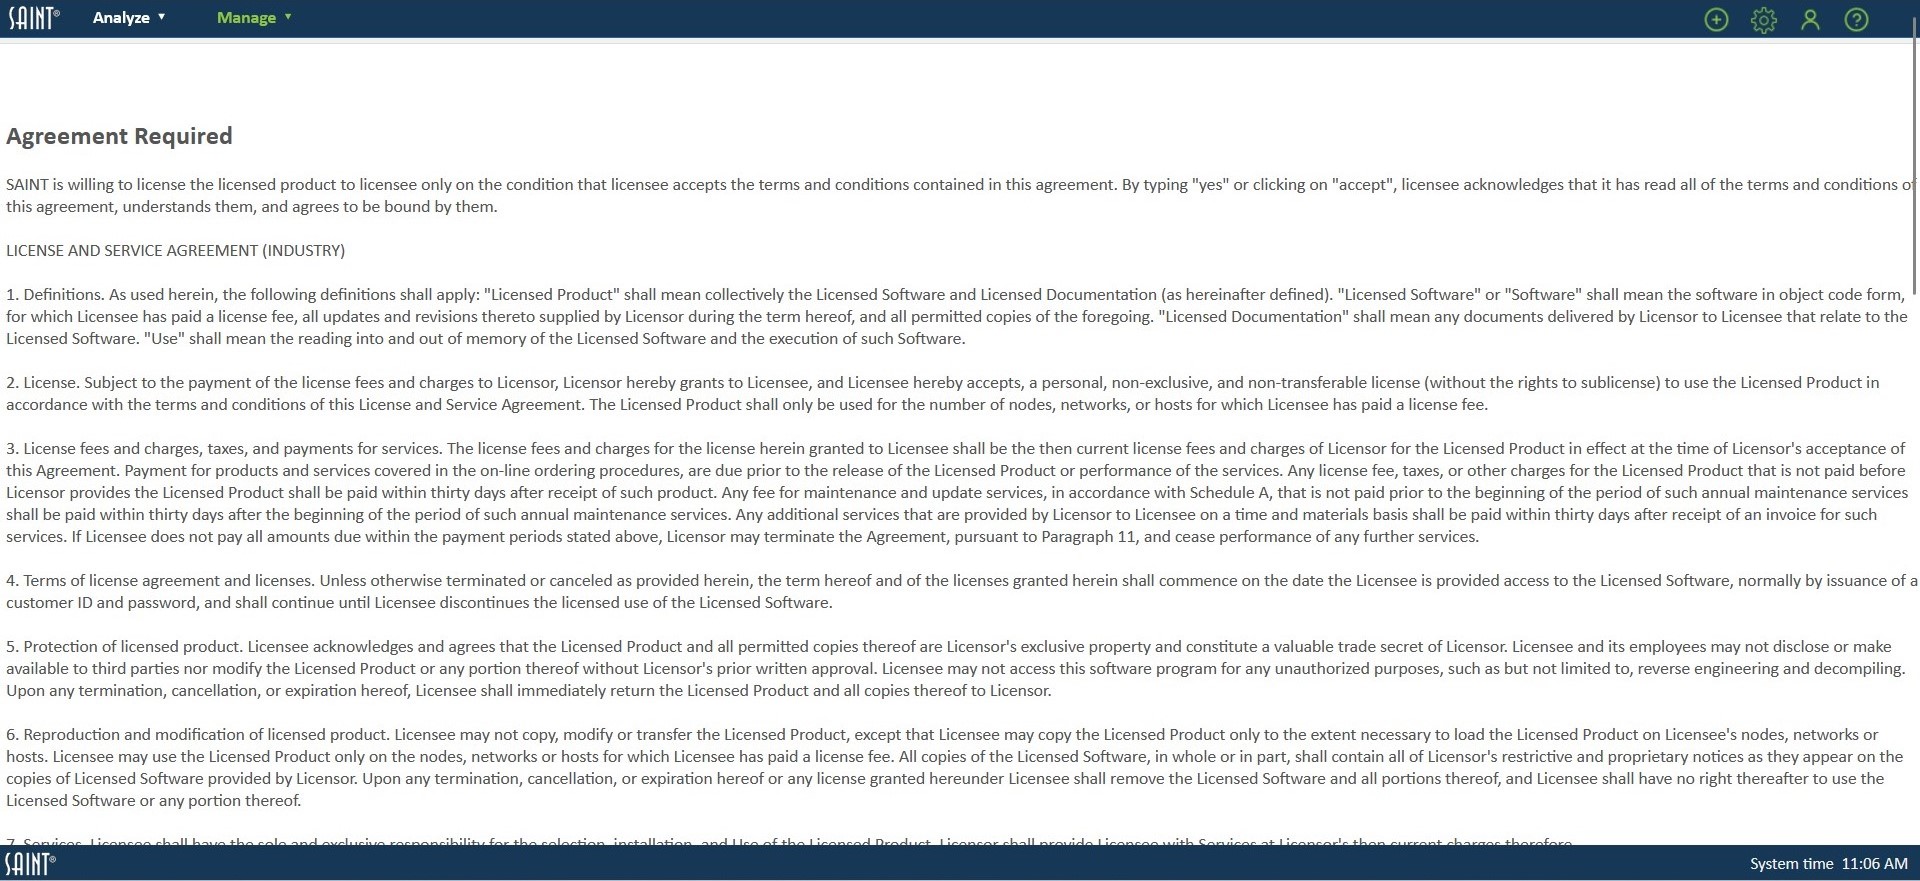
When logging into the product via a browser, SAINT Security Suite will launch a browser window and display the End User License Agreement.
Note: Some versions of Linux may not automatically launch a browser window. If SAINT Security Suite was installed from a Linux DEB or RPM package and you are launching the system directly from the install host, some installation of Linux may not automatically launch a browser window. If that happens, you can choose SAINT Security Suite from the Applications menu. (It may appear under a sub-menu such as “Other” in some Linux versions.) Otherwise, if the SAINT Security Suite installation program created a SAINT 8 icon on your desktop, double-click on the icon. For those using the pre-configured virtual machine (VM) version, we have also included browser tabs to our public website and technical support portal, for ease of access.
Please read through the agreement and then accept at the bottom of the page.
Note: The License Agreement will only be displayed and require acceptance during the initial setup and whenever major releases are delivered.
Logging In
Accepting the agreement will load SAINT Security Suite into the browser window and provide a login dialog. Each account owner is provided access to the administrative credentials to support first login and for performing administrative functions such as creating user accounts and setting up permissions. Use this account for your initial login, changing the default administrator password, and establishing your internal user account and access control policies.
Configure the License Key
-
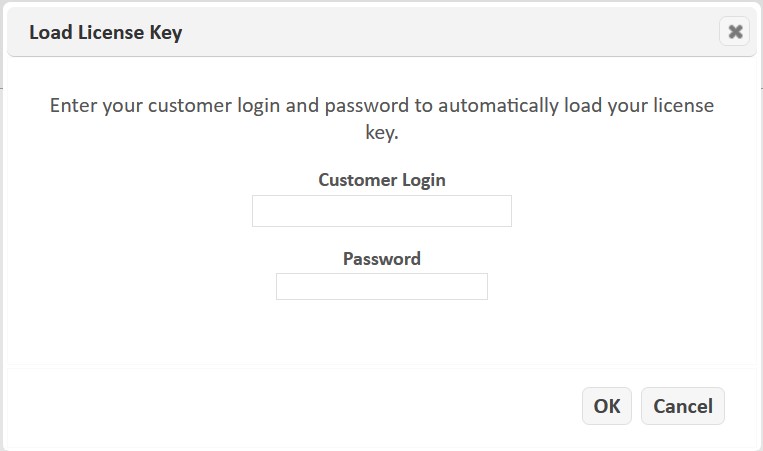
Upon first login, the first step is to configure your license key. If no license key is present, the application will direct you to the License Key page and open a login prompt. Enter your customer login and password to automatically load your license key from the mySAINT server.
Manual License Key Configuration
If you prefer to paste your license key into the application manually, click the Cancel button at the login prompt and proceed as follows:
-
To download your key, open a second tab in the browser and return to the mySAINT customer portal (https://my.saintcorporation.com). Login to the portal with the account name and password you received in your Welcome email message. Note: Click on “Forgot your Password?” link on the login page if you do not know your password. This link will auto-generate a new password.
-
Navigate to the License Keys page in the mySAINT customer portal.
-
Click on the clipboard icon beside the desired license.
-
Paste the entire SAINT key content (including the SAINTexpress transmission information at the bottom) from the mySAINT portal page into text area of the License Key page in the application.
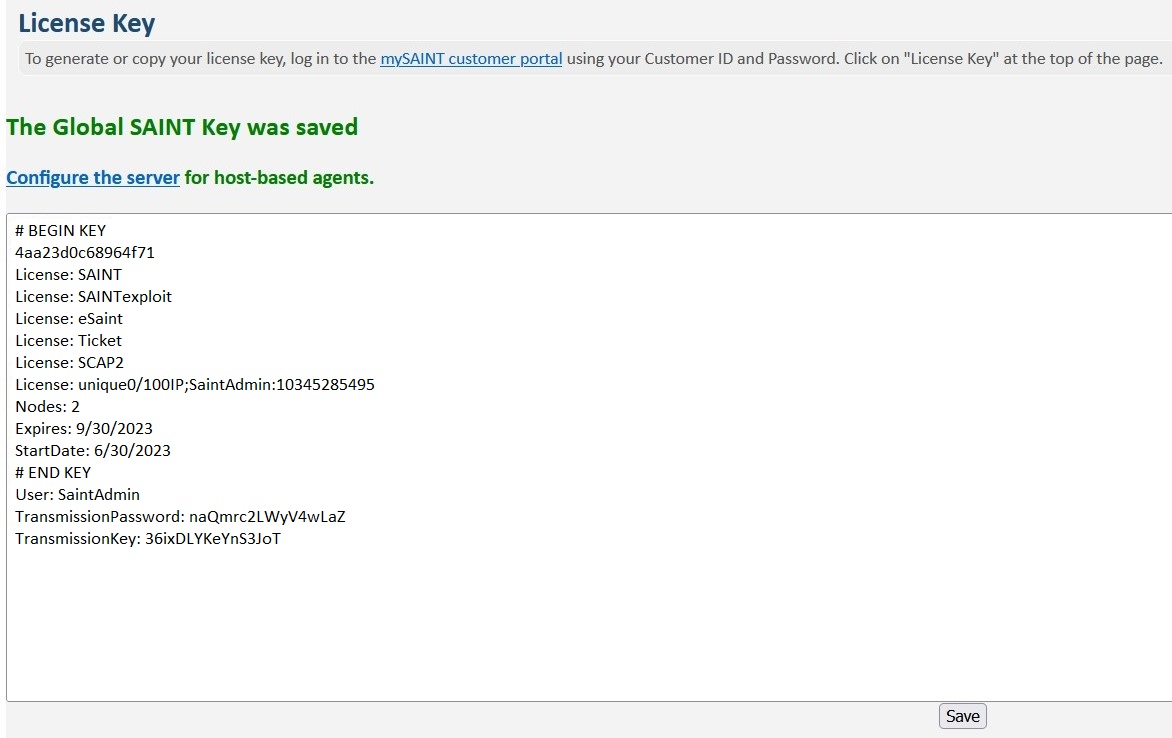
Note: For command line users, alternatively, you can also place the content into a file in your saint directory and name it saint.key. -
Click Save.
Understanding the Key
There are two types of licenses. The key structure must be consistent with the license type and total usage volume purchased under the current subscription:
-
Unique Target License: This key is based on a fixed number of static IP-based target addresses. For example, purchase a key that allows you to scan up to 100 unique targets, and scan that number of targets, as many times as you wish over the course of the license period. Target IPs are not added to this count (metered usage) until a target is discovered live and assessed via a scan policy. Note that once an IP has been counted, it cannot be removed and replaced with another IP. However, you can increase the license size during your license period as demand increases, by contacting your account representative.
-
Metered Scan License: This key is based on counting the total number of host targets scanned over a license period. For example, scanning 10 hosts weekly over 52 weeks equates to 520 total scans. In this key structure, specific IP addresses, size of the network or dynamic addresses are of no concern because every target assessed in every Job’s scan is counted.
Configure System Updates
The first time you install a License key (including the User Name, Transmission Password, and Transmission Key at the bottom) via the Configure the License Key option, this process automatically configures the system update process (a.k.a. SAINTexpress) with the user and transmission information. If you later change your User Name (e.g., when upgrading from an evaluation license to a purchased license), or if your network environment includes a proxy, you need to enter that information into this form.
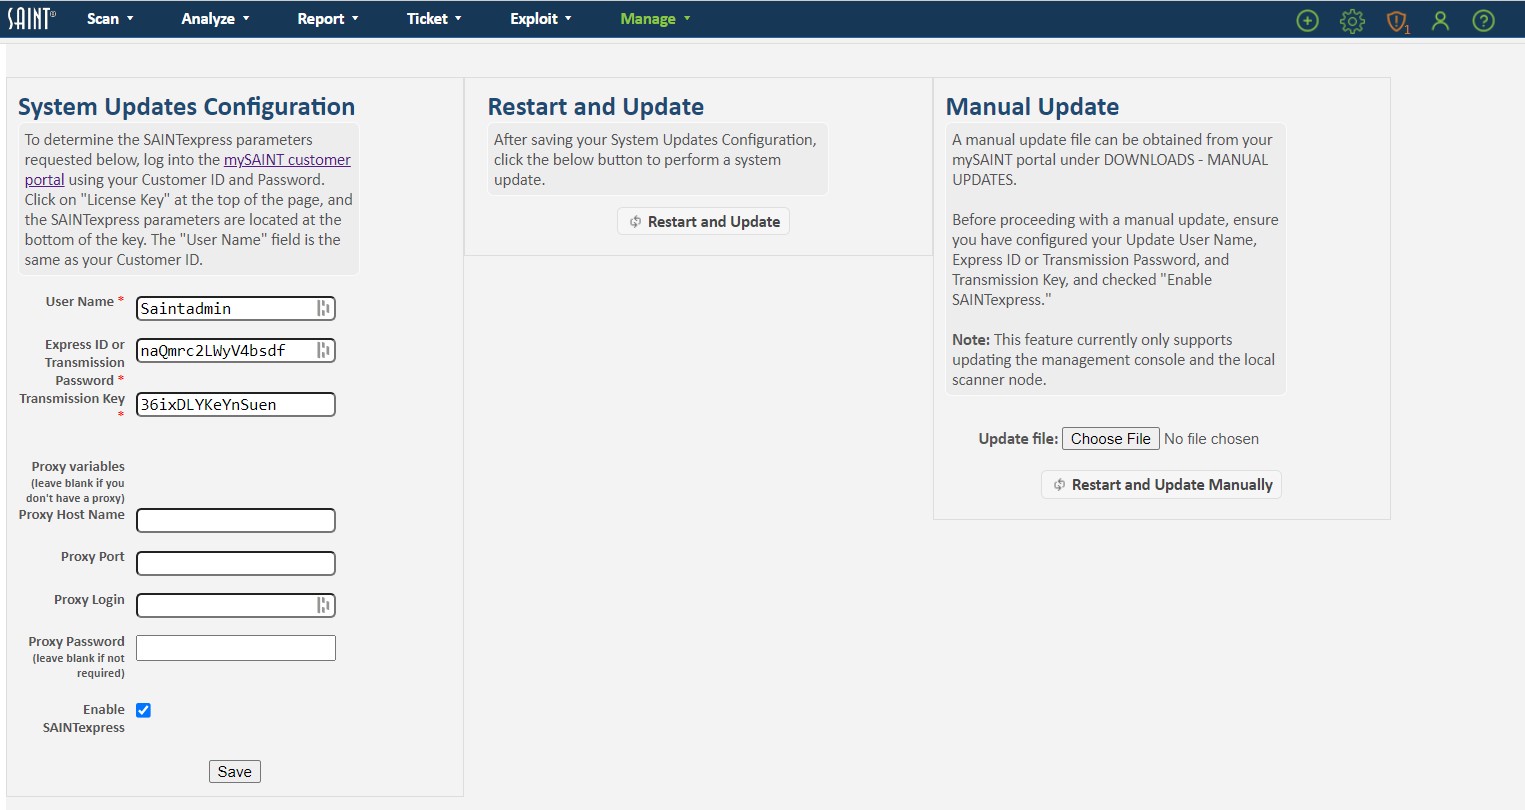
This page also provides a checkbox to enable (by default) or temporarily disable the update process (Uncheck the "Enable SAINTexpress" checkbox) to prevent automatic updates of your installation on restarts. This option may be preferable to comply with local change management policies or if you are in a closed network environment and must manage updates without an Internet connection.
The System Updates page also provides options to perform a manual check for updates via the “Restart and Update” option, as well as perform a “Manual Update” for instances, such as a closed network that cannot conduct automated update processes.
Get the Latest Updates
The last step in the installation process is to ensure that you have all of the latest vulnerability checks, exploits, tutorial content, bug fixes, and feature updates.
From the System Updates page, click the Restart and Update button. SAINT Security Suite will use the SAINTexpress update process to pull the latest updates and publish them to your new installation. The System Update Status will always be displayed on this page. This updates the manager and the local node. If your installation includes remote/distributed nodes, restart those nodes from the Manage Scanner Nodes page.
Note: SAINT Security Suite updates can also be controlled via the Command Line Interface (CLI). You can start Security Suite from the command line with the –Q argument. This will start SAINT Security Suite and NOT check for updates. This process will only be valid for this run-time instance. It does not control the stored configuration/status of the SAINTexpress System Update plugin.
System Status
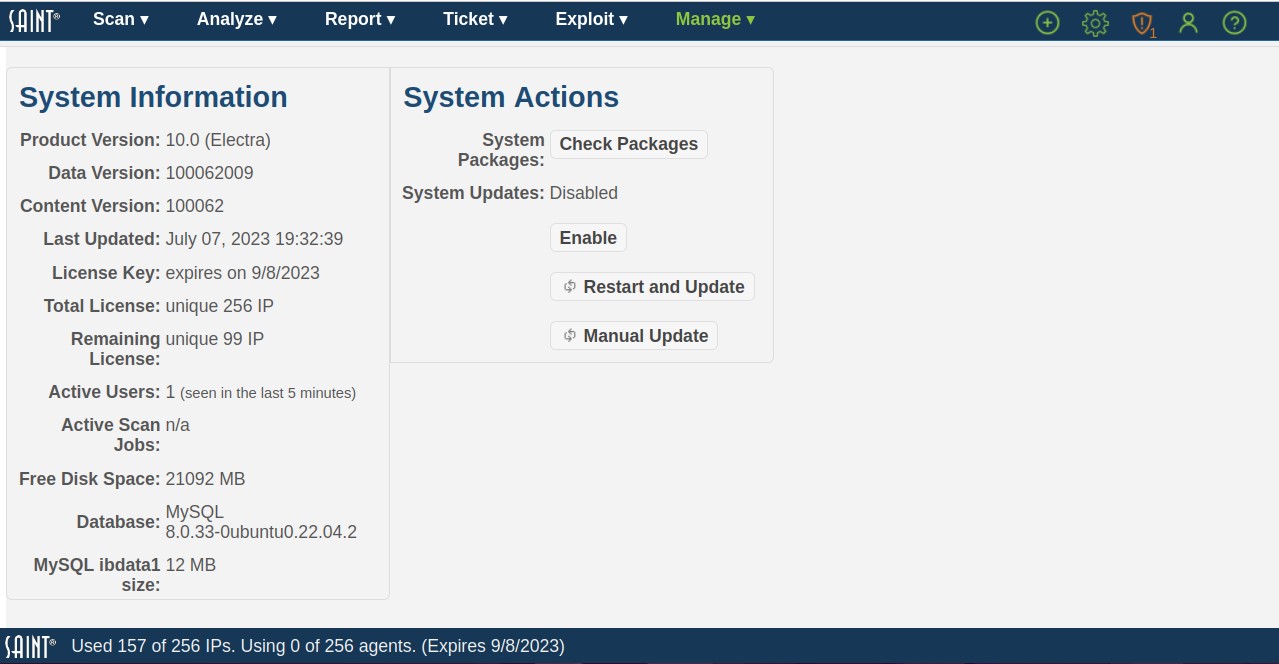
The System Status page provides a summary of details for your SAINT Security Suite installation. Information, such as product version, date of the last update, license key status, as well as information about current active usage.
Note that the product version information is defined by three (3) values.
-
Product Version: [Major Product Number] [Current Software Update Release Number]. This number is associated with the software updates that package code and scripts related to software features, product functionality, bug fixes and database changes. Major product versions have historically been introduced every 5-6 years. Software updates to these major releases are typically in quarterly update cycles.
-
Data Version: This version number is associated with the version of the database, as it relates to the product version. This value assists engineers in researching possible issues whenever there is a problem with your installation.
-
Content Version: This number sequence corresponds to the current number of content updates for the version of the software. Content updates are typically associated with vulnerability checks, exploit code and remediation Tutorials. Content updates are routinely released twice weekly.
Running your First Scan
-
Click on the Scan Jobs option under the Scan menu.
-
The first time you access the system, you will be prompted that there are no scan jobs in the system: “Would you like to create one?”
-
Click that hyperlink to set up your first job
The Scan Job Wizard displayed will walk you through the process of setting up your first job. In the following example, we will set up a quick scan, using only the minimum required steps to create a scan:
Step 1: Give the job a Name, and select the Scan Policy to be used, Step 2: Enter the host Targets to be scanned
Step 3: Decide when to schedule your first job.
Refer to the Scan section of the user guide for more details on all of the available options and advanced configurations for running various types of scans.
-
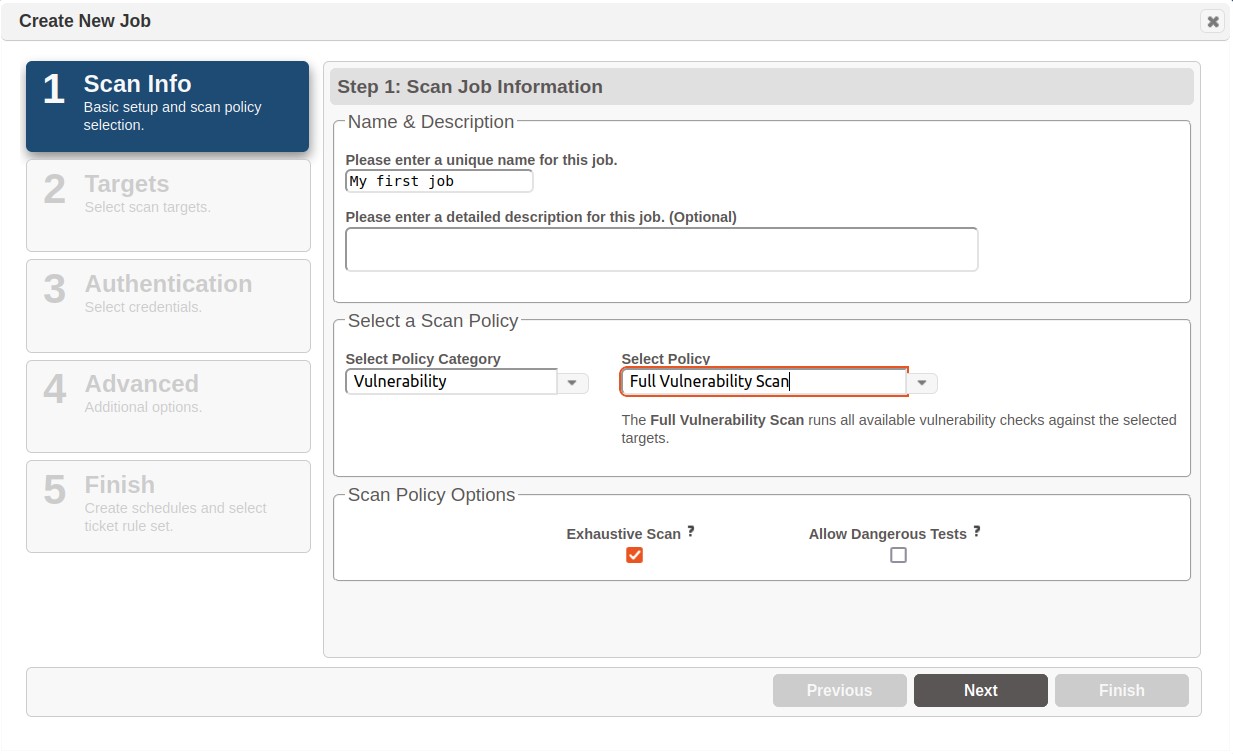
Scan Info.:
– First, enter a Name for your scan Job.
Optionally, you can also enter a description to assist in identifying the scan Job at a later time.
Scan Policy – Select the type of scan to be executed for the scan Job. SAINT provides many pre-defined scan policies that are based on various types of vulnerability, content, and configuration assessment needs from general vulnerability scanning to specially configured scans tailored for various industry compliance controls. For this scan, select the Vulnerability Policy Category, and select a Full Vulnerability scan policy. Leave the Exhaustive option checked (shown below) to configure this policy to enforce more thorough check methods. This type of scan executes all of SAINT’s vulnerability checks applicable to the type of target being assessed.
-
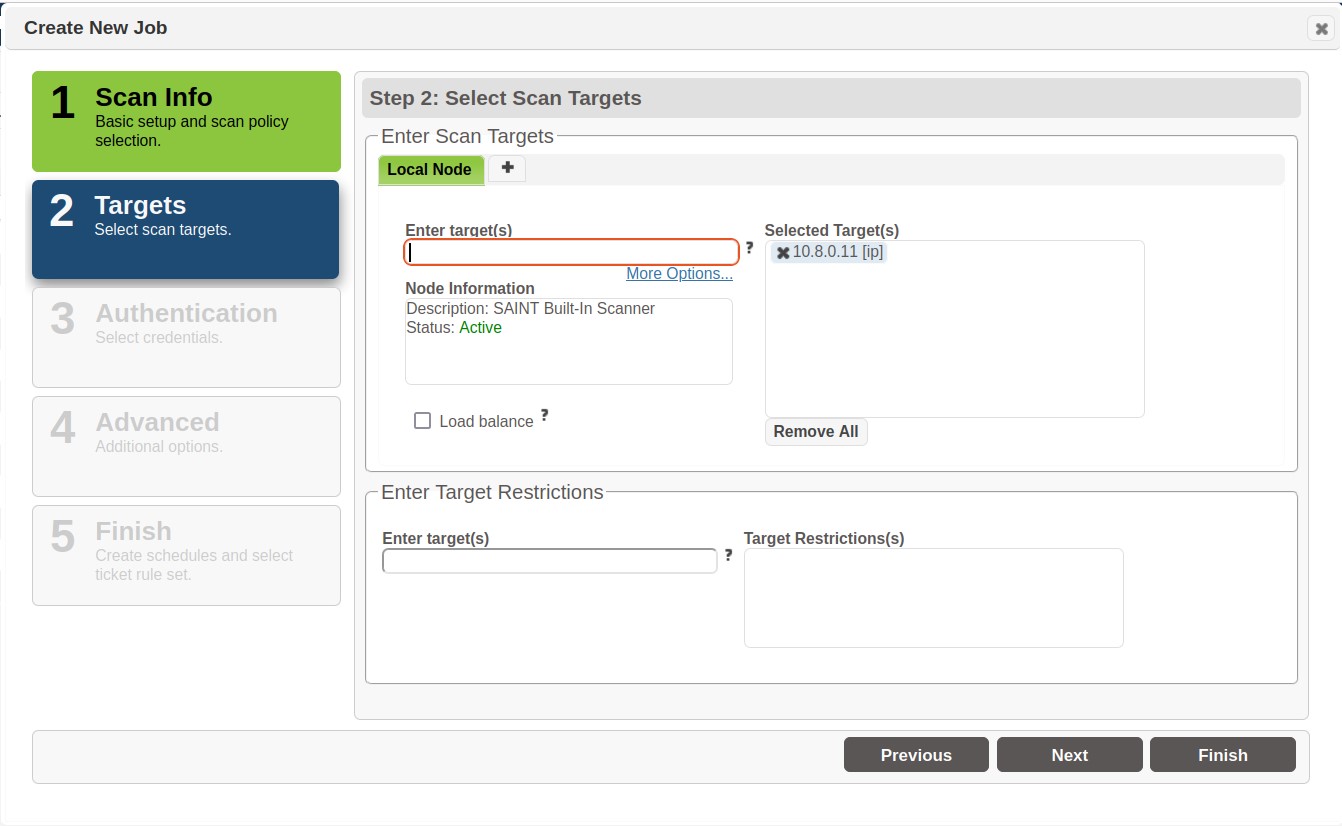
Targets – Click Next to enter the host targets to be scanned. Enter the address(es) of the target(s) to be scanned. This can be individual IP addresses, Subnet, CIDR for IPv4 or IPv6 addresses, or domain names. This can be done through a number of options, to include manual entry, importing target lists, creating and using Target and Asset Groups; as well as connecting to external sources such as Active Directory, Microsoft Azure, and Amazon Web Service (AWS) accounts.
-
Review, Schedule and Finish – There are many other configuration options available for granular control of your scan workflows. These steps are optional and not described in this quick scan example. Click the Finish button to review the Summary information and choose to run the scan “Immediately”.
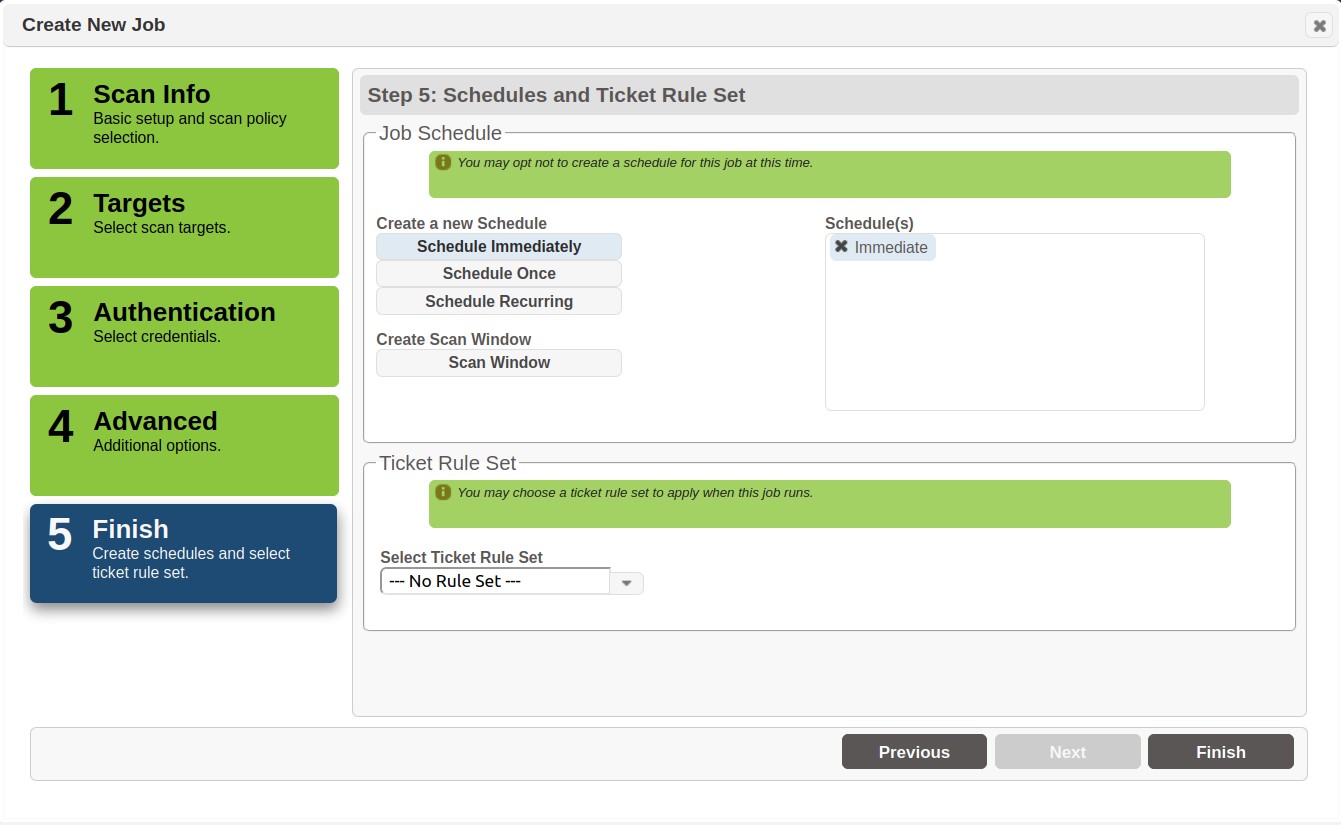
Click Finish in the Summary button once you've chosen when to run the scan. Your scan will now be initiated.
You will now see your new job’s scan queued and ready on the Scan Jobs page.

Once the scan is complete, you can use the various product features to view strategy graphs in the Dashboard tab, perform detailed analysis in the Analyze tab, and create reports from pre-defined report types (templates) or create customized reports.
View Scan Status File
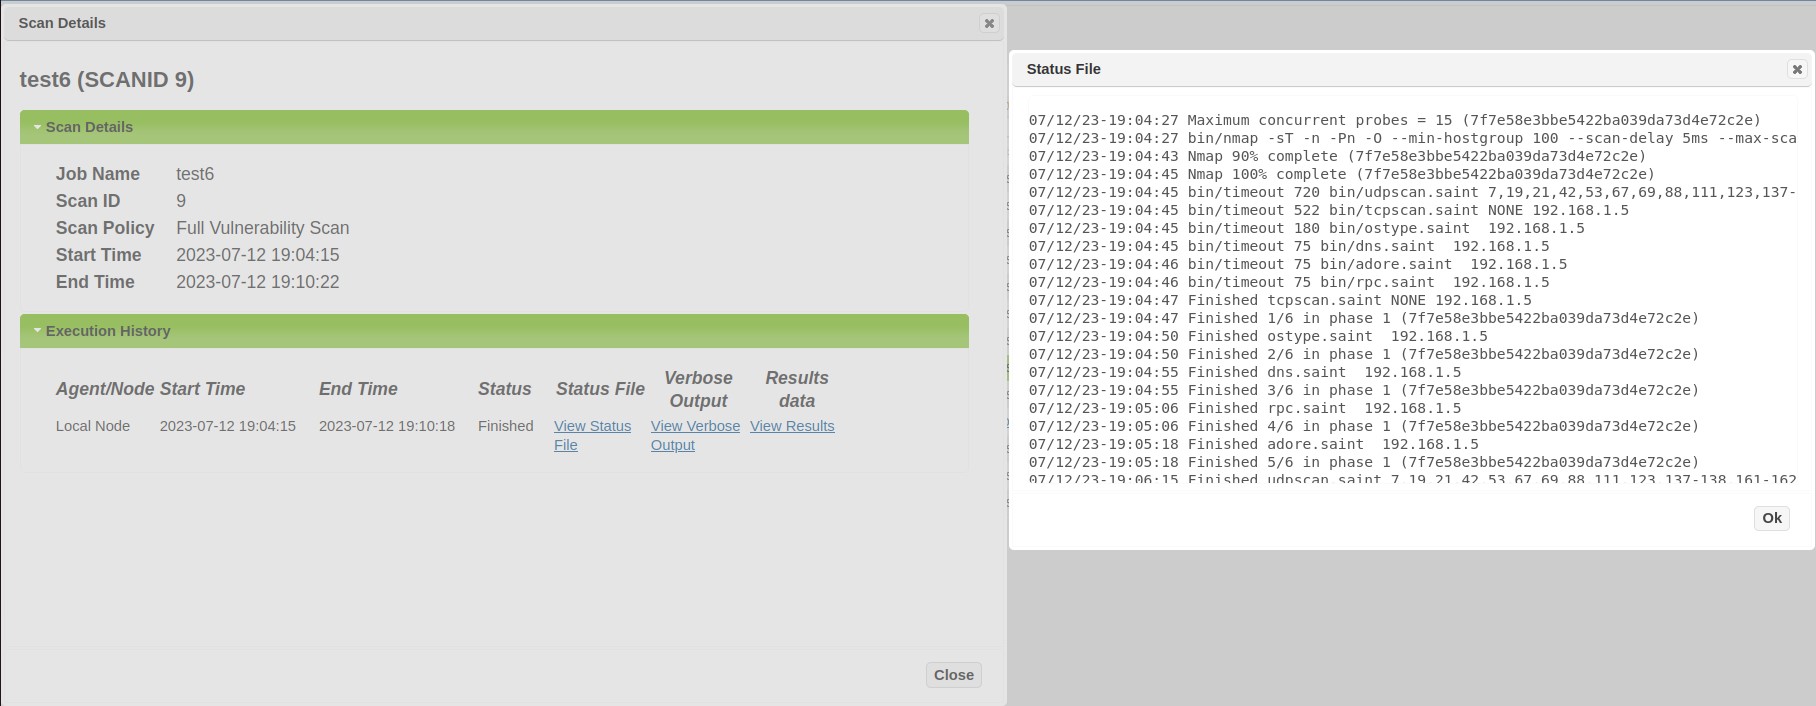
The scan status file contains time stamped information about scans that have been run, including the session name, the time the scan was started and completed, and the probes which were run. This information can be extremely valuable in reviewing the current progress of a running scan, as well as identifying possible causes of issues identified at the conclusion of a scan.
The Status File scan can be viewed from SAINT Security Suite using the following steps:
-
Navigate to the Scans grid under the Scan menu.
-
Click on the Details action button for the scan you want to review.
-
Click on the Execution History bar to view the scan history and details for each scan.
-
Click View Status File to display the raw status file content.
Asset Tracker Service
The asset tracker service allows SAINT Security Suite to run recurring scans against targets with dynamic IP addresses, without requiring the user to continually change the targets’ IP addresses in the job or target group. The service uses a lightweight agent program on the target which generates a unique asset ID and periodically sends that ID to SAINT’s tracker service. The tracker service then detects changes in the IP address associated with that asset ID, and updates all scan jobs and target groups to use the current IP address.
Follow these steps to use the asset tracker agent:
-
Start your installation with the tracker service enabled:
cd /usr/share/saint/eSaint/saint_manager
./saint_manager.py --with_service tracker start -
The first time the tracker service starts, it will generate the agent setup program containing its own public key and connect-back address. The program will be located in
/usr/share/saint/eSaint/saint_manager/bin/tracker_setup.exe
Copy and run this program on all targets which are to be tracked. (The tracker agent is currently available for Windows only.) -
A dialog box will inform you when installation is complete.
-
Schedule jobs or create target groups in the usual fashion, using each target’s current IP address. The job or target group will be automatically updated whenever a change in a target’s IP address is detected.
Once installed, the agent sends its asset ID to the tracker service every time the user who installed it logs in, and once every six hours if the user who installed it had administrator privileges. The agent uses 2048-bit RSA encryption to ensure the confidentiality of the asset IDs, and a challenge-response protocol to protect against replay attacks. Connections from the agent to the tracker service use port 6262/TCP.
Uninstalling the Asset Tracker Agent
To uninstall the asset tracker agent if it was installed with administrator privileges:
-
From the Windows control panel, open the Programs and Features dialog.
-
Highlight SAINT Asset Tracker.
-
Click on Uninstall.
To uninstall the asset tracker agent if it was not installed with administrator privileges:
-
Log in as the user who originally installed the asset tracker agent.
-
From the All Programs list, open the Startup folder.
-
Right click on tracker.
-
Click on Delete.
Asset Tracker Connect-back Address
When the tracker service generates the agent setup program, the address to which the agent will connect is hard-coded into the program. By default, the IP address of the SAINT machine’s local interface is used. However, in some situations that might not be the correct address. For example, if the local interface is a private IP address which is mapped to a public IP address by the firewall, and the intended targets can only access the public IP address. In this case, you can specify the correct connect-back IP address by editing /usr/share/saint/eSaint/saint_manager/config/manager.ini and changing the connectback_addr setting. (Delete the .keys/tracker.key file to force the tracker service to re-initialize the next time it restarts.)
Asset Tracker Scripts
In addition to automatically updating scan jobs and target groups, the tracker service allows you to plug in custom tracking scripts. This may be useful if you wish to track targets for purposes other than maintaining scans.
Any language may be used to write a tracker script, as long as the script file is executable by the operating system. The script should accept two command-line arguments. The first argument is the previous IP address of the target, and the second argument is the new IP address of the target. The script will be called with these two arguments whenever the tracker service detects a change in a target’s IP address.
Once the script is complete, edit /usr/share/saint/eSaint/saint_manager/config/manager.ini and set the script_file parameter to the full path of the script. Ensure that the execute bit is set on the script. If it is not or you aren’t sure, run chmod u+x <filename>.
Standalone Usage
Besides running as a module within SAINT Security Suite, the asset tracker service can also run as a standalone service. When running as a standalone service, it can still support custom scripts, but cannot track targets in the database or automatically update jobs and target groups.
To run the tracker service standalone, copy /usr/share/saint/eSaint/saint_manager/src/services/tracker.py and /usr/share/saint/eSaint/saint_manager/bin/tracker_setup_win32 to the desired location. It may be outside the SAINT installation directory, or on an entirely separate machine.
Run the program as follows:
python tracker.py [-p port] [-t timeout] [-k key_file] [-d db_file] [-s script_file] [-l log_file] [-a agent_file] [-c connectback_addr]
All command-line arguments are optional. If no script_file is specified, then the tracker will simply log IP address changes and do nothing more.
Scan Agents
SAINT Security Suite supports agent-based scanning as well as network scanning. In order to use the agent-based scanning features, a scan agent must be installed on every endpoint which is to be scanned. For more information on agent-based scanning, see Agents. For more information on installing agents on endpoints, see the SAINT Agent Installation Guide, which can be found in the Resources section of the mySAINT portal.