Exploit
SAINT's exploit and penetration testing module includes a variety of exploits designed to gain command execution privileges on remote targets. The exploits can be run on demand or as part of an automated penetration test.
Browse Exploits
To view the list of available exploits select the Exploit menu, and then select the Exploits page. The grid shows all exploits and detailed information about each – including what can be exploited, and how to set up an exploit or tool for execution. See the Exploit Tools page for details on how to set up and execute a specific exploit tool.
The exploit grid provides the capability to sort the list by selecting a column heading; search for a specific exploit or tool; or constrain the list to specific exploits or exploit types (client, local, remote, tool), target platforms, related CVE or exploit date; as well as other characteristics available in the column selector, such as Class and Protocol (IPv4, IPv6). To search for an exploit, enter a keyword in the search box, and then choose one of the options to search for the keyword in the exploit name, CVE, BID, or OSVDB.
When an exploit of interest is found, click on Info ( ) link or double click on the exploit to view detailed information about the exploit, including background information, a description of the problem, fix information, links to references, and limitations. The limitations section may include information such as what software versions the exploit is known to be effective against, whether the exploit depends upon system state, and what type of user interaction may be required on the vulnerable host.
Run Exploits On Demand
Once an exploit has been chosen, it can be executed by clicking on the Run icon (right arrow) for the exploit record, or by selecting the Run button within an exploit's information dialog. This selection will display the setup form containing information specific to the chosen exploit. Among the most common fields are:
-
Target – the host name or IP address of the host against which to attempt the exploit
-
Target Type – the target platform, chosen from the list of platforms in the pull-down menu
-
Port – the TCP or UDP port on which the vulnerable service is listening
-
Shell port – the TCP port on which a successful exploit opens a command shell on the target
After filling in the requested information, click the Run button to launch the exploit. A status update will appear indicating that the exploit is running, or explaining why the exploit could not run in the case of failure. When the exploit finishes, there will be a status update indicating whether or not the exploit succeeded.
Exploit Types
Remote vs. Local Exploits
Remote exploits target vulnerabilities in network services which listen for connections on a TCP or UDP port. Examples include vulnerabilities in web services (HTTP or HTTPS), mail services (SMTP, POP3, or IMAP), or RPC services. Remote exploits do not typically require prior access to the target before the exploit can be attempted.
-
To run a remote exploit, click on the Run Now button beside the exploit name or at the bottom of the exploit description page to display a setup dialog to configure the exploit for execution, as in the example below for the MySQL file remote privilege elevation exploit:

-
The first step is to select the scanner “node” to run the exploit from. This node must be able to reach the target. For standalone installations, this will be the built-in local node. For multi-node deployments, this must be a scanner node that can access the host being exploited.
-
Select an existing Job to associate the exploit with, or enter the name of a new Job for the exploit.
-
Enter parameters for each option available in the exploit setup, as shown in the selected exploit. Note that each exploit can have unique characteristics. Context-sensitive help is available via each field’s help (?) button for guidance.
-
Enter the target to direct the exploit to.
-
Click Run to launch the exploit.
Local exploits target vulnerabilities in entities which are not accessible across a network, such as the operating system kernel or services which do not accept remote connections. Local exploits require prior access to the target, so there must be an existing connection to the target before the exploit can be attempted. Whereas remote exploits target remote command execution vulnerabilities, local exploits target privilege elevation vulnerabilities. To accurately assess the success of a local exploit, the existing connection must not already be at the root or administrator level.
The steps for executing a local exploit are the same as setting up a remote exploit (Job; Settings; Target). Again, context-sensitive help at the field level is provided for specific help.
Client Exploits
Client applications such as web browsers and media players do not listen for connections on a TCP or UDP port like server applications do. Instead, all data transmission is initiated by the client. Therefore, exploits for client vulnerabilities cannot be executed directly. Instead, these exploits must wait for a connection from the vulnerable application.
-
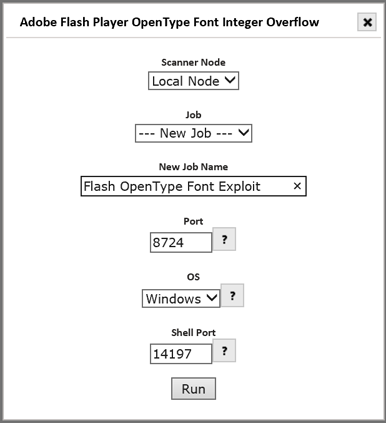
To run a client exploit, click on the Run Exploit icon beside the exploit name or the Run button at the bottom of the exploit description page to display a setup dialog to configure the exploit for execution, as in the example below for the Adobe Flash Player client exploit:
-
The first step is to select the scanner “node” to run the exploit from. This node must be able to reach the target. For standalone installations, this will be the built-in local node. For multi-node deployments, this must be a scanner node that can access the host being exploited.
-
Select an existing Job to associate the exploit with, or enter the name of a new Job for the exploit.
-
Enter the listener port number. This is the TCP port number on which to run the exploit server.
-
Select the operating system of the target computer (if options are available).
-
Enter the Shell Port number. This is the TCP port number to use for controlling the target in the event that the exploit is successful.
-
Click Run to launch the exploit.
When a client exploit is run, a server is started that listens for connections from vulnerable clients on a port, and serves the exploit when it receives a request.
Exploit Status
Once an exploit has been executed, a dialog will be displayed to first attempt resolution of the Target and display a message if/when target resolution has occurred; and additional messages to show progress as the exploit executes. The last update will display whether the exploit is successful or unsuccessful. Example status messages are shown below:
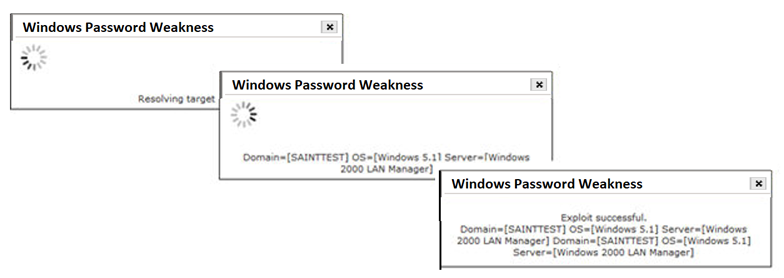
Successful exploit results will then be loaded into the repository and available for analysis, via the Analyze pages and Exploit reports.
Exploit Tools
In addition to the remote, local, and client exploits designed to exploit a command-execution vulnerability on a target, SAINT also includes a number of additional tools. Each tool performs a certain information gathering task which might be a useful part of the penetration testing process, but doesn't attempt a penetration in and of itself.
To view the list of Exploit tools like the screen capture below, click on the Exploit Tools option under the Exploits menu; or use the Exploits page and sort or constrain the list by tool in the Type column.
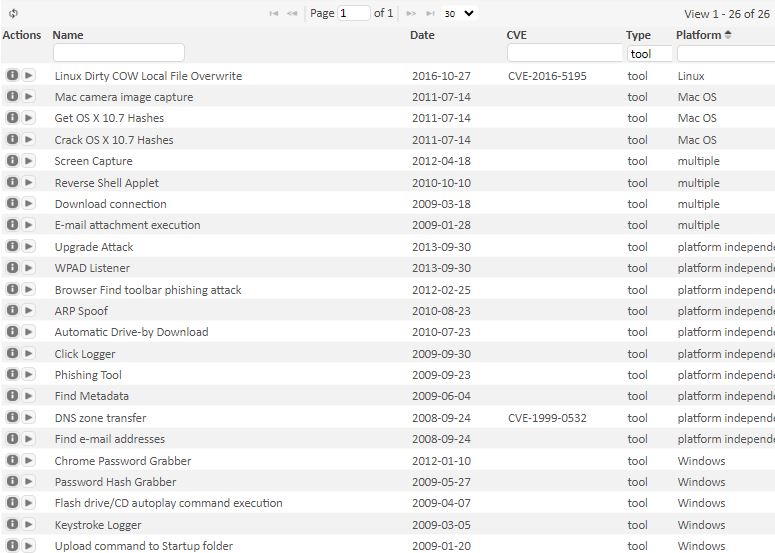
Viewing the details about a tool and running a tool are both executed through the same point-n-click method used for the exploits. To run an exploit tool, enter the requested information in the tool's setup dialog, and then click the Run button. The results will be available in the Analyze page after the tool finishes running.
The following describes the exploit tools currently available by SAINT:
 |
ARP Spoof Exploit Tool – This tool sends a forged ARP reply which is stored in a target’s cache, allowing impersonation of that target’s gateway router or another key destination. The tool proceeds to conduct a man-in-the-middle attack and capture packets being sent between the target and the destination. |
 |
Automatic Drive-by Download – This tool waits for client connections, and then gathers information about the operating system and installed software on the client. Next, it chooses the latest and most reliable client exploit for the client's operating system and installed software, and delivers that exploit to the client. |
 |
Browser Find Toolbar Phishing Attack – This tool uses the browser's Find toolbar to capture the user's password. |
 |
Chrome Password Grabber – This tool uses an existing connection to extract all passwords saved in the Chrome browser for the logged in user. |
|
|
Click Logger – This tool runs an exploit server which simply returns an error page and logs which users visited it. It can be used to find out which users were susceptible to clicking on the link in an e-mail message. |
|
|
Crack OS X 10.7 Hashes – This tool will open hashes dumped by the Get OS X 10.7 Hashes tool and crack them using a word list. Successfully cracked accounts are saved. |
|
|
Disable Firewall – Disables the firewall on a target system for further penetration analysis. The connection requires root privileges on Unix and Linux targets. |
|
|
DNS Zone transfer – This is a process by which a secondary name server copies all DNS records for a domain from a primary name server. |
|
|
Download Connection – This tools allows you to download a file which, when executed, establishes a command connection. This tool requires a user to execute the downloaded file in order to succeed. The target field must be a licensed target but is unused. |
|
|
E-mail Attachment Execution – This tool sends an e-mail attachment which, when executed, establishes a command connection. This tool requires a user to execute the e-mail attachment in order to succeed. This tool requires the IP address of a working mail server which allows relaying of mail to the recipients. The target field must be a licensed target but is unused. This tool accepts either a single recipient or a space-separated list of recipients. If the user's e-mail client blocks .exe attachments, then an attachment filename which doesn't end in .exe must be used, and the file must be renamed to end in .exe before it can be run. |
|
|
Find E-mail Addresses – E-mail addresses in a given domain can often be found using publicly available information such as Internet search engines, network registrars, and public key servers. This tool attempts to provide a list of e-mail addresses using these resources for automating client type exploits, and is integrated with the SAINT e-mail forgery emulator. |
|
|
Find Metadata – This tool searches the Internet for PDF and Microsoft Office files in the given domain, and extracts the metadata from those files. This metadata often contains the names or aliases of the document's authors or contributors, which can be used to guess valid e-mail addresses for use in client exploits. |
|
|
Flash Drive/CD Autoplay Command Execution – A trojan that can be downloaded on a USB drive or CD, and when connected to a computer, will provide a direct connection to the exploit server. This tool allows you to create a USB flash drive which, when inserted into a Windows computer, prompts a user to run a program which creates a command connection. The program is disguised as the Open Folder option in the AutoPlay dialog to entice the user to run it. |
|
|
Get OS X 10.7 Hashes – This tool attempts to retrieve all user names and their associated SHA512 password hashes. If successful the hashes are dumped for offline cracking. This tool works on Mac OS X 10.7 and 10.7.1 |
|
|
Keystroke Logger – This tool records all keystrokes which are typed at a computer's console. The keystrokes can be viewed in the exploit server's log. |
| Linux Dirty COW Local File Overwrite – This tool allows you to overwrite an arbitrary file on Linux. | |
|
|
Mac Camera Image Capture – This tool attempts to retrieve an image file captured by an iSight camera such as the one built into a MacBook. If it is successful, the picture is displayed. |
|
|
Password Hash Grabber – This tool grabs the windows SAM file or password hashes of the target. The SAM file/password hashes can be viewed in the exploit tools previous results section. Results may be used with third party programs to obtain passwords in plain text. |
|
|
Phishing Tool – This tool serves an HTML form which collects information from users. It allows you to specify a custom header graphic, a custom footer graphic, and an introductory text message. For best results, design the HTML form to look like a legitimate web site so users will be more inclined to enter the requested information. |
|
|
Read Address Book – This tool attempts to gather e-mail addresses from Outlook and Outlook Express address book files (.WAB, .PAB) on the target. Recent versions of Microsoft Outlook no longer store address books locally by default. Therefore this tool is primarily useful for targets using Outlook Express or old versions of Outlook. |
|
|
Read passwords Stored in Web Browser – This tool attempts to retrieve web site passwords which have been stored by Internet Explorer. Due to the encryption algorithm used by Internet Explorer, this tool can only retrieve passwords that were entered by the same user that is running the tool. For Internet Explorer 7, due to the encryption algorithm, this tool can only retrieve passwords for web sites that are still present in the browser's history. For Internet Explorer 7, passwords can only be retrieved if AutoComplete is enabled and the user chooses yes when prompted to save each one. |
|
|
Reverse Shell Applet – This tool runs an exploit server which delivers a signed Java applet, embedded in an HTML page, to the target hosts. The user is presented with a signed digital certificate which, when accepted, establishes a reverse shell connection back to the exploit server. |
|
|
Screen Capture – This tool captures the screen of a remote target, based on an existing connection already established to the target. Note that for Unix and Linux systems, the xwd utility must be present on the target in order to exploit the target and perform screen captures. |
|
|
Upgrade Attack – Like the WPAD Listener, this exploit tool sends fake LLMNR responses to trick browsers into proxying web requests through the exploit tool. It then proceeds to intercept requests for device driver updates and delivers an executable which establishes a command connection. |
|
|
Upload Command to Startup Folder – Each user's Startup folder on Windows systems contains programs that run at start-up time. This tool uploads a command connection to a user's startup folder. Then the connection is established the next time the computer starts. |
|
|
WPAD listener – This tool sends fake LLMNR responses to trick browsers into proxying web requests through the exploit tool. It then proceeds to request NTLM authentication from the browser and collects the resulting password hashes. |


Exploit Servers
Once a client exploit has been run, its exploit server will appear in the Exploit Servers task area under the Exploits menu.the follow example, an Exploit is being run for the VMWare OVF Tool Format String.
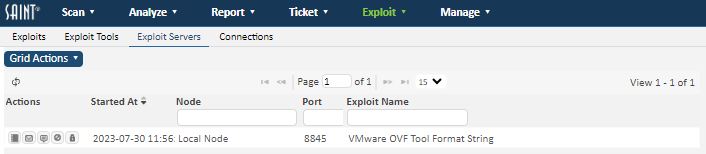
There are several options available at this point. Click on the Log icon to see what requests have been received by the exploit server. Click on the Send E-mail icon to craft an e-mail message to lead users to the exploit server (see e-mail forgery). Click on the Send Text Message icon to send a text message which leads a cell phone user to the exploit server (see text messaging). Click on the Stop icon to terminate the exploit server.
E-mail Forgery
Once an exploit server has been started, users need to initiate a connection with it in order for exploitation to occur. A good way of telling users to connect to it is through e-mail. Craft an e-mail message to lead potentially vulnerable clients to the exploit. Since it may be more effective if the e-mail appears to come from a colleague or a prospective customer, forge the e-mail message such that it appears to come from any name and e-mail address. A number of graphical templates designed to entice a user into following a link are also included.
The option to craft an e-mail message is available after the exploit server has started by clicking on the Send E-mail icon in the Exploit Servers section. To enable e-mail, enter one or more recipient addresses, separated by spaces or commas. Click on the light bulb icon followed by the Find E-mail Addresses link, if desired, to search for possible e-mail addresses in the desired domain.
If desired, also change the subject line, the content type, the template, the message body, or the name and address which the message will appear to come from. Use the preview links beside the template choices to see how the message will appear to the recipient.
Note that the default message includes the link to the exploit and, for some exploits, special instructions for the recipient to attempt the exploit. The link should remain intact, but the surrounding text can be anything which would be most effective in persuading the recipient to follow the link.
The e-mail will be sent through a mail relay if specified. The relay must accept mail for the recipient's domain, or be configured to allow relaying from the exploit host to the recipient's domain. If a mail relay is not specified, the mail is sent directly to the mail server for each recipient's e-mail domain.
Text Messaging
The section above discusses the use of e-mail to lead users to the exploit server. However, some users may be less inclined to read such e-mail messages, and others may never see the message at all due to spam filters. In these cases, text messaging may be a more effective option for leading users to the exploit server.
To send the exploit server link in a text message, click on the Send Text Message icon (![]() ) for the desired exploit server on the Exploit Servers page. In the resulting dialog window, enter one or more cell phone numbers in the To box, separated by spaces or commas. Each cell phone number should have ten digits, with or without dashes. Next, customize the message content if desired. The URL should be left intact in order to link to the exploit server, but the surrounding text can be anything which would be effective in persuading the recipient to follow the link. Finally, click the Send button.
) for the desired exploit server on the Exploit Servers page. In the resulting dialog window, enter one or more cell phone numbers in the To box, separated by spaces or commas. Each cell phone number should have ten digits, with or without dashes. Next, customize the message content if desired. The URL should be left intact in order to link to the exploit server, but the surrounding text can be anything which would be effective in persuading the recipient to follow the link. Finally, click the Send button.
Connections
After a successful exploit, a control channel is created by connecting to a shell port, receiving a shell connection back from the exploit, or recording the parameters which allowed remote access to the target, depending on the payload of the exploit. This control channel is referred to as a connection. The connection gives you control over the target after it is exploited, allowing you to view the file structure or take other actions which serve as proof of access.
Connections Manager
To view your current connections, click on the Exploit menu followed by the Connections option. If there are any active connections, they are listed on this screen.
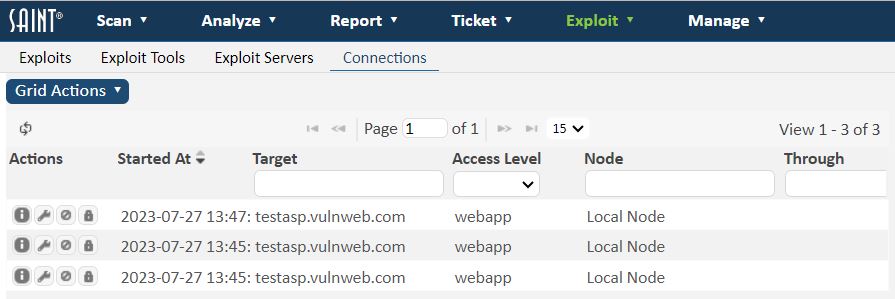
Connections resulting from exploits, which gained full administrative privileges on the target, are indicated by the word admin or root in the access level column. Connections which gained access only to a particular resource on the target, such as an SMB share, are indicated by the resource name in the access level column. All other connections are indicated by the word user in the access level column.
Clicking on the wrench icon in the right-hand column of any connection displays a menu of actions which may be taken on the connection. These actions are discussed in the sections which follow.
Command Prompt
The command prompt provides the ability to interactively send commands to the remote host and view the resulting output. The command prompt is available in most connections, except those resulting from limited-access exploits such as SMB password guessing.
How to Invoke the Command Prompt
To invoke the command prompt, click on the Exploit menu followed by the Connections task item to view the connection list. Then click on the wrench icon on the desired connection in the list, and then Command Prompt on the pop-up menu. Enter commands followed by the Enter key, and wait for the results to appear.
Note that the commands are sent directly to the command shell on the remote target. Thus, the set of recognized commands depends upon the operating system of the remote target. dir, cd, and type are common commands on Windows targets. ls, pwd, cd, and cat are common commands on Unix and Linux targets. Consult an operating system manual for more information on available commands.
Depending upon the type of exploit, the connection may be a virtual connection instead of a real TCP connection to the target. Although the command prompt for a virtual connection appears the same as that for a normal connection, the underlying function invokes a new command shell for each command rather than having a persistent shell. Thus, the shell will have no "memory". The environment of each command will be independent of previous commands. For example, a change to the current working directory using the cd command will not be remembered by the next command.
File Manager
The file manager allows you to browse the folders and files on the remote host, to download or upload files on the remote host, or to delete or rename files on the remote host.
How to Invoke the File Manager
To invoke the file manager, click on the Exploit menu followed by the Connections task item, and then click on the wrench icon for the desired connection, followed by File Manager. The files and folders found in the current folder are displayed on the initial grid. Clicking on any of the displayed folders changes it to the current folder. The current folder’s full path is shown above the grid, and clicking on any of the folders in the path also changes it to the current folder.
To download a file from the remote host, click on the down-arrow icon beside the desired file in the file manager. To upload a file to the remote host, click on the Upload option in the Grid Actions dropdown. On the form, specify the file name on the remote host and the local file to upload.
Security Suite will attempt to upload or download the file using TFTP, active FTP, passive FTP, or SMB—whichever method is available with the current connection type and target operating system. Note that in some connections, the ability to upload and download files may not be available. In these cases, text files can be viewed using the type or cat command in the command prompt instead.
Once a file has been downloaded successfully, it will be handled by the browser based upon the file type. HTML, XML, text, and other file types will usually be displayed by the browser itself. You may be prompted to enter a file name to save other types of files.
To delete a file on the remote host, click on the trash can icon beside the desired file, and choose OK in the confirmation box.
Screen Capture
The screen capture displays whatever is on the screen of the remote computer at the time the capture is performed. In some cases, this may show useful information, such as an open application or a user's desktop. In other cases, it may just show a login prompt or a screen saver.
How to Perform a Screen Capture
To perform a screen capture on an exploited target, click on the Exploit menu followed by the Connections task item. Then click on the wrench icon for the desired connection. That will bring up the Exploit Tools grid. Enter Screen Capture in the search box below the Name column heading, or scroll down and find the Screen Capture exploit tool. Click on the Run Exploit icon for that exploit tool to open a dialog box which reports the progress as it captures the screen, downloads the bitmap, converts it to PNG format, and displays it. It can then be copied and pasted using your browser’s copy function.
Note that the screen capture function will not be available for remote systems that do not use a graphical user environment. Furthermore, the screen capture function requires the ability to upload and download files on the remote host, which may not be available in some connections.
Exploit Tunneling
Depending on the design of the network, there may be some parts of the network that are restricted or inaccessible from other parts of the network. A thorough penetration test will attempt to use a successfully penetrated target to evaluate other potential targets which may be accessible from the first target. The scan engine achieves this type of penetration test by tunneling exploits through a target which has been successfully penetrated. The tunnel runs on the penetrated target and forwards network data between the scan engine and the new target, essentially allowing most functions, including port scanning, exploit attempts, and shell connections, to run as though the scanner has direct access to the new target.
How to Run Exploits through a Tunnel
To run exploits through a tunnel on a penetrated target, go to the Exploit menu followed by the Connections task item. Then click on the wrench icon for the desired connection, followed by Start Tunnel from the pop-up menu. Wait while the tunnel is established, and verify that it was established successfully. Then, select that connection as your tunnel on the setup page when running exploits either on demand or as part of an automated penetration test.
When the tunnel is no longer needed, follow the same instructions as for starting the tunnel, but click on Stop Tunnel. This will also terminate any connections resulting from successful exploits which ran through the tunnel.
Disconnecting
When a connection is no longer needed, it should be disconnected to conserve resources and to avoid misuse by other users.
How to Close the Connection
To disconnect, click on the Exploit menu followed by Connections and click on the Disconnect icon for the desired connection. This will close the persistent TCP connection if there is one, and remove the connection parameters from the disk.
Run an Automated Penetration Test
Pen Test Setup
In an automated penetration test, the exploit process begins by gathering information on operating system types and open services, and then launches a set of exploits specific to those operating systems and services.
To begin a penetration test, set up a scan Job that will execute the penetration test. Use the PenTest scan category under the policy step. (See the Scan tab section for setting up a scan job for help on this process).
The scan levels for running a penetration test are as follows:
-
Discovery will discover live hosts in the selected address range, and then stop. This level does not require a license key. It is useful for figuring out which IP addresses to put in your key. The discovery method depends on the selected firewall support option.
-
Information Gathering will discover live hosts, try to determine their operating system types, and scan their ports.
-
Single Penetration will include all of the above steps and then proceed to run remote exploits for the detected operating system and services, starting with those least likely to cause crashes, until one succeeds in establishing a shell connection.
-
Root Penetration is similar to Single Penetration but continues until the maximum privilege level is reached on the target. The maximum privilege level is root on a Unix or Linux system and administrator on a Windows target. The Root Penetration level also runs local exploits if the available remote exploits result in a connection without maximum privileges.
-
Full Penetration will run all available exploits for the detected operating system and services. This level is the best choice if the objective is to exploit as many vulnerabilities as possible. However, if the objective is to obtain evidence of penetration, such as files or screen captures from the target, then this level is not the best choice because a successful connection could be severed if a later exploit causes a crash.
-
Web Application will search the target for Web applications, and run all available exploits against those applications. This level is the fastest way to find exploitable Web application vulnerabilities such as SQL injection.
The exploit functionality also provides support for authentication to the targets. This option is similar to the scanning Authentication option. For the purpose of penetration testing, authentication is helpful for determining operating system differences, such as service pack levels or Linux varieties, more precisely than would be possible using un-credentialed methods. This information helps the exploit process choose the correct arguments when running exploits, and may improve the success rate. However, the login and password are not typically needed for the exploits themselves.
Set up the remainder of the scan Job process as you would other types of scans. Define the schedule for the job and send it to the job queue. Job status for Penetration Testing jobs will be available via the Scan grid.
Analyze Exploit Results
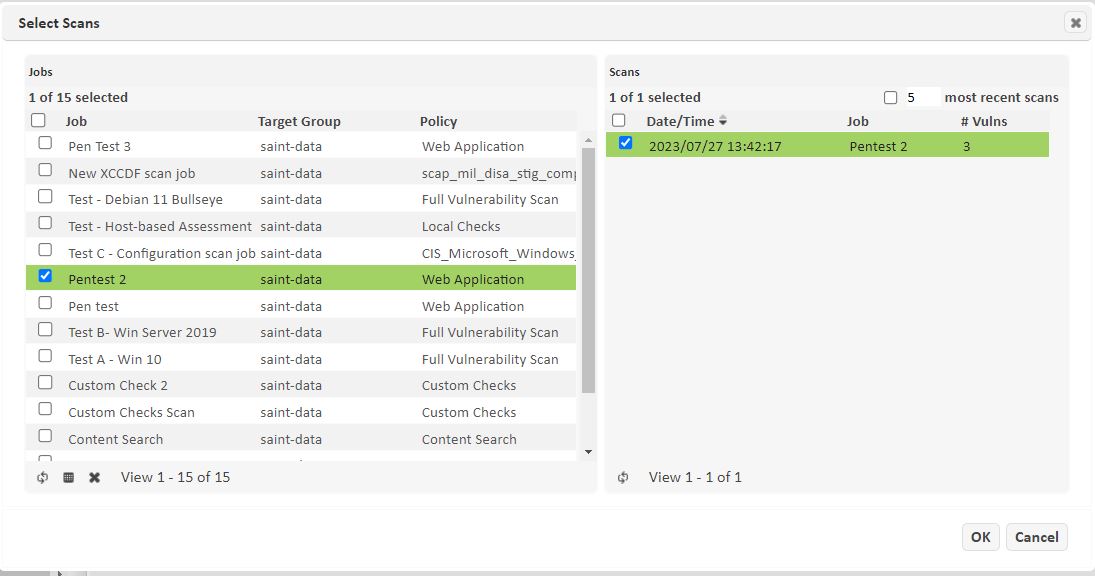
Exploit results are stored and accessible in a manner similar to other types of scans. Therefore, results can be selected and analyzed within the Analyze page or generated as a report. Refer to those sections for more information for more detailed help. The following shows an example of running a full penetration test and viewing the results of the completed job.
First, select the job and specific scan result. The job can be run multiple times, so it is important to identify the specific scan execution you wish to assess. Note that the scan shows Zero (0) for Number of Vulnerabilities. In this case, the results are not identified specifically as vulnerabilities, as in the case of a vulnerability assessment. However, there may be results retrieved as a result of the exploit that are specific to the type of exploit or test used.
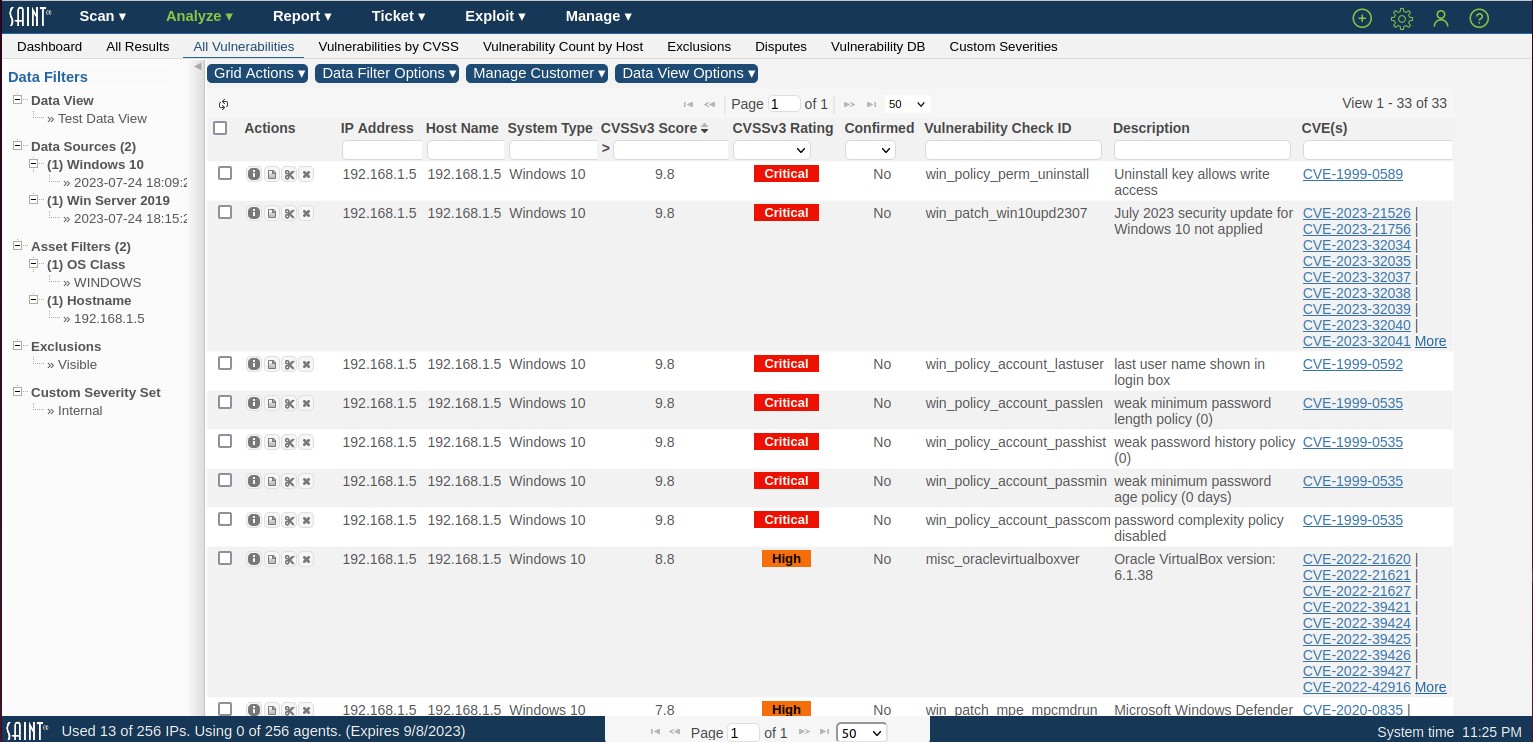
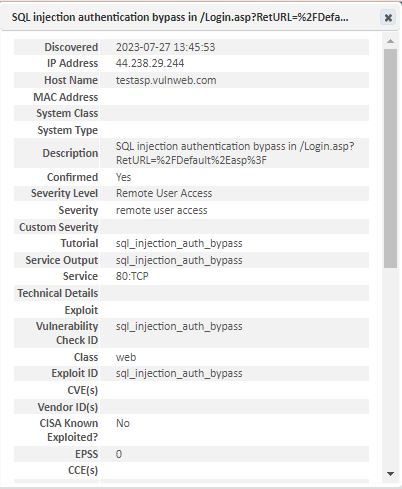
The Analyze pages will display results columns specific to exploits, as there are variances in the types of information collected between vulnerability and exploit assessments. The following shows results from a full penetration test.

This results show the Exploit ID of each exploit, the severity of individual results, the description of the exploit, and references to any related CVEs (with hyperlinks to the CVE authoritative source for additional details on the CVE).
Use the Details () option for a results record to obtain additional information about the result, as well as any other hyperlinks to reference sites for remediation guidance.
Exploit Severity Levels
The significance of an exploit result is different from that of a vulnerability check. Therefore, different severity levels are used to classify exploit results. The following severity levels are used by SAINT:
 |
Remote Admin (Red): Exploit resulted in the ability to read files or execute commands with the privileges of the administrator or superuser without any prior access. |
 |
Remote User (Brown): Exploit resulted in the ability to read files or execute commands with the privileges of an unprivileged user without prior access |
 |
Client Access (Blue): Exploit resulted in the ability to read files or execute commands after a local user took some action to cause the exploit to proceed. |
 |
Privilege Elevation (Yellow): Exploit resulted in elevated privileges on a target of which some level of access was previously available. |
 |
No Access (Green): The exploit was unsuccessful. |