Scan Tab
The Scan menu contains the primary interface for creating and managing scan activity. This includes creating target groups to centrally manage the collection of “like” hosts to be targeted for scanning; managing Assets (discovered/scanned hosts); viewing the extensive list of vulnerability checks for individual SAINT scan policies; adding custom checks to those policies as well as adding custom policies; creating and managing credentials that can be applied to scan jobs on a recurring basis; and creating scan jobs for immediate use or scheduled at a pre-defined time, or setting up recurring scans based on a defined job.
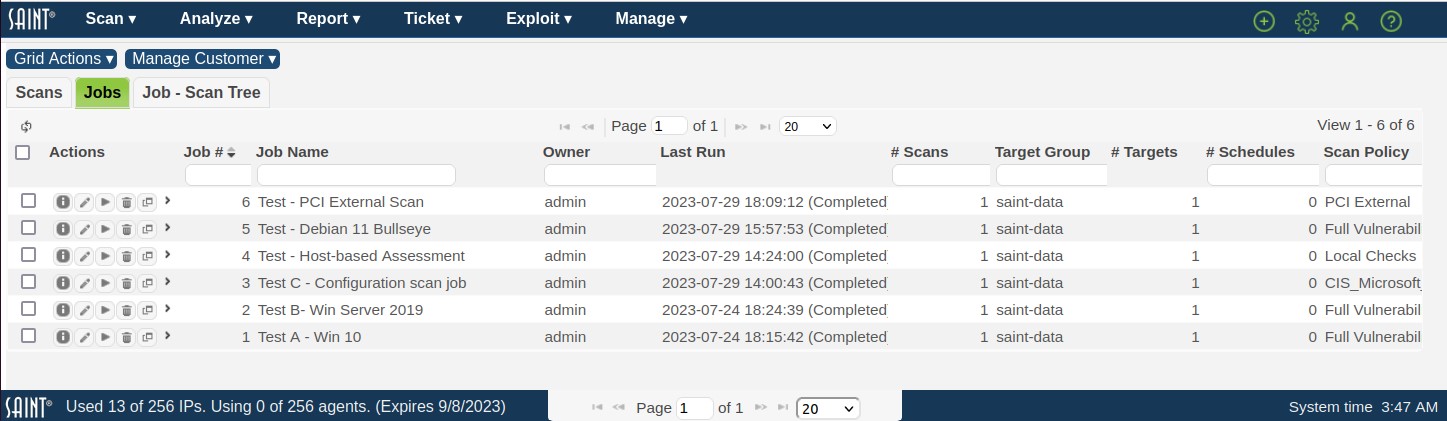
As shown below, the Scan Jobs page provides a data grid to enable you to view, sort, search, and manage scan Jobs and the Scans executed from these jobs. You can obtain information about specific records or perform other actions such as running existing jobs, or using the options from the Grid Actions drop-down to perform actions as reloading the grid content (refresh), creating a new Job, and identifying what columns you wish to view or resorting the view. Refer to the Using the Results Grid section for more detail on the definition and usage of these options.
Jobs Tab
A job is a main object for setting up and executing scans. Jobs can be associated with target groups during job setup, or can be run outside of a target group. A job can be run as single scans, or can be configured for recurring, continuous scans based on the job’s defined targets, policies, credentials, configurations, notification workflows and schedule. As with target groups, Manage Jobs main display presents all available jobs in a list view in a results grid.
With the applicable role-based permissions, you can sort this list, perform column searches, see detailed information about a record in the display, or take other actions such as adding/removing columns, refreshing the display to dynamically update the content with any new content since you entered the grid, and take other actions related to creating, editing and deleting content. The following describes these features in more detail.
Single and Multi-Node Scan Support
For installations that are using only a single scan engine (local scanner node), such as standalone installations or shared installations that are scanning reasonably small environments, you will enter targets into the Enter Target(s) tab named local node. SAINT's architecture also provides support for multiple scanner node deployments to support large environments or distributed scan needs. The scan job setup process for this type of implementation will be a bit different, in that the target setup process will display both the local node (or whatever custom name your administrator has chosen for it), and a + (add) option to choose other available nodes to scan specific targets or to be used as part of a load balanced scan process. The following describes the job setup process for either a single or multi-node deployment.
Create a New Job
For quick, uncredentialed scans, scan jobs can be run by entering a job name and selecting the applicable scan policy in Step 1; entering a target in Step 2; and clicking the FINISH button to run the job “immediately” in the Summary tab. This three-step process then uses pre-defined configuration settings to execute the scan on the target hosts. Scans can also be set up with more advanced configurations; with multiple targets or based on targets already defined in a target group or by asset tags; target credentialed/authentication; specific scan configuration settings and notification work flows; as well as based on scheduled or recurring scan needs. The job wizard provides a step-by-step approach to setting up these options. Each is described in more detail in the following sections.
To create a scan job, click on the Create option (upper right corner of the screen) from any page, or select Grid Actions > Create Job from the Jobs grid on the Scan page. The job creation wizard will be displayed to walk through the steps for creating a scan job:
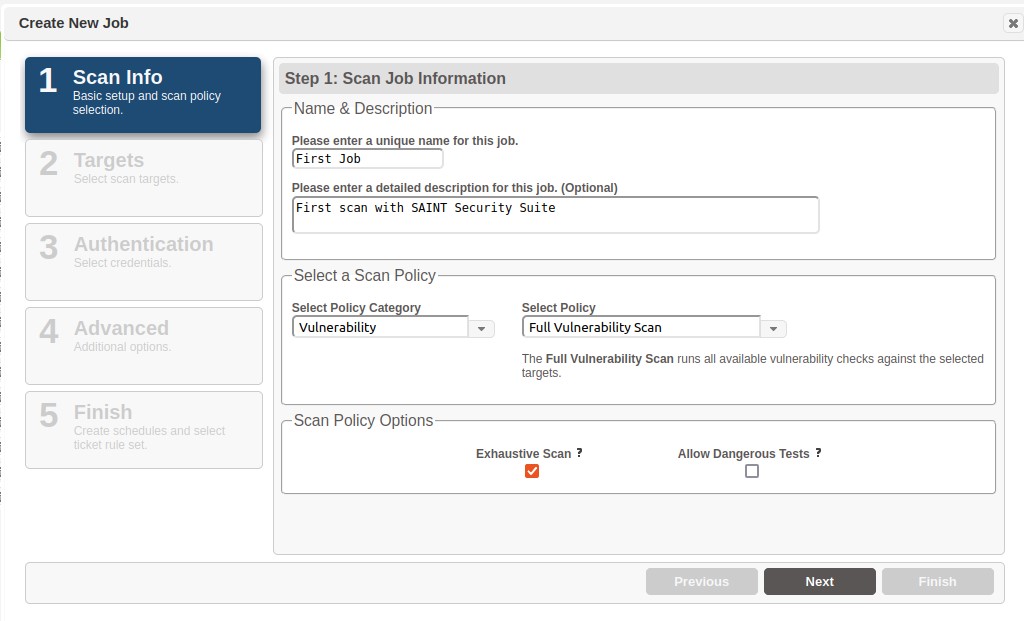
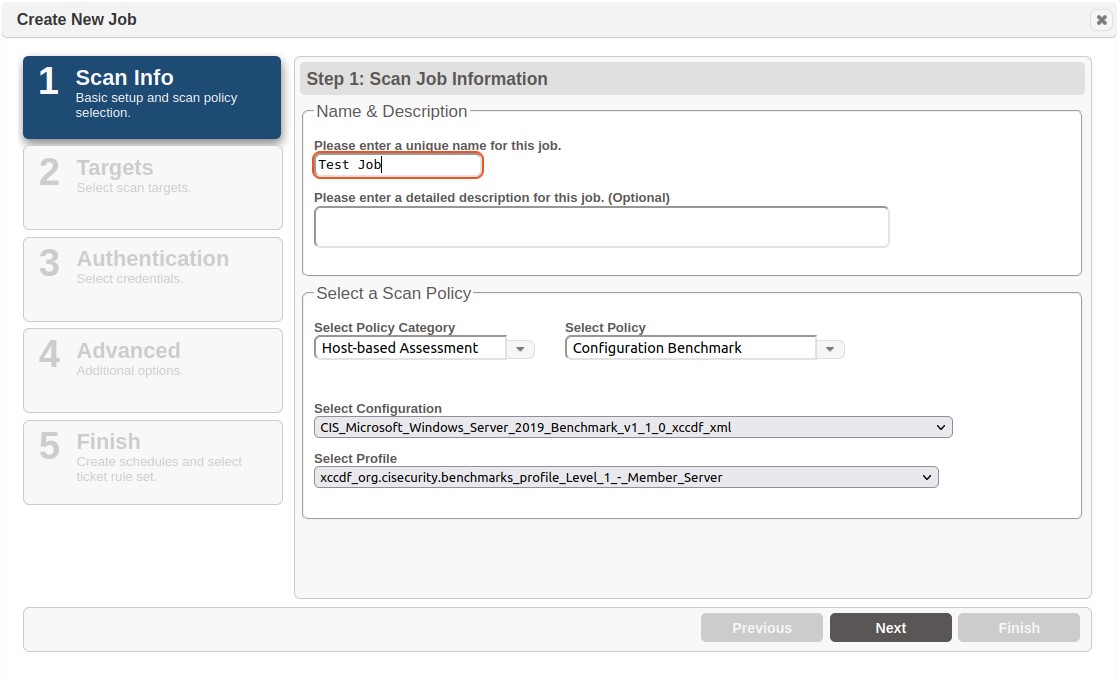
Step 1 – Scan Info
Name and Description
Enter a name for the new job. Enter a detailed description to communicate the purpose of the job and other details pertinent to the job.
Category and Scan Policy
Scan policies control the types of probes and checks that are executed for defined targets. These policies are categorized for ease of management and include subject-matter groups such as compliance, platform and type of scan.
-
Select a scan policy by first selecting a category from the Select Policy Category drop down list.
-
Select a policy for the category by clicking on the policy name in the Select Policy drop down list. Then, click Next to enter the host targets to be scanned
Each category and their applicable policies are described below.
Information Gathering
-
Discovery – This is the least intrusive scan. SAINT identifies hosts which are alive and fingerprints their host type. If desired, the live hosts can then be pre-selected when creating a new job after the discovery scan finishes, using the Choose Targets from a Previous Scan option in step 2.
-
Port scan – For this policy, SAINT will identify live hosts and check for services listening on TCP or UDP ports. The range of ports to check is determined by the ports to scan settings on the Options page.
-
Web Crawl – For this policy, SAINT detects web directories on the targets. It does so by first scanning ports for web services, and then finding directories by following HTML links starting from the home page.
-
Content Search – For this policy, SAINT searches files on Windows and Linux/Mac targets for credit card numbers, social security numbers, or any other specified patterns. See the SAINT Configuration section for more information on configuring SAINT's file content searching feature. Authentication is required for this policy and if scanning a Linux/Mac target, SSH must be enabled.
-
Anti-virus (AV) information – For this policy, information is collected about installed AV software, such as last scan date, enabled, definition file dates, and other information useful for auditing requirement 5 of the PCI DSS. Information is currently gathered for Windows versions for many of the most popular AV software products in use today, such as: Vipre Business Agent, McAfee, Symantec, AVG, F-Secure, MS Forefront, Kaspersky, and Trend Micro. Note that some results are only reported if they are considered vulnerabilities while others are always reported. For example, if available, the last scan date is always reported while a check to determine if updates or the AV software itself is enabled, only gets reported if it’s disabled. Authentication is needed to run this scanning policy. Facts containing the string '(Master)' mean that an anti-virus server/manager/admin is installed on the target. For more information, see Configuration options; also see the knowledge base on the mySAINT customer web site.
-
Auth Test – For this policy, SAINT performs authentication against the targets using the credentials specified in either the credentials manager or the Windows/Linux/Unix/Mac input boxes under the Authentication tab. User can generate reports from this test by selecting the Auth Test report template from the report creation wizard.
-
Software Inventory – This policy generates a list of software installed on Windows targets. Authentication is required. The software list retrieved during the scan is displayed in the Vulnerability List section of the Full Scan or the Overview reports. Note that the software list is generated by enumerating the Uninstall key in the Windows registry. Therefore, only software which was registered with the operating system during installation will be included. Software which was placed on the system without running an installer program is typically omitted. Furthermore, registered software which was incorrectly removed from the system may still be included in the list after removal.
Vulnerability
-
API Scan– This policy scans for vulnerabilities in REST APIs. When using this policy, it is recommended that you provide an OpenAPI Description file in step 2 of the scan wizard. See Import OpenAPI Description for more information.
-
Full Vulnerability Scan – For this policy, SAINT will check for services listening on TCP or UDP ports. Any services detected will then be scanned for any known vulnerabilities. This scan policy includes all current vulnerability checks, and is the scan policy that should be used in most situations. (This scan policy excludes obsolete checks. If you need to include obsolete checks, see the All Checks policy described below in the Legacy category.)
-
Windows Patch – For this policy, SAINT checks for missing Windows patches. Since most of the checks for Windows patches require authentication, Windows domain authentication is recommended with this policy.
-
Win Password Guess – This policy conducts password guess checks against Windows targets using the password guess and password dictionary configuration options. Authentication is recommended so SAINT can enumerate accounts.
-
Microsoft Patch Tuesday – This policy checks for the latest published Microsoft patch Tuesday vulnerabilities (second Tuesday of each month). This policy and associated content is typically updated via SAINTexpress by noon Wednesday, following publication of Bulletins from Microsoft.
-
Web (OWASP Top 10) – This policy checks for vulnerabilities in web servers and web applications, such as SQL injection, cross-site scripting, unpatched web server software, weak SSL ciphers, and other OWASP Top 10 vulnerabilities. It also enables file content checks. Authentication is recommended or required for some of the checks included in this policy. SAINT OWASP Top 10 Coverage is detailed in the table below. More information about OWASP Top 10.
|
OWASP |
Examples |
SAINT ID |
Authentication |
|
A01:2025-Broken Access Control |
Direct URL Access |
web_prog_cgi_directurlaccess |
Web authentication recommended |
|
Server Side Request Forgery |
web_prog_cgi_ssrf |
Web authentication recommended |
|
|
A02:2025-Security Misconfiguration |
Software patches |
web_server_* |
Operating system authentication recommended |
|
Default passwords |
net_password pass_httpbasic pass_webapp |
Authentication not required |
|
|
Error Message Information Leakage |
web_security_errorinfo |
||
|
Missing or Incorrect Security Headers |
web_security_mimesniff web_security_clickjack web_security_httponly web_security_sslcache |
||
|
XXE vulnerability |
web_service_xxe |
Web authentication recommended |
|
|
A03: 2025 – Software Supply Chain Failures |
Vulnerable Server Software |
web_server_* |
Operating system authentication recommended |
|
Vulnerable Development Frameworks |
web_dev_* |
||
|
Vulnerable Libraries |
web_lib_* |
Web authentication recommended |
|
|
A04:2025-Cryptographic Failures |
Unencrypted Content |
misc_checkmachine |
Operating system authentication required |
|
misc_webcontentsearch |
Web authentication recommended |
||
|
Cleartext password transmission |
web_security_clearbasicauth web_security_clearpass |
Authentication not required |
|
|
TLS/SSL weak algorithms and invalid certificates |
misc_cipher_* misc_tls_* |
||
|
Session cookies without "secure" flag |
web_security_httpssecure |
||
|
A5:2025-Injection |
SQL Injection |
web_prog_sql_* |
Web authentication recommended |
|
Command Injection |
web_prog_cgi_cmdinject |
||
|
CRLF Injection |
web_prog_cgi_responsesplit |
||
|
SSI Injection |
web_prog_cgi_ssiinject |
||
|
XPath Injection |
web_prog_cgi_xpathinj |
||
|
Cross-site scripting |
web_prog_cgi_xssgeneric web_prog_cgi_xssstored |
||
|
A06:2025-Insecure Design |
Insecure design |
This item cannot be detected by a vulnerability scan. |
|
|
A7:2025- Identification and Authentication Failures |
Weak Passwords |
net_password |
Authentication not required |
|
Cleartext Password Transmission |
web_security_clearbasicauth |
||
|
Session IDs in URL |
web_security_urlrewriting |
||
|
Session Fixation |
web_security_sessionfixation |
Web authentication required |
|
|
A08:2025-Software and Data Integrity Failures |
Insecure deserialization |
web_dev_javaserialobject |
Web authentication recommended |
|
A09:2025-Security Logging and Monitoring Failures |
Security Logging and Monitoring Failures |
This item cannot be detected by a vulnerability scan. |
|
|
A10:2025 – Mishandling of Exceptional Conditions |
Error Message Information Leakage |
web_security_errorinfo |
Authentication Not Required |
-
Operating System Password Guess – This policy includes all SAINT password guessing features designed to guess the operating system password. This policy includes checks for default FTP passwords, as well as dictionary-based password guessing via Telnet, SSH, and FTP. Authentication is recommended to ensure user account enumeration.
-
Mobile Device – This policy queries Active Directory servers for information about mobile devices (for example, phones and tablets) which use Exchange ActiveSync, and uses that information to infer vulnerabilities on those devices. The devices which are discovered in this manner will be listed in the scan results as separate targets although those targets aren’t actually scanned. In order for this policy to succeed, OpenLDAP must be installed on the scanning host, and the scan must run with Windows domain administrator credentials (see Step 3 – Authentication). The target list must include at least one Active Directory server, and the SSL certificate for that Active Directory server should be installed and configured on the scanning host. (See Authenticating to Windows Targets.)
-
Network Device – This policy checks for vulnerabilities in routers, switches, and other networking devices.
-
Log4j – This policy scans for vulnerabilities in the Log4j Java library. It includes checks for remote Log4j attack vectors, a filesystem search for vulnerable versions of Log4j, and checks for other software which is known to include vulnerable versions of Log4j. Windows or Linux authentication is recommended for a thorough scan.
Legacy
-
Normal – For this policy, SAINT collects information from the DNS (Domain Name System), tries to identify the operating system, and tries to establish what RPC (Remote Procedure Call) services the host offers and what file systems it shares via the network. The policy also includes probes for the presence of common network services such as finger, remote login, FTP, WWW, Gopher, e-mail, and a few others. With this information, SAINT finds out the general character of a host (file server, diskless workstation) and establishes the operating system type and, where possible, the software release version.
-
SQL/XSS – For this policy, SAINT checks for SQL injection and cross-site scripting vulnerabilities on web servers. This includes both generic tests, where SAINT finds HTML forms and tests all parameters for SQL injection and cross-site scripting, and checks for known SQL injection and cross-site scripting vulnerabilities.
-
MoveIT – This policy scans for vulnerabilities in the MOVEit Transfer software. Windows admin authentication is needed for this policy.
-
All Checks – This policy includes SAINT’s entire set of vulnerability checks. It’s similar to the Full Vulnerability Scan but includes obsolete checks for old vulnerabilities which don’t exist in real-world environments anymore. Since these checks waste time and may produce false positives, it’s generally recommended to use the Full Vulnerability Scan instead of this policy.
PenTesting
-
Discovery will discover live hosts in the selected address range, and then stop. This level does not require a license key. It is useful for figuring out which IP addresses to put in your key. The discovery method depends on the selected Host Discovery option.
-
Information Gathering will discover live hosts, try to determine their operating system types, and scan their ports.
-
Single Penetration will include all of the above steps and then proceed to run remote exploits for the detected operating system and services, starting with those least likely to cause crashes, until one succeeds in establishing a shell connection.
-
Root Penetration is similar to single penetration but continues until the maximum privilege level is reached on the target. The maximum privilege level is root on a Unix or Linux system and administrator on a Windows target. The root penetration level also runs local exploits if the available remote exploits result in a connection without maximum privileges.
-
Full Penetration will run all available exploits for the detected operating system and services. This level is the best choice if the objective is to exploit as many vulnerabilities as possible. However, if the objective is to obtain evidence of penetration, such as files or screen captures from the target, then this level is not the best choice because a successful connection could be severed if a later exploit causes a crash.
-
Web Application will search the target for Web applications, and run all available exploits against those applications. This level is the fastest way to find exploitable Web application vulnerabilities such as SQL injection.
The PenTest job setup also provides a step for entering credentials to authenticate to the targets. However, the login and password are not typically needed for the exploits themselves. For the purpose of penetration testing, authentication is helpful for determining operating system differences, such as service pack levels or Linux varieties, more precisely than would be possible using uncredentialed methods. This information also aids the pen test engine in choosing the correct arguments when running exploits, and may improve the success rate.
Compliance
-
PCI External – This scan policy, when run by an Approved Scanning Vendor (ASV) in accordance with the ASV Program Guide, satisfies the quarterly external scan requirement outlined in PCI DSS section 11.2.2. It is similar to the Vulnerability Scan policy, but includes all 65535 TCP ports and only common UDP ports, enforces a spider depth of at least 5, enables certain low severity checks which are normally disabled, and reduces the restrictiveness of certain other checks.
-
PCI Internal – This scan policy satisfies the quarterly internal scan requirement outlined in PCI DSS section 11.2.1. Unlike the PCI External policy, it does not include all 65535 TCP ports.
-
FISMA – This scan policy provides support for security controls related to continuous monitoring, as well as performing risk assessments. Selecting this scan policy ensures that probes scan for alll current vulnerabilities, with the Exhaustive option. SAINT also provides a pre-configured report template that describes the supported controls and reports results at a summary and detailed level.
-
HIPAA – This scan policy provides support to HIPAA security requirements related to both risk analysis and overall risk management. Selecting this scan policy ensures that probes scan for all current vulnerabilities checks with the Exhaustive option. SAINT also provides a pre-configured report template that describes the supported controls and reports results at a summary and detailed level.
-
NERC CIP – The NERC CIP compliance scanning policy reports the results of an exhaustive vulnerability scan on selected hosts. SAINT also provides a NERC CIP report template to use the results of this scan policy that describes the applicable NERC CIP security controls, as well as a pre-formatted report with executive level graphs/charts and detailed level scan results.
-
SOX – The SOX scan policy runs all current vulnerability checks against selected targets, and supports financial organizations’ internal risk management strategies, as well as facilitating provisions in Section 404 of the Sarbanes-Oxley Act, requiring a management report annually on the effectiveness of internal controls for financial reporting and that external auditors confirm management’s assessment.
-
IAVA – This compliance policy executes a full port scan for all vulnerabilities reported in the Information Assurance Vulnerability Alert (IAVA).
-
NESA – The NESA report template provides a background on the Information Assurance Standards specified by the United Arab Emirates National Electronic Security Authority (NESA) and reports all available information, including charts, tables, hosts, vulnerabilities, services, users, shares, and technical details.
-
Cyber Essentials - This policy runs all current vulnerability checks against the selected targets, and supports the organization's compliance with the Cyber Essentials standard specified by the UK National Cyber Security Centre.
-
CMMC - This policy runs all current vulnerability checks against the selected targets, and supports the organization's compliance with the Cybersecurity Maturity Model Certification specified by the U.S. Department of Defense.
Host-Based
These scan policies require an agent to be installed on the asset being scanned. See Managing Agents and Host-based Assessments for more information.
Custom Policies
-
SAINT provides the capability through the Scan Policies page to create new checks, enable/disable existing checks and create custom policies based on local requirements. Custom scan policies can then be viewed by selecting custom from the Select Policy Category drop down list, and then the applicable policy from the Select Policy drop down list. See the section on Scan Policies for more information on creating a custom scan policy.
Scan Policy Options
The following options can be used to modify some of the scan policies described above.
-
Exhaustive – During the course of a scan, there are certain cases where it seems unlikely that there would be any benefit to running a certain instance of a probe, but it may still be worthwhile to do so for the sake of being as thorough as possible. Examples include checking for default router passwords on non-standard telnet ports, checking for web application vulnerabilities in non-standard directories, and checking for proxy vulnerabilities on non-standard HTTP ports. The exhaustive scanning option allows you to control what SAINT does in these cases. Enabling this option results in a more thorough scan, but may cause the scan to take more time but will take extra steps to be as thorough as possible. This option affects the vulnerability, PCI and custom scan policies.
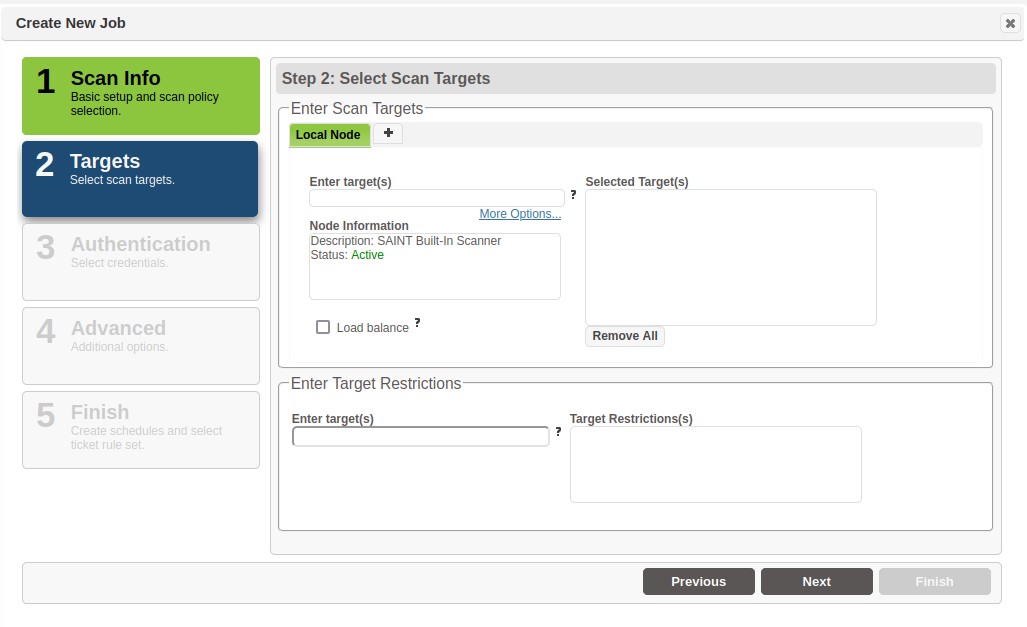
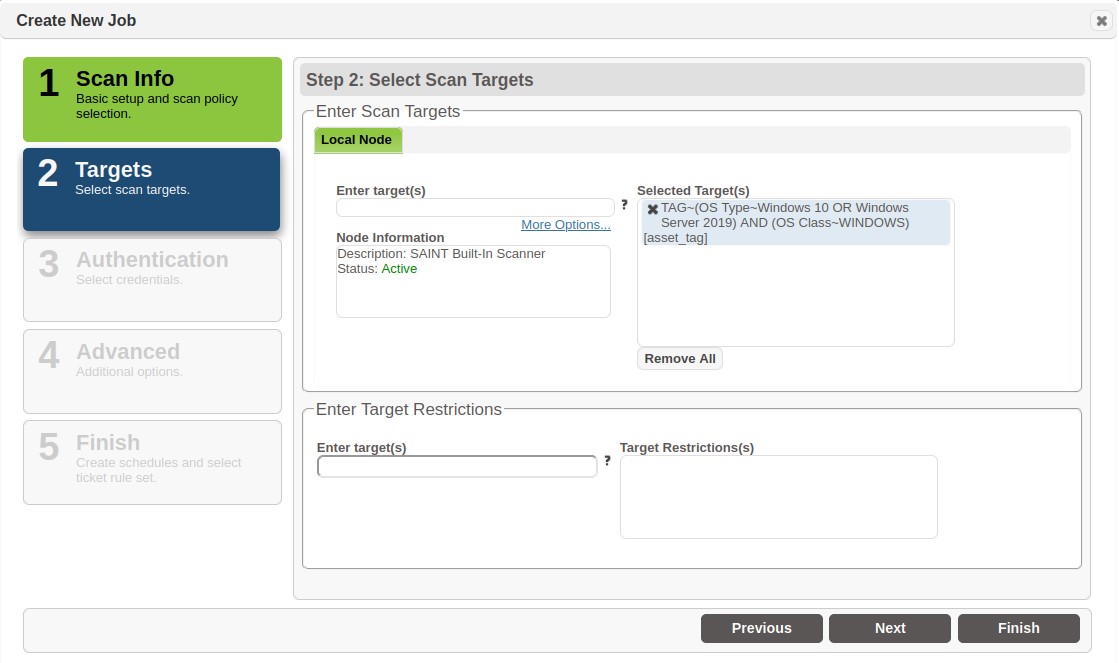
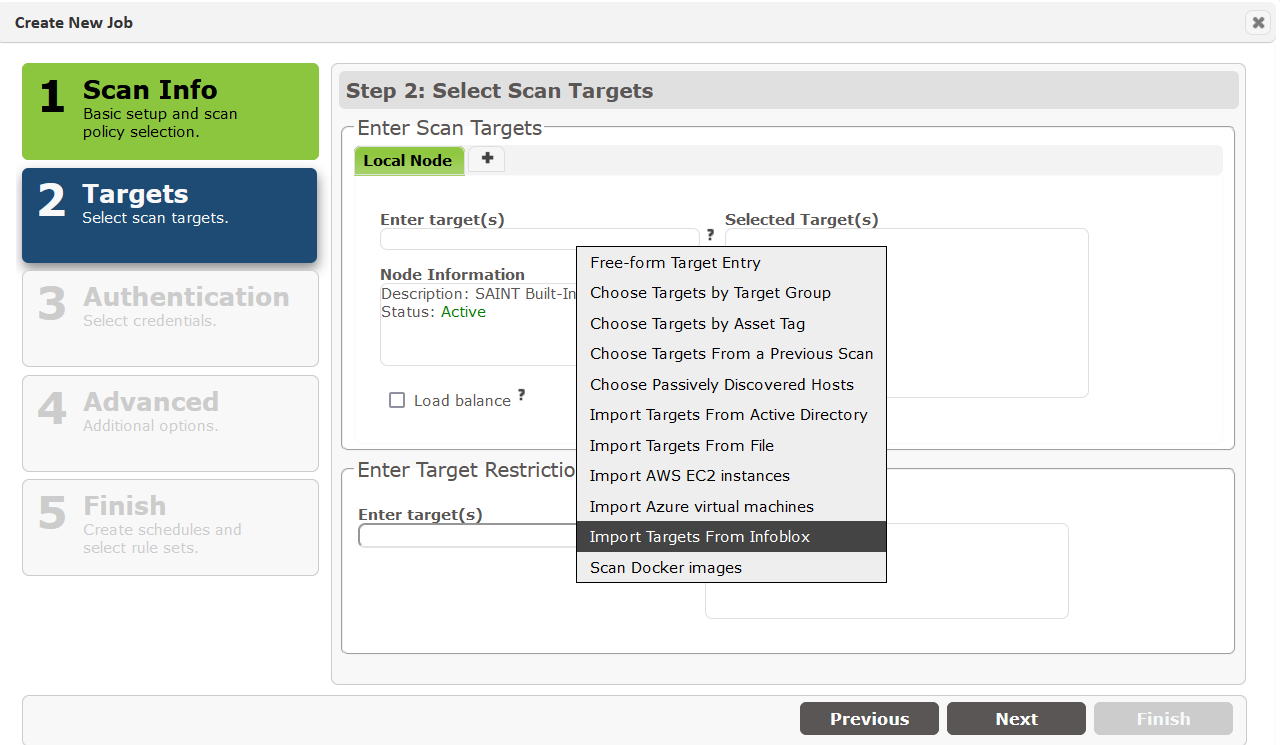
Step 2 – Targets
-
By default, Security Suite and SAINTCloud provide access to a single scanning engine (aka “local node”). SAINT also provides support for a multi-scanner (aka multi-node) architecture. When defining hosts to scan, step two of the wizard will display the primary scanner as the highlighted tab (as shown above) as well as providing the capability to select this or other scan nodes on which to run the scan from the tabs in the Enter Scan Targets area. If the desired node is not shown, choose the "+" tab and select it from the drop-down menu. (If the "+" tab is not shown, then all allowed nodes are already shown.)
To run a scan on multiple nodes, select the desired scan nodes one at a time, and enter the targets to be scanned by each node under the corresponding tab
Optional – Check the Load Balance box if a load balanced scan is desired. With this option, the targets will be divided evenly among all available nodes, and the scan will be queued until at least two nodes are available. Click on the Configure button to customize the minimum number of nodes, maximum number of nodes, and the set of nodes among which to run the scan.
-
Enter the targets (desktops, servers, routers, etc.) to be scanned for this job. By default, this is done individually through the Enter Target(s) field, but other options are available by clicking on More Options. See Target Entry Options for more information about these other options. SAINT allows target selection in one or any combination of several formats:
-
-
Host names – one or more host names. SAINT must be able to resolve the host names, either using a DNS server or the /etc/hosts file or an error will result.
-
IP addresses – one or more IP addresses.
-
Subnets – one or more class C subnets, represented as only the first three octets. SAINT will expand the subnet to include every IP address beginning with the given three octets.
-
IP address ranges – one or more IP address ranges. Each range consists of a beginning and ending IP address, separated by a dash. SAINT will expand the range to include the starting and ending addresses and every address in between.
-
URLs – one or more URLs, such as http://hostname:port/path. SAINT will scan the target specified in the hostname portion of the URL, specifically including the web program(s) found on the specified port and path.
-
CIDR network addresses – a network address followed by a slash and a prefix length. For example: 192.30.250.0/18.
-
Previous Scan – use the host information collected from previous scans to select hosts to scan.
-
Passively Discovered Hosts – Scan devices which have been recently seen on the network, if Passive Host Discovery is enabled.
-
Target Groups – select a pre-defined Target Group to quickly load the target list, or create a target group at scan run time based on the live hosts discovered during the scan.
-
Asset Tags – defined assets to be scanned by Asset Tags assigned in the Asset table.
-
Asset Sources - Scan existing targets which were imported from an asset source or import new targets from an asset source.
-
Active Directory – configure the scanner to connect to an AD server to collect host information.
-
Amazon Web Services (AWS) – connect to AWS instances
-
Azure – connect to hosts residing in Microsoft Azure
-
Imported File – import host lists from an imported file
-
Docker images – Scan Docker images from a registry or repository.
-
Infoblox – Import targets from Infoblox.
Note: All of these with the exception of Subnets can be used with both IPv4 and IPv6 addresses. Most of SAINT's vulnerability checks work on IPv6 targets, as long as any system tools which the check uses (Samba, rpcinfo, Telnet, etc.) are also IPv6-compatible. Only the Linux version of SAINT is IPv6-compatible. Note that IPv6 addresses must be specified by IP address, not by host name. The required Perl modules for running IPv6 exploits are Socket6 and IO-Socket-INET6. Both are available from www.cpan.org. Also, note that IPv4 and IPv6 addresses can be scanned together in the same job, with the exception of Subnet target.
Note: Targets can be removed from the list at any time in the job setup, by selecting the “x” pinned to a target shown in the selected targets box.
Optional – Target restrictions can also be set by entering the target(s) in the Target Restriction field. This can be useful, for example, if you must exclude specific IP addresses, hostnames, Internet domains, IP address ranges, subnets, or CIDR blocks from the scan.
-
-
Click Next to manually configure other job settings OR click FINISH to use pre-defined scan configuration settings and either a) save the job without executing a scan at this time or b) choosing when to run the job once the job is saved.
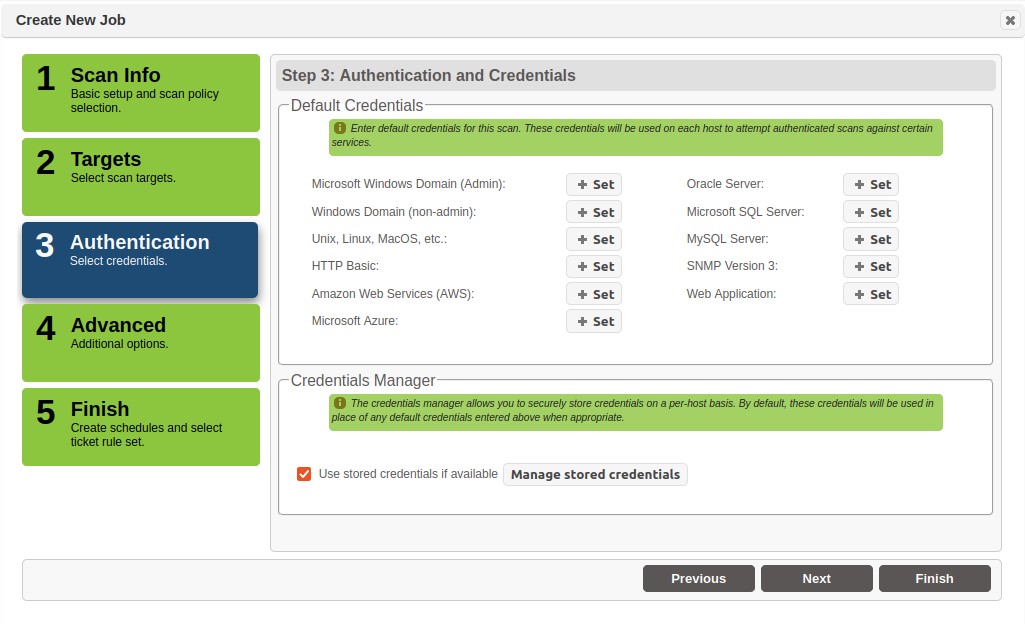
Step 3 – Authentication
Optional – Use this tab if you wish to run an authenticated scan and you have the knowledge of a login and password to the targets.
Scans can be executed without providing account credentials (i.e., authentication) to the target hosts. However, providing authentication credentials does enable scan probes to access the registry, file attributes, or package lists on remote targets, and provide a much more in-depth scan. There are three benefits to authentication. First, an authenticated scan can detect additional vulnerabilities, such as client vulnerabilities and missing hotfixes, which could not otherwise be detected by probing network services. Second, an authenticated scan is sometimes able to check for fixes whose presence could not otherwise be determined, thereby reducing false alarms. Third, an authenticated scan may be able to gather additional information related to the targets, such as user lists, software inventory, or mobile devices which sync with the target. Besides authentication to operating systems, authenticating to specific services offers additional benefits. For example, authenticating to web servers allows access to pages within web applications that may be affected by vulnerabilities such as SQL injection or cross-site scripting. Authenticating to database services allows inspection of objects within the database system for security weaknesses. Authenticating to the SNMP service will allow SAINT to collect certain system properties when SNMPv3 is being used.
Default Credentials
This Authentication option enables you to enter a single user/password combination for each authentication type on all targets.
-
Click on the + Set button for the required platform. For example, Microsoft Windows Domain (Admin).
-
Enter the username and password.
-
Optional – confirm the password by re-entering it in the Confirm Password field.
-
Optional – For Windows Domain Admin credentials, you can also click on the Check Login button to verify the credentials before continuing. If a "Service unavailable" message is displayed, this typically means the target host was offline or is blocking the Windows services used for authentication.
-
Click Save.
Further details about the usage for each supported platform’s credentials are described in the Credentials Manager section of this document.
Default credentials are stored with scan jobs using AES-256 encryption with either a permanent or ephemeral encryption key. See Ephemeral Encryption Key for more information.
Manage Stored Credentials
The Credentials Manager allows you to store credentials securely on a per-host basis, by a comma-separated list or by associating the credentials to a pre-defined target list in a target group. The scan engine automatically uses any stored credentials to speed up the scan setup time, and will use a combination of manually entered credentials and the credentials manager if both are used.
-
Click on the Manage Stored Credentials button to open the Credentials Manager grid to view or edit the current list of stored credentials or create a new credentials file for use in the job.
Refer to the Credentials Manager for more information about creating and storing credentials for each supported platform.
Click Next to complete the authentication step.
Step 4 – Advanced
The scan configurations displayed in the Advanced tab are set either by scan default values, locally modified in the global Configuration tab, or modified at job-level through this step.

As shown, these configurations enable you to control such settings as discovery controls; port settings; e-mail and report delivery settings; anti-virus and content search settings; and a wide-variety of others. This section will highlight some of the most frequently modified configuration settings. Refer to the Configuration Tab section for a detailed description of each option.
Host Discovery
SAINT's scanning engine can perform host discovery two ways: using SAINT's proprietary discovery engine, or with Nmap. The SAINT method is simpler to configure, while Nmap allows for more customization.
SAINT Discovery Configuration
In order to avoid wasting time scanning hosts which do not exist or are unreachable, the scanner attempts to discover live hosts at the start of a scan. The method used to discover live hosts varies depending upon whether a firewall is in place.
-
No Firewall Support – The No Firewall Support option is the default, and should be selected if no firewall is in place. With this option, the scanner attempts to send an ICMP echo request (ping) to each host. When the host does not respond, the scanner assumes the host is down and skips further probes.
-
Firewall Support – If you are scanning targets that are behind a firewall from a system that is not behind the firewall, or in any other case where ICMP does not work, choose one of the Firewall Support options. With these options, the scan engine does not rely on ICMP for discovering live targets. Instead, there are two alternate options.
-
-
TCP Discovery – This option causes the scanner to use TCP for discovering live targets. Each potential target in the specified target range will be scanned for a few standard TCP ports. If there is a response, then either the port is open or the connection was refused by the target, then the host is considered to be alive.
-
ARP Ping Discovery – With this option, the scanner will consider a potential target to be alive if the IP address can be resolved to a MAC address using the ARP protocol. The benefits of this method are that it still works even when ICMP pings and TCP ports are blocked, and it is the fastest discovery method. But it only works for targets that are on the same local network as the scanner.
-
-
Combined Firewall Support – If you do not know whether your targets are behind a firewall, or if some targets may be behind a firewall while others are not, then choose the Combined Firewall Support option. This option uses all the above discovery methods. It is the slowest option, but also the most likely to succeed in discovering all live targets.
-
Extensive Firewall Support – This option skips the discovery process altogether and does a complete scan of every target address, regardless of whether it is alive. Hence, Extensive Firewall Support can lead to a very slow scan, especially if a large target range was entered. Use this option only when the targets do not respond either to pings or to TCP requests to closed ports, and do not consistently have any of the standard ports open.
See the Workarounds section for more information on configuring the standard port. The firewall support options are intended only to work around discovery issues, and do not allow the scanner to scan targets behind firewalls which perform network address translation, or IP address masquerading. Hosts behind such firewalls will still be invisible from the outside and thus cannot be scanned from the outside.
Nmap Discovery Configuration
-
TCP SYN Scan – Sends empty TCP packets with the SYN flag set. Live hosts will reply with either a RST or SYN/ACK TCP packet. An optional list of comma-separated ports may be supplied. If omitted, the default Nmap ports will be used.
-
TCP ACK Scan – Sends empty TCP packets with the ACK flag set. Live hosts will reply with a RST packet. Some firewalls prevent hosts from replying to SYN requests to closed ports, but may still respond to ACK packets. An optional list of comma-separated ports may be supplied. If omitted, the default Nmap ports will be used.
-
ICMP Echo/Timestamp/Address Mask – Sends ICMP Echo (type 8), Timestamp (type 13), or Address Mask (type 17) request.
-
UDP Ping – Sends UDP packets to the given ports. Empty packets will be sent to most ports; however, ports specified in the config/nmap/nmap-payloads will send the corresponding packets, which will be more likely to illicit a response.
-
SCTP INIT Ping – Sends an SCTP packet with the minimal INIT chunk. Live hosts will reply with an ABORT chunk if the port is closed, or an INIT-ACK chunk if it is open. An optional list of comma-separated ports may be supplied. If omitted, the default Nmap ports will be used.
-
IP Protocol Ping – Sends an IP packet with the specified protocol number set. An optional list of comma-separated protocol list may be supplied. If omitted, the default Nmap protocols will be used.
-
ARP/ND Ping – Uses Nmap to handle ARP requests instead of the host operating system. This is useful for scanning local LANs and may improve performance. If IPv6 targets are used, then ICMPv6 Neighbour Discovery is used instead of ARP.
Port Settings
Use Heavy Port Ranges – Check this box to include all ports defined in the heavy ports lists (TCP and UDP). Leave this box unchecked to run scan using only ports listed in common ports lists (TCP and UDP).
These configuration options provide granular port setting control for “All” ports or specific TCP and UDP ports. Each text box in this tab display the current defined list of ports and port ranges for TCP and UDP port for heavy scans, common port scans, OS types and authentication tests. The boxes are designed to fit inside of the confines of the Port tab. However, you can use the up/down arrow in each text box to scroll through the list and make changes. Or, click and hold the mouse pointer on the lower right corner of a text box and drag it out to make an individual box larger and easier to view/edit the content.
E-mail Notifications
These configuration options define whether you wish to send an e-mail alert and content to e-mail recipients once a scan has been completed for the job being defined. Use the fields in the upper section of the tab to do the following:
-
First section:
-
-
Set the e-mail notification flag by clicking the Send E-mail checkbox
-
Define a local mail server (blank uses the recipient's default mail configuration)
-
Define the e-mail address that will display as the e-mail’s “From” address
-
Define an e-mail “display name” for the from addressee
-
Set a trend length if you wish to send trend reports in the job notifications. The default 0 uses all scans for the job to build trends.
-
Define a default name and attachment. You can also be more granular and define specific report names in individual e-mails if you intend to send multiple reports.
-
-
Lower sections subdivided by horizontal lines:
-
-
Each section provides the capability to define individual e-mail notifications. Each with their own comma separated e-mail addressee list; report name, subject, report type (e.g., executive report) and report format (e.g., PDF).
-
Click Next once you have completed any Scan Configuration options, to continue the job setup.
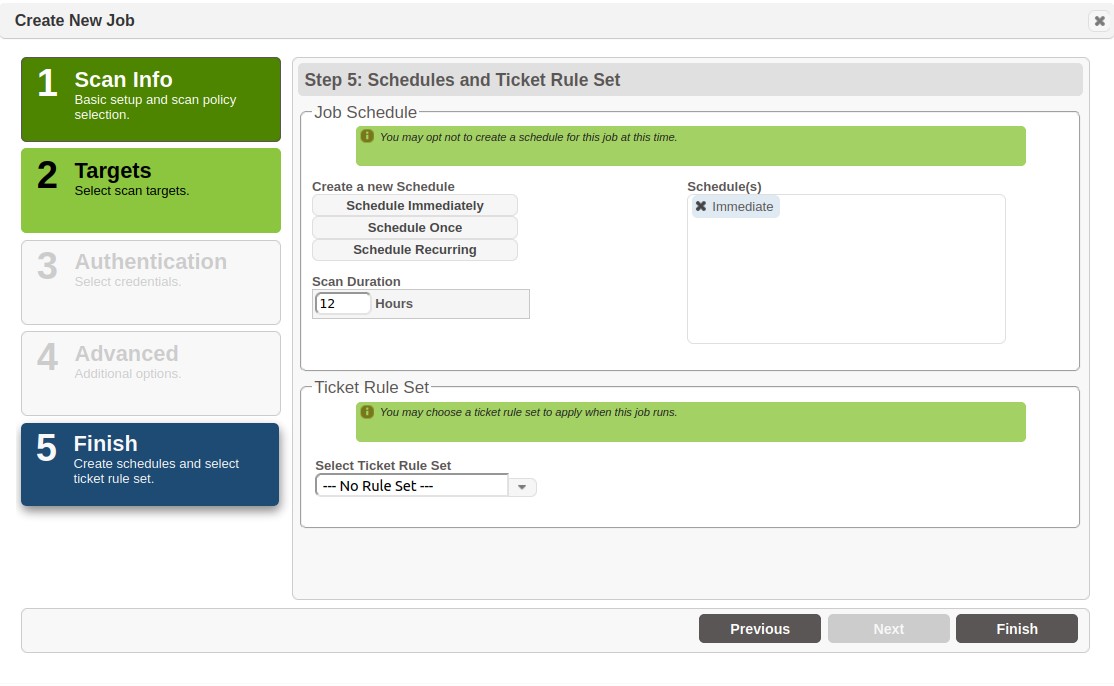
Step 5 – Finish
Step five is the last step in setting up a scan job, and enables you to define the job schedule; select a Scan Window, if applicable, and apply pre-defined rule sets, if applicable.
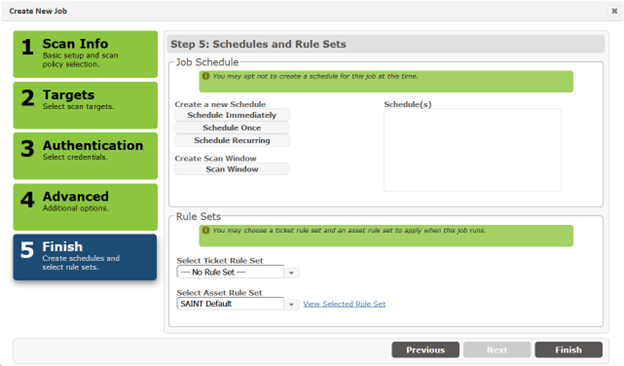
Once all final decisions are made to control the scan activity, post-scan ticket generation/update, and asset information, you must click the Finish button to save the changes and execute any changes you’ve made – either during job creation time or editing an existing job to adjust these settings.
Scheduling
These options include running the scan now (immediately); scheduling the scan to run at a specific date/time (schedule once); and schedule continuous scanning (schedule recurring) for this job, based on defined date(s), day(s) of the week and frequency. Each option is described in detail below:
Schedule Immediately
Select this option to send the job to the scan queue immediately after finishing the job setup. This option will be displayed in the Schedule(s) window to confirm your selection.
Schedule Once
Select this option to display the One-Time Schedule dialog, and configure the job to run on a specified date/time.
-
Enter the date to run the job
-
Enter the time to run the job
-
Click Add
This option will now be displayed in the Schedule(s) window to confirm your selection.
Schedule Recurring
Select this option to display the Recurring Schedule dialog, and configure the job to start on a specified date/time; set when the job should run; and (optionally) when the recurring job should end.
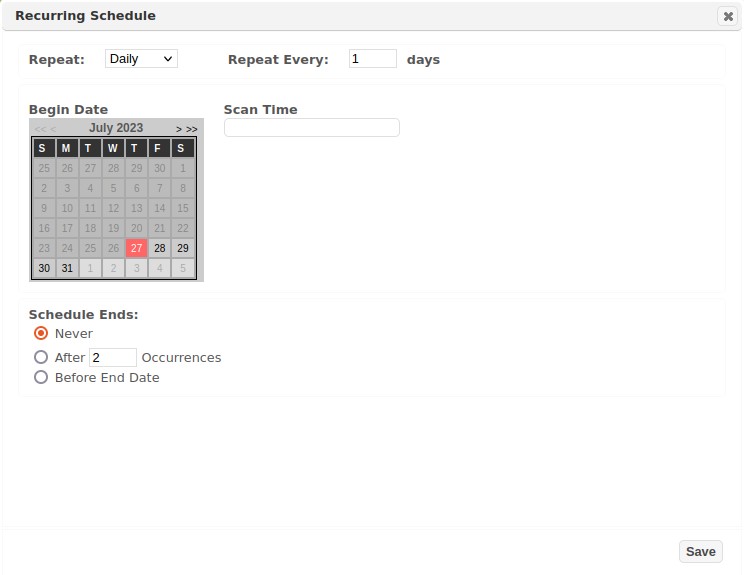
-
First, select the period to repeat the recurring scan (daily, weekly, monthly)
-
Use the Repeat Every [number]. Set the number of [days, weeks, months] to set how frequently the job should run within the day, week, or month setting.
-
For weekly scans, define the days you wish to run the scan during the week.
-
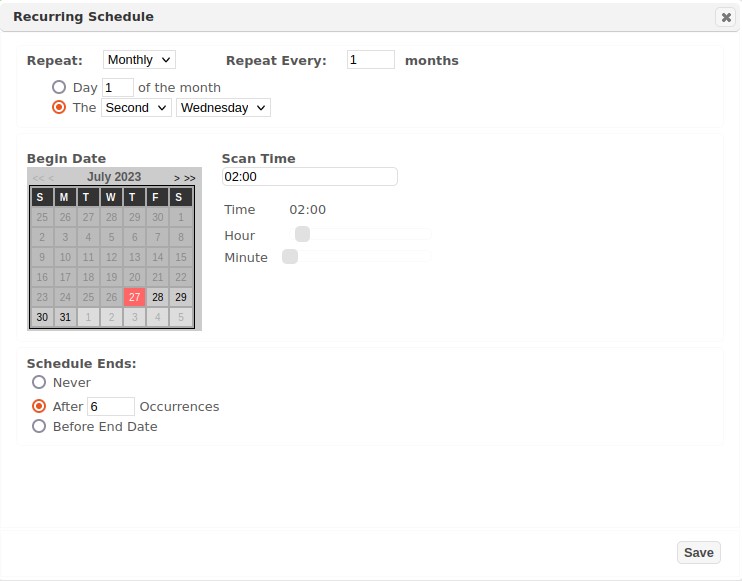
For monthly scans, use the radio button for Day [number] of the Month to define the recurrence based on a calendar date. For example, “Day 15 of the Month” runs the job on the 15th day of each month. Alternatively, you can also choose the radio button for “The [1st-5th] [Sunday-Saturday]” option to set the job to run on a specified day during the month. For example, run the job on the “Second Tuesday” of each Month, to support a Microsoft Patch Tuesday assessment.
-
Set the Begin Date to define when the job should start for the first time.
-
Set the Scan Time by sliding the hour and minute bars to the applicable hour and minute, using a 24-hour time clock.
-
Next, define when the job schedule should end. The first option is to Never end the recurring schedule. This radio button is selected by default. Setting this value ensures the job runs, as defined, until you edit the schedule and choose to modify or disable (stop) the schedule. A second approach is to run the job for a pre-defined number of times. Choose the radio button for the After [number] Occurrences. A third option for defining the end of the schedule, is by a defined date. Use the radio button for Before End Date to display the End Date calendar and select the month/date/year you wish to end the scheduled job.
-
Click the Add button once you have defined all of the settings for the recurring job.
The following shows an example of a recurring job schedule to run scans on the second Wednesday of every month for 6 months, to validate patches applied after each Microsoft Patch Tuesday bulletin release:
The Schedule(s) window is displayed to confirm your selection:

Click the Finish button to save your job and send it to the job's queue for its schedule execution.
Return to the Job grid and click the Refresh icon. You will now see the new job in the display, along with the current status of execution:

Click on the Scans tab to view the ongoing status of the current scan for the Job:

Scan Window
The Scan Window feature provides the capability to set a time period (scan window) during which recurring scheduled scans can run. The scan window start time/date is the time a scheduled scan will resume (if scheduled scan is currently paused) and the scan window end time/date is the time a scheduled scan will pause (if scheduled scan is currently running). The defined scan window time frames are used to send signals to the scheduled scan process to ensure scheduled scan processes do not run during times outside of the scan window range. The following are example use-cases:
Use-case 1 – I want to schedule a daily scan job to run only between 9 p.m. and 3 a.m. the next day. In this case, the scheduled scan job will start at 9 p.m. and run until 3 a.m. unless it completes before then. If it does not complete by 3 a.m., the scheduled scan job will pause and resume when the next allotted start scan window is reached (i.e., daily at 9 p.m.) If it completes the night before, a new scan will start at 9 p.m. and will run with the same settings as the previous scheduled scan.
Use-case 2 – I want to run a weekly scheduled scan job to run only on Saturday starting at 9 p.m. and pause (if not yet completed) on Monday at 6 a.m. for a scan job that may take a long time due to the size and complexity of the targets. In this case, the scheduled scan job will start on Saturday night at 9 p.m. and more time must be allocated for this large job to minimize the possibility that it will not complete within the scan window and overlap with the next scan window. If it does not complete by 6 a.m. on Monday, the scheduled scan job will pause and will only resume when the next scan window is reached.
Create a Scan Window
-
Create a scan window for the job by clicking on the Scan Window button in Step five of the job wizard. If you are editing a job that has an existing scan window, this option will display Edit/Delete Scan Window to view and modify the existing window.
The following dialog will be displayed to define the Scan Window Start (resume) Time Period and Scan Window End (pause) Time Period.
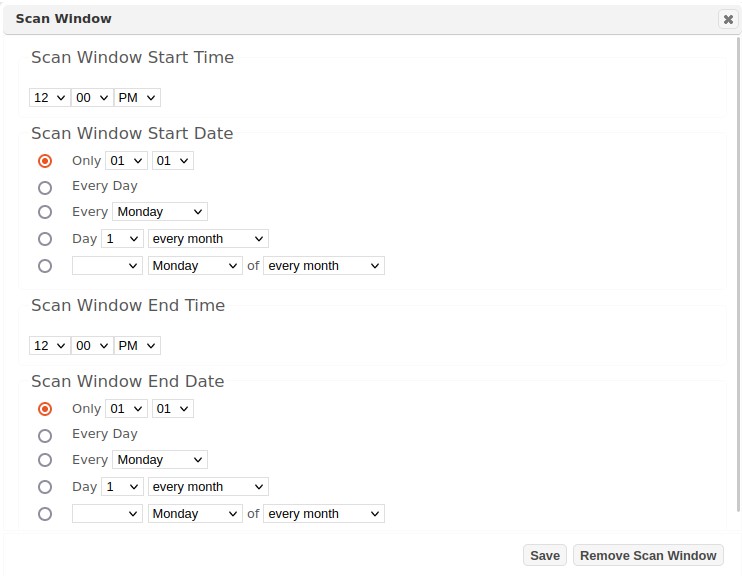
-
As described in the example use-cases, define when you want the scans to be allowed to run. Remember to complete both a Start and End period for the scan window.
-
Click Save to create the new scan window and return to the finishing steps of the job setup.
View, Edit, Delete a Job's Scan Windows
To view the current settings of a scan window, click on the Edit (pencil) icon for the job in the Manage Job’s grid, and navigate to Step 6 of the wizard. Notice that the scan window option has changed to Edit/Delete Scan Window. This verifies the job has a defined scan window. Click on the Scan Window button to display the current settings. You can now edit the settings and re-save, to change the scan window and re-run the job. Or, you can click the Remove Scan Window button to delete the scan window and continue using the job without a defined scan window.
Select a Ticket Rule Set for a Job
As defined in the Ticketing section, you can create one or more rules for determining ticket assignments based on parameters such as: a target list, host operating system platforms, type of vulnerability, severity of a vulnerability or even ranges of CVSS score. These rules are packaged in a parent Rule Set and then used at Job creation time to ensure tickets generated as a result of vulnerabilities detected during a job’s scans are assigned to the proper individual for remediation.
Ticket Rule Sets are made available, based on the user’s permission settings, via a drop-down list in Step five of the job creation wizard. Selection of a Rule Set is optional. Select an applicable Ticket Rule Set only if you wish to automatically assign remediation tickets generated from the job’s scans.
Besides choosing a ticket rule set here, if allow override is chosen in the Enable Ticketing setting, this is also where generation of tickets can be enabled or disabled for the job. Under Create Tickets, choose yes or no to enable or disable ticket generation for this job, respectively. The third option, When vulnerability matches a rule, can be used to cause tickets to be created only for vulnerabilities which match one or more rules in the selected rule set.
Once all settings have been defined for the Job, click the Finish button to save the job and send it to the queue for schedule execution.
Target Entry Options
Besides the default method of specifying targets individually, there are also several options available to assist in selecting or importing multiple targets in a single step. These options are described in the following sections.
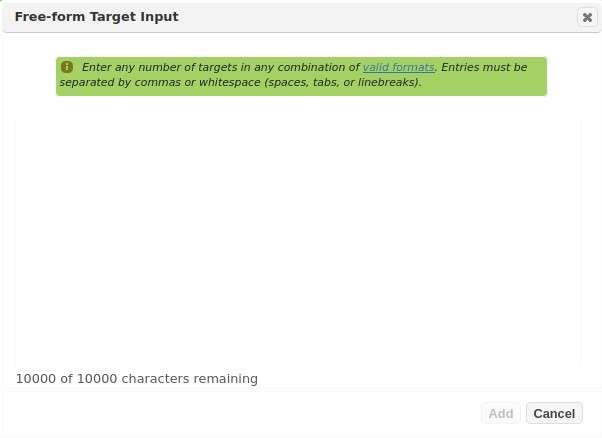
Free-form Target Entry
Free-form target entry allows you to copy and paste an existing list of targets rather than entering them one at a time. This may be useful if you already have your target list saved in an external document. To use free-form target entry:
-
From either the Create/Edit Target Group dialog or step 2 of the scan job wizard, click on More Options… under the Enter Target(s) box.
-
Click on Free-form Target Entry to open the free-form target entry dialog, which is shown below:
-
Enter the targets by hand, or copy and paste the target list into the text area. Targets must be separated by spaces, line breaks, or commas. The same target formats are allowed here as when entering targets individually. Mouse over the valid formats link for information about the acceptable target formats.
-
Click on the Add button. This will populate the Selected Target(s) box with the targets you entered.
Choose Targets by Target Group
Target Groups provide the capability to pre-store a collection of hosts or host ranges to decrease the time it takes to set up scans. For example, a Target Group has been defined in the example below for a range of internal addresses for hosts to be scanned in a data center. Rather than remembering the IP range, the group was defined ahead of time and selected at job setup time.
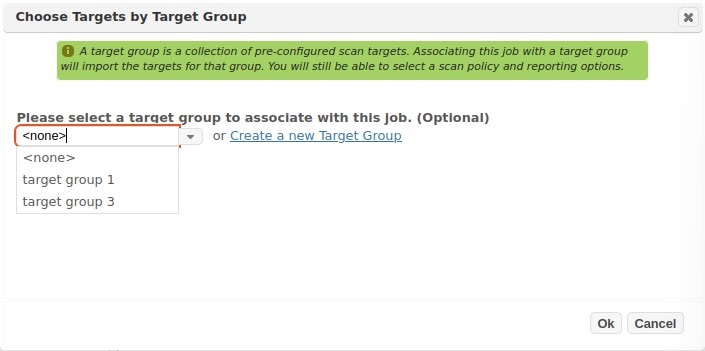
Also note that you can create Target Groups at job run time by selecting the “Create a new Target Group” option, and giving the Target Group a name. The live hosts discovered for the target(s) entered in the job target list will be used to populate the new Target Group upon scan completion.
Choose Targets by Asset Tag
Choose Targets by Asset Tag to display the following Asset Filter dialog:

-
Select a Tag Name for the tag(s) to be displayed.
-
Click on the Tag Value. Use Control-Click to select multiple options.
-
Click the Add button to add the filter to the Filter Criteria box.
-
Repeat steps 1-3 to add additional criteria for the Target list.
-
Click OK to save the criteria and add the Asset Tags to the Target List, as shown below:
Choose Targets by Asset Source
To choose individual targets that have been imported by an asset source, or to create and import a new asset source during target selection, click on More Options... and choose Import Targets from Asset Source. See Scan by Asset Source Unique ID for more information.
Choose Targets From a Previous Scan
When creating a job or target group, besides allowing you to enter new targets, the job wizard also supports creating target lists from hosts that have already been scanned. This may be convenient if you want to scan just a subset of the targets from an existing job. You can also run a scan using the Discovery policy initially to find live targets, and then select targets from that scan to populate the target list for a heavier scan.
To choose targets from a previous scan:
-
From step two of the scan job wizard, click on More Options… under the Enter Target(s) box.
-
Click on Choose Targets From a Previous Scan to open the list of previous targets, which is shown below:

-
Optional – Click on the Select Data Set button to choose the scans from which to select targets, and click OK.
-
Check the box beside each target you wish to add. Or, click on the box at the top-left corner of the grid to add all visible targets. Use the filter boxes in the second row of the grid to narrow down the displayed targets as desired. If there are many targets, use the paging buttons at the bottom of the grid to view additional targets.
-
Click on the OK button. This will populate the Selected Target(s) box with the targets you selected.
Choose Passively Discovered Hosts
If the passive host discovery option is enabled (see Passive Host Discovery), this option allows you to easily scan the devices which have been recently seen on the network.
To scan passively discovered hosts:
-
From step two of the scan job wizard, click on More Options… under the Enter Target(s) box.
-
Click on Choose Passively Discovered Hosts. The following dialog box will appear:

-
Click on the button for one of the three options:
-
-
Scan all passively discovered hosts – This option will dynamically generate the target list every time the scan job runs, to ensure that all recently seen devices are scanned.
-
Scan hosts which haven’t been scanned in last N days from scan date – This option will also dynamically generate the target list every time the scan runs. All passively discovered hosts which have not been scanned in the chosen number of past days, including hosts which have never been scanned, will be included.
-
Select hosts to scan – Selecting this option will open a grid allowing you to select one or more hosts to scan from the current list of passively discovered hosts.
-
-
Click on the OK button. This will populate the Selected Target(s) box with the option you selected.
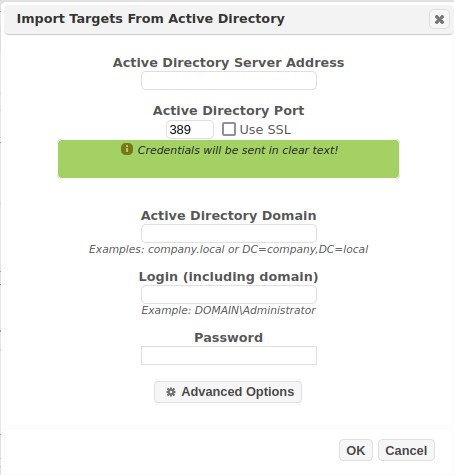
Import Targets From Active Directory
To assist with the scanning of Windows domains, import target lists from an Active Directory server (typically a domain controller). This allows scan jobs to automatically include every computer which exists in the domain controller’s directory under a specified domain. It is also possible to customize the search to reduce the list down to those computers which have specific properties in the directory.
To import targets from Active Directory:
-
From step two of the scan job wizard, click on More Options… under the Enter Target(s) box.
-
Click on Import Targets From Active Directory. That opens the dialog shown below.
-
Enter the IP address of the Active Directory server.
-
Check the Use SSL box if you want the LDAP request to go over SSL. (i.e., LDAPS) Warning: If you choose not to check this box, your credentials will be sent to the Active Directory server in plain text. If you check this box, then the certificate of the Active Directory server must be installed on the system running SAINT. See http://www.sans.org/reading-room/whitepapers/protocols/ssl-secure-ldap-traffic-microsoft-domain-controllers-33784 for further instructions.
-
Optional – enter the LDAP port used by the Active Directory server. In most cases, the default is the correct port, and this field shouldn’t be changed.
-
Enter the Active Directory domain. This can either be formatted as a Windows domain (such as company.local), or an LDAP Base DN (such as DC=company,DC=local).
-
Enter the Active Directory login (including the domain name) and password.
-
Optional – Click on the Advanced Options button.
-
Modify the search filter if desired. The filter should be formatted as defined in RFC 4515. The default filter searches for all computers in the specified domain.
-
Leave Resolve Targets to IP Addresses checked if you want the targets to appear as IP addresses in your target list, or uncheck this box if you want the targets to appear as fully-qualified host names in the Active Directory domain. Warning: If you uncheck this box, it may be necessary to configure the scan node to use the Active Directory server as its DNS server in order for it to resolve the host names.
-
-
Click on the OK button. This will perform the Active Directory search and populate the Selected Target(s) box with the resulting targets.
Import from a File
This option provides the capability to import target lists from an external file. Use the Browse button to select a plain text file containing a comma or whitespace (spaces, tabs, linebreak) separated list of targets. Once the file name is displayed in the form field, click the Import button to import the list to populate the target list in step 2two of the wizard.
This feature also provides the capability to create a Target Group at job runtime, by entering the title of the new Target Group field, and checking the “Create Target Group” checkbox in the highlighted area above the import form.
Import AWS EC2 Instances
To assist in scanning your Amazon Web Services (AWS) environment, import EC2 instances from a chosen region into your scan jobs. These instances are resolved to their current IP addresses every time the scan runs, to ensure that the correct targets continue to be scanned even if their IP addresses change. There is also an option to include all newly created instances in future scans, to ensure that the entire environment continues to be scanned as it expands over time.
To import AWS EC2 instances:
-
From step two of the scan job wizard, click on More Options under the Enter Target(s) box.
-
Choose Import AWS EC2 instances from the pop-up menu.
-
Enter your AWS Access Key ID and AWS Secret Access Key. (To obtain an AWS access key, log into the AWS console, and go to Identity & Access Management on the AWS console home page, or Services > Security & Identity > IAM. Create a user, or select an existing user and choose User Actions > Manage Access Keys > Create Access Key. (The IAM user must have at least AmazonEC2ReadOnlyAccess permissions.)
Optional: Check the Remember box to save the AWS Access Key ID and AWS Secret Access Key entered above in your user profile. This will cause these fields to be automatically completed in the future. -
Choose the desired AWS region from the drop-down menu.
-
Click on the Import button. This brings up a grid displaying information about all EC2 instances found in the specified region.
-
All instances which are accessible from the selected scan node are selected by default. If you want to exclude any of these instances from the scan, deselect them by clicking on the corresponding checkboxes. (Note: For an instance to be accessible from the selected scan node, it must either have a public IP address or be in the same VPC as the scan node.)
-
Optional. If you are creating a recurring scan job, check the radio button beside Scan selected instances and any running instances not shown above to ensure that your entire EC2 environment continues to be scanned as it expands over time. If this button is checked, then SAINT will check the selected AWS region for new EC2 instances every time the scan runs, and will add those of which are accessible from the selected scan node to the target list.
-
Click on the Import button. The selected instances, identified by their region and instance ID, will appear in the Selected Target(s) box.
Import Microsoft Azure Instances
To create an Azure user, log into https://portal.azure.com and go to Azure Active Directory > Users > New User. Enter a name and username and click Save. Then go to Subscriptions and click on your subscription. Go to Access Control (IAM) > Add Role Assignment. Add the Reader role to the user you just created and click Save. Log in as the new user and change the password.
In the scan Job wizard, enter the Azure Subscription ID, Azure UserID and Azure User’s Password.
Click the Import button to configure the scan Job to connect to Azure and scan the host(s) associated with this subscription.
Scan Docker Images
To assist with the scanning of Docker container images, SAINT allows you to specify an image in a Docker registry, a repository on a remote host running SSH, or a local repository on the scanner. When you use any of these options, the scanner will download and temporarily run the specified image on the scanner. While the container is running, the scanner will scan its IP address (which is typically a private IP address visible only to the scanner) and run local checks inside the container. The scanner will remove the temporary container and any downloaded files when the scan completes.
In order for a Docker image scan to work, Docker must be installed on the scanner, and the image must be compatible with the scanner’s kernel and architecture. Furthermore, the Docker image must be able to run persistently by default. An image that runs a single command and then exits will not stay running long enough to be scanned.
To scan Docker images:
-
From step two of the scan job wizard, click on More Options… under the Enter Target(s) box.
-
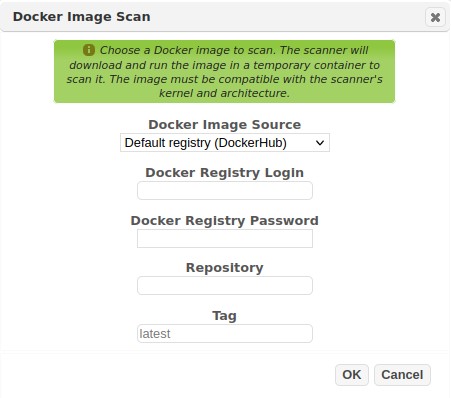
Choose Scan Docker Images. The following dialog will appear:
-
Choose the source of the Docker image:
-
Default registry (DockerHub) – The image is in a repository located at hub.docker.com. A login and password for the registry is required.
-
Other registry – The image is in a repository located at a Docker registry other than the default registry. The IP address or hostname of the registry server is required in addition to the login credentials for the registry.
-
Remote repository (SSH server) – The image is located in a repository on a remote host which is running SSH. The IP address or hostname of the remote host and the host’s SSH credentials are required. The image will be exported on the remote host and transferred using the SCP protocol.
-
Local repository (on scanner) – The image is located in a local repository on the scanner.
-
-
Enter the repository name and the tag name. If the tag name is omitted, the latest image in the repository is used. If a registry was selected in the previous step, you may either enter the repository in user/repository format or just the repository name. If just the repository name is entered, the user name will be prepended automatically.
-
Click on the OK button and continue through the scan wizard.
-
If you chose “Remote repository (SSH server)” above, click on the Set button beside Unix/Linux/Mac in step 3 of the scan wizard, and enter the SSH credentials for the remote host.
Infoblox
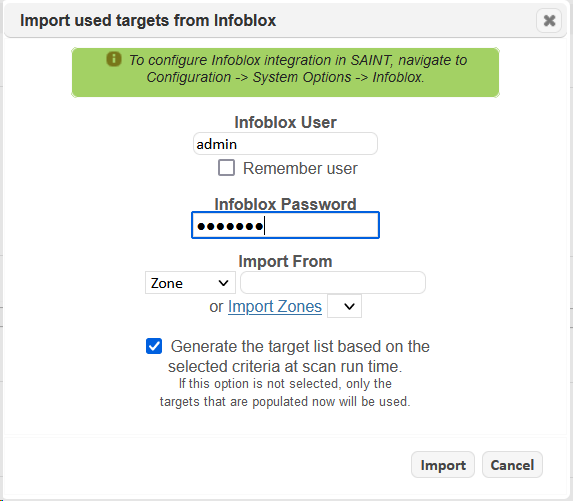
SAINT Security Suite can import “USED” targets from Infoblox while creating a scan job, and automatically grab new targets before each scan run. (See Configuration)
Import OpenAPI Description
Note: this feature requires API Scanning to be enabled in your license key.
Unlike scanning interactive websites which can be crawled automatically, scanning REST APIs requires advance knowledge of certain information such as endpoints, methods, and parameters in order to achieve a thorough scan. SAINT uses the OpenAPI standard for this information.
To scan a REST API, choose More Options in step 2 of the scan wizard, and then choose the Import OpenAPI Description menu option. Specify the path to your OpenAPI description file and click the Import button. The file may be in either JSON or YAML format.
Uploading the OpenAPI description file will automatically add the server URLs found in the file to the scan targets. If there are any URLs that you don’t want to scan, remove them by clicking on the corresponding X in the selected targets box. Note that if the API requires credentials, it is still necessary to provide them in the next step of the scan wizard, since they are not in the description file.
Importing Targets
After the Infoblox configuration is completed, the option to import targets from Infoblox will be available during job creation. Click on the “More Options” link in step #2 of the job creation wizard.

This will open a form, allowing targets to be imported by subnet, IP range, or zone.
When it comes to zones, there is an option that will populate the zone list after the credentials have been entered. Users can also input the zone into the field next to the Zone field.
While importing targets from Infoblox, there is an option to save the criteria that gets used before each scan run. If this option is enabled, then the target list will be expanded to include new targets found based on the subnet, zone, or range before each scan starts within the job.
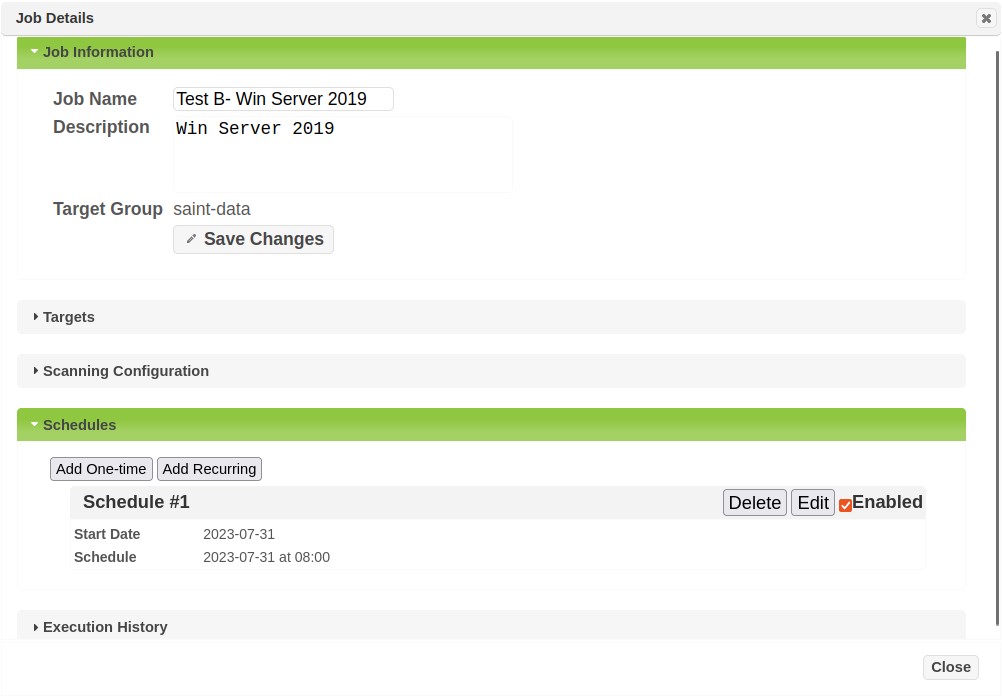
View Job Details
The Action column of the Jobs tab provides an option to view basic information (name, description, target group, target lists, and scan policy) about each job, as well as detailed about job schedules, execution history and status files. Click the Information option (“i” icon) on the job row that you wish to view. An example of this display is shown below:
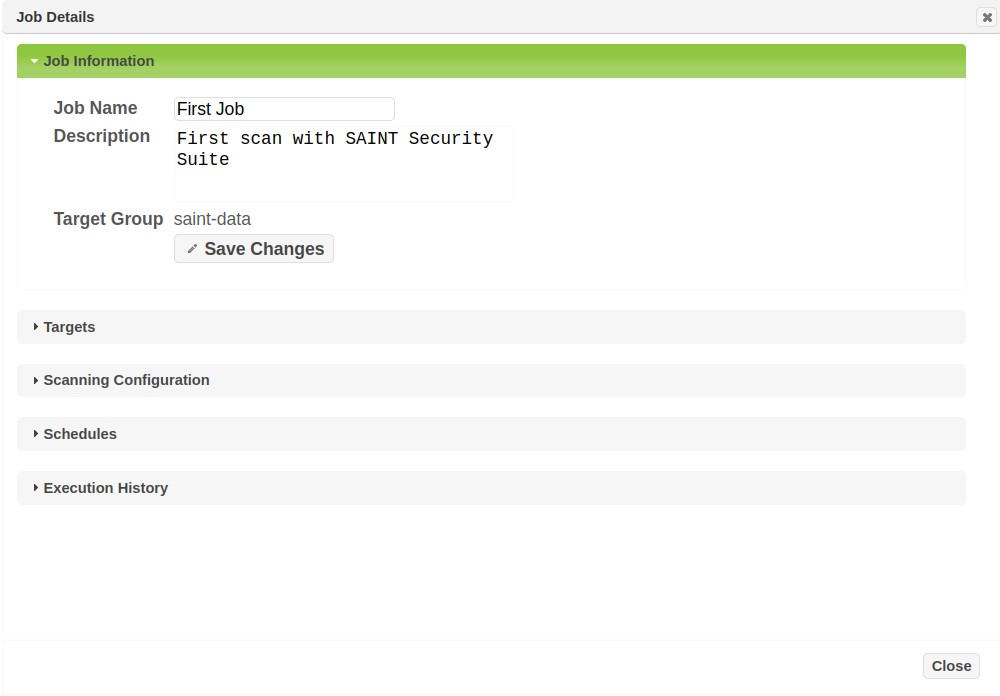
Clicking on the section headings in this window will expand the selected section and provide further details such as the Target List, scan Schedules and the Execution History that displays details about scans that have been run for the job.
Host-Based Assessments
Starting a Scan
There are currently three scan policies which can be used with the Agent: Local Checks, OVAL Definitions, and Configurations..
-
Local Checks
-
Windows
-
Patch checks
-
Application checks
-
Firewall status
-
Software inventory
-
Open ports
-
-
Linux/Mac OS
-
Patch checks
-
Application checks
-
Open ports
-
-
-
OVAL Definitions (Windows/Linux/Mac OS)
-
All OVAL definition content found at the CIS OVAL Repository may be used.
-
Content from other sources will work as well.
-
-
Configuration (Windows/Linux/Mac OS)
-
Perform configuration scans using configurations available from USGCB, DISA, CIS, and others.
-
To start a Host-based Assessment, load up the job creation wizard by using the ‘+ Create’ button at the top right of the UI and clicking on Scan Job. You can also access the wizard by navigating to Scan > Grid Actions > Create Job.
Select the Host-based Assessment from the Select Policy Category dropdown. Now, from the Select Policy dropdown, you can choose Local Checks, OVAL Definitions, or Configuration.
**If performing an OVAL Definitions or Configuration scan, configuration/OVAL content must first be downloaded or imported from Scan > Configuration Scanning. From this page you can import one of the predefined configurations or OVAL Definitions, or import your own.
Step 1

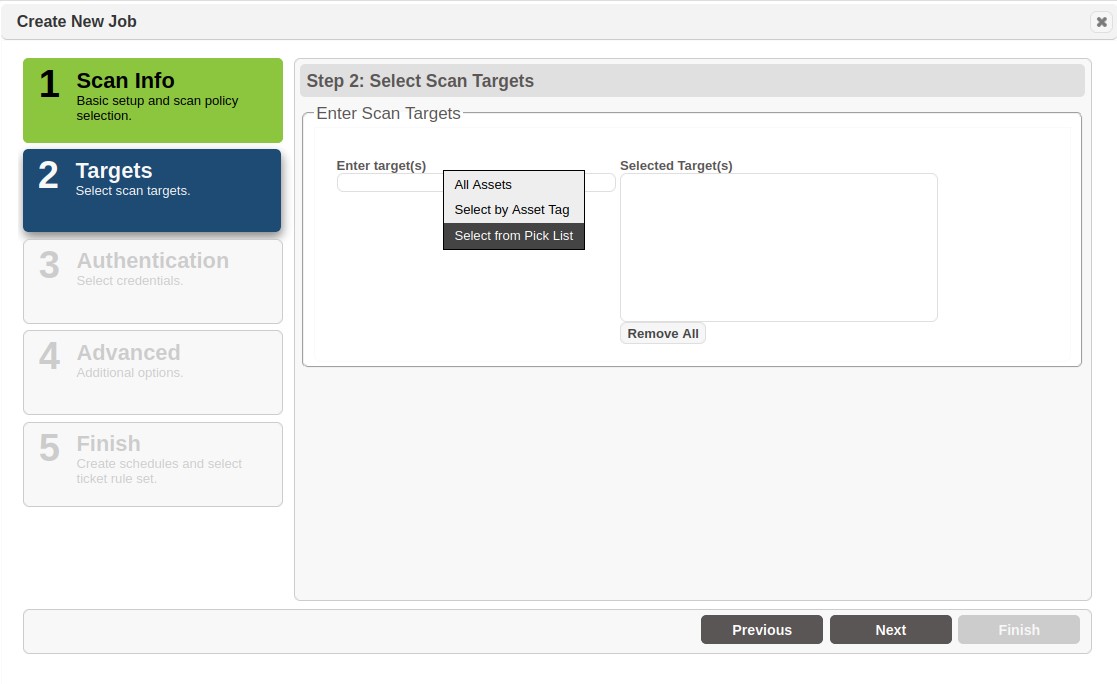
Step 2
After selecting a policy, click on Next to get to the target selection step. Click on the Enter target(s) text box and there will be three options:
-
All Assets - This will allow all agents to perform scans
-
Asset Tag - This will perform scans against assets that only have certain tags
-
Pick List - This lets you select individual agents from a grid
Step 3
The last step is to schedule the scan. The scan will initiate from a given start time, or immediately, and await connections and data from agents for the number of hours specified in the Duration field.
Checking Scan Progress
The progress of each Agent can be checked during and after a scan by clicking on the orange Details link in the progress column. The progress percentage is determined by the number of completed scan tasks divided by total number of scan tasks across all agents in the scan.

Clicking Details will bring up a dialog containing the status of each scan task for each agent.

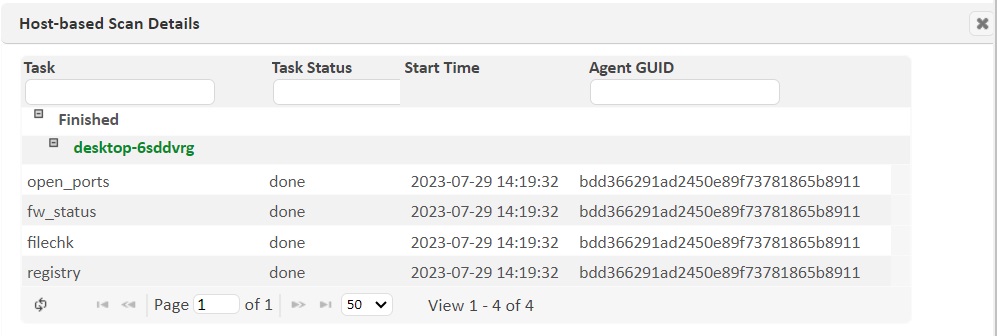
The status categories are:
-
Scanning – Agent is in the process of performing scan tasks
-
Finished – Agent has finished scanning
-
Hasn’t checked in – Scan is running but the Agent has not been seen yet
-
Didn’t check in – Scan is complete, but the Agent never connected
-
Partially Scanned – Some of the scan tasks were completed, but others did not finish. This could occur due to stopping a scan or the scan ending.
The scan tasks are the various probes which run on each Agent. They have three states:
-
New – task is waiting to be started on the Agent
-
Sent – task has been started on the Agent
-
Done – task has been completed and results returned
Edit Jobs and Save As
The scan job creation wizard is also used to support editing the settings of an existing job. This can include editing the job Name, Description, Target lists, Targets to Exclude, the Policy, detailed Configurations and Email notifications, Authentication and running the edited job Immediately or adding a new scan schedule. The only limitation is removing (deleting) an existing schedule. You must use the process described in the Edit Job Schedules, to edit, enable or disable a job’s schedule from the scan queue. Note that editing settings such as the target list, target exclusions, scan policy, authentication settings and others can dramatically affect the scan results from previous scans associated with the Job and future scans. So care should be taken when editing an existing job to ensure the integrity of the intended purpose of the job (such as trend analysis or performing a specific assessment like content scanning or a compliance analysis) is not compromised. Follow these steps to edit an existing job:
-
Navigate to the Scan page’s Job tab.
-
Click on the Edit option (pencil icon) for the job to be modified. The job creation wizard will be displayed with the existing job settings populated in each step.
-
Navigate to the applicable steps and scan setting, as you did during job creation, and update the required settings.
-
When all changes have been made, navigate to Step five and click Finish. A confirmation dialog will be displayed to ask whether you wish to save the changes for the existing job or "save as" a new job. Once you have made your selection, the changes will be saved and executed, as applicable.
Edit Job Schedules
The Job Details dialog provides support for editing the name and description, as well as managing the schedules defined when the job was created (see Step 5 – Summary of the job creation process for more details). The following describes the steps for viewing a job’s information and editing this information.
-
Click the Edit option (pencil icon) on the job row that you wish to edit.
-
Edit a job’s name and description can be done by clicking in the applicable text box and typing in the revised text. Click the Save Changes button once you’ve completed the changes.
-
Expand the Schedules section of the Job Details to view the current schedules defined for the job.
-
Editing Job Schedules through this feature supports the following options:
-
Add One-time – click this option to add an additional scan that will run once, based on the job definition. The Run Once dialog will be displayed to define the date and time to run the job.
-
Add Recurring – click this option to add a new recurring scheduled scan for the job. The Recurring Schedule dialog, also used in the job creation wizard will be displayed to define the settings for the new recurring job schedule.
-
Delete – click Delete to remove the currently selected schedule.
-
Edit – click Edit to view the selected schedule and edit when scheduled scans should run for that schedule.
-
Enable – Check this box to activate the selected schedule and run scans for the job based on the schedule’s settings. Uncheck this box to cancel any further scans being run based on the selected schedule.
Note: there may be existing scan activity currently underway if your revisions are being done at the time a job schedule is to be executed. Individual scans can be stopped by navigating to the Scan grid and clicking the Stop button on the applicable scan.
-
Copy Jobs
Owners of jobs, and users with “Copy” permissions to applicable job(s), may copy existing jobs and use them as a starting point for a new job. For example, a job owner may use an existing job to perform similar scans across a number of host environments, as different jobs. Or, an administrator may develop a job with a number of customized configuration settings and then permit other users to copy that job to use in their own work, such as using the copied job to enter their own targets for managing their own scans while taking advantage of previous efforts in configuring a job template for consistency across teams. To copy a job:
-
Navigate to the Jobs tab.
-
Click on the copy action button beside the job to be copied (If the copy action button is not visible, click on the more options button to display it.)
-
A dialog box will be displayed to choose whether you also want to copy the existing job’s Schedule(s) and Credential settings. Check each box, if applicable, then click the Copy button to close this dialog.
-
A new job will be created in the grid, using the title “Copy of [name of the copied job]”
-
Click the edit button beside the newly created job, to open the job’s setup wizard, perform applicable modifications, such as giving the job a new name, modifying target lists, etc. and then save the new settings for execution.
Permission settings to support the Copy function
Scan jobs can include a host of content and settings that are not globally accessible by all users of the product. Such as the scanning engine (node) being used to scan, the hosts being scanned, the credentials being used for credentialed scanning, specific configuration settings, etc. Therefore, the owner of a job must ensure that the users being permitted to View and Copy a job have the applicable permissions required to view, copy and execute the intended capability of the copied job. The following is a synopsis of the permissions settings to be considered for the “copy job” feature:
-
The owner of a job has all permissions required, by default, to copy a job. If the owner of a job wants to make a copy of the job click the Copy button in the Action column of the Scan Jobs grid. A copy of the job, named "Copy of [name of the copied job]" will appear on the Scan Jobs page.
-
If the user of the copied job does not have permission to scan from the scanner node associated with the copied job, then scan permission is granted as a result of the “copy” permission. However, the user does not have full visibility of the scanner node. It will be displayed as "Unknown node".
-
A user who is not the owner of the job, who has "Copy" permission on the job, may click the Copy button in the Action column of the Scan Jobs page to make a copy of the job.
-
The user who copies another user's job becomes the owner of the new copy of the job. The original owner still owns the original job.
-
If owner of the job edits a job in the Scan Wizard, a dialog will be displayed when the Finish button is selected, to "Save" the edited job or "Save as" a new job, that includes all of the previous job’s settings and modifications.
-
The owner of a job may grant permission to another use to "copy" the job. The original owner must first grant the new owner "View" permission on any Credentials Manager credentials needed by the job, if the owner wishing to allow the user to use those credentials from the original job.
-
If the job uses a custom scan policy, and the custom scan policy contains custom checks, the original owner must grant the new owner "view" permission on the custom checks.
-
If a user who is not the owner of a job has "modify" permission on a job, that user may edit the job in the Scan Wizard. When that user clicks Finish, the option to "Save A Copy" of the job will not be displayed unless that user also has “copy” permission on the job.
Delete Job
Delete a single Job:
-
Click the Delete option (trash can icon) on the job row that you wish to delete.
-
Confirm the delete action.
Delete multiple jobs at once:
-
Click the checkboxes in the leftmost column on the job rows that you wish to delete.
-
Click on Delete Jobs under the Grid Actions menu above the grid.
-
Confirm the delete action.
Export Job
To assist with the management of jobs, jobs can be exported and imported. The export format is a gzip-compressed data file which can be easily saved, transferred, backed up, and re-imported at a later time to the same installation or a different installation. This may be useful in situations where scanning and reporting are to be performed on two separate installations, or in situations where scan data is considered too sensitive to store permanently in the database.
Only the user who created the job or a member of the Administrators group may export a scan job.
To export a scan job:
-
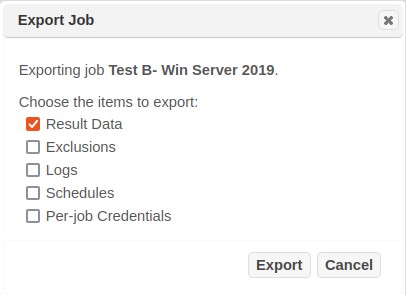
From the Scan tab, click on the Export icon (box with diagonal arrow) on the job row that you wish to export. (If the Export icon isn't visible, click on the More Options button on the desired job row to show it.) This opens a dialog box as shown below, which exports the job with all scan runs. Alternatively, to export the job with only a single scan run, go to Scans tab and click on the Export icon on the desired scan row.
-
In the dialog box, check the items which you want to export:
-
Check Result Data if you want the scan results to be available in the dashboard, analyze, or report screens after importation.
-
Check Exclusions if you want any excluded vulnerabilities to remain excluded after importation. (See Exclusions.)
-
Check Logs if you want the status file and verbose output to be available after importation. (See View Current Status of a Running Scan and View Verbose Output.)
-
Check Schedules if you want any one-time or recurring scan runs scheduled for the future to run after importation.
-
Check Per-job Credentials if you want any credentials which were entered in the create job wizard to be used when running the job after importation. Note that this does not include credentials stored in the credentials manager. (See Authentication.) Warning: since the destination SAINT installation may have a different encryption key than the source installation, passwords are not encrypted in the export file.
-
Note: if none of the above are selected, the job name, description, target list, and configuration will still be exported.
-
-
Click on the Export button.
-
Save the export file. The interface for saving the file varies with different browsers.
-
Optional – After the export dialog closes, click on the Delete icon (trash can) on the grid row if you wish to delete the job or scan run from the database. The job can be restored later from the saved export file.
Import Job
To import a scan job which was exported as described above:
-
From the Jobs tab, click on the Import option from the Grid Actions dropdown list. This opens an Import Job dialog box.
-
In the dialog box, set Import Type to SAINT and choose the file which was in step 4 above. The interface for choosing the file varies with different browsers.
-
Click on the Import button.
-
Wait for the import process to complete. A message will appear in the dialog box indicating whether the import was successful.
All imported jobs will be owned by the user who imported them, regardless of the original owner.
Import Nessus Scan
To import a Nessus Scan, go to the Scan Jobs page and use the Grid Actions -> Import Job link.
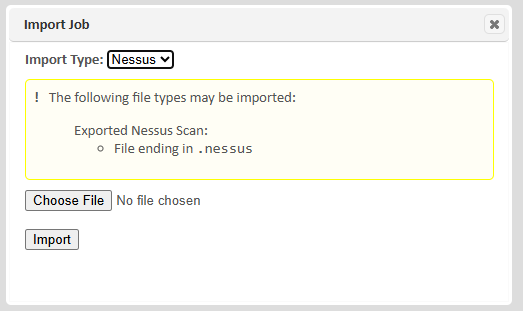
- Select "Nessus" from the "Import type" menu and click on "Choose File."
- Select a *.nessus file. These files can be obtained from Nessus Professional and Nessus Expert by using the “Export” drop down and choosing the “Nessus” option. These are XML files containing Nessus scan information and results.
- Click on “Import.”
This will create a scan job and a scan containing the results from the exported Nessus data. All targets will be associated with the local SAINT scanner node.


The results can now be analyzed through the Analyze, Dashboard, and Reports pages just like SAINT scan data.
Export Jobs
The Export Jobs option from the Grid Actions menu allows you to choose multiple jobs by age, job name, or owner username to export to a location on the SAINT host, or to download locally to your computer. The number of days may be set to ‘0’ to export all the jobs. Jobs which have never been run or which have unfinished scans may be exported, but the unfinished scans won’t be included. The job name and owner username may be specified with wildcard characters where ‘*’ matches zero or more characters and ‘?’ matches one character. Just like when exporting an individual job, you have options for which job-related data to export for multiple jobs. Once the export is complete, you also have an option to delete the jobs that you just exported.
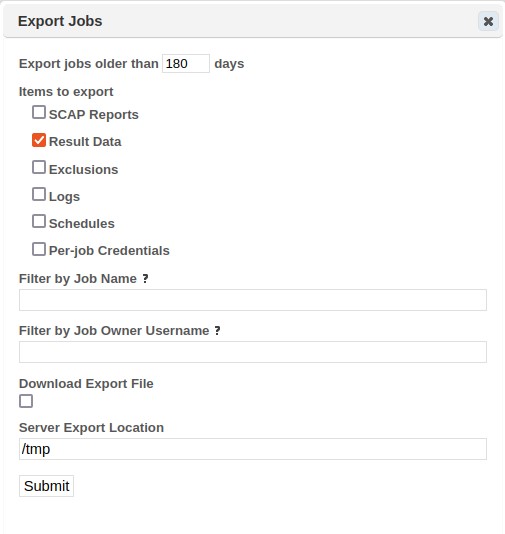
Scan Tab
The Scans tab on the Scan page provides basic information about individual scans executed for a job. This information is similar to the job, but is focused on the actual scan that produced results you analyze in Dashboards, Analyze grids and Reports. Click the Information option (“i” icon) on the scan row that you wish to view.

Scan Status
While a scan is running, the Status column indicates whether the scan is ready to run, running, paused, finished or stopped. Paused scans are denoted by “Paused” to indicate manual interaction to temporarily pause a scan, or “Pause Window” to indicate a scan is currently paused because a Scan Window was defined for the recurring scheduled scan Job and the current scan is currently active but the time is not within the defined scanning Window. The Progress column provides an estimate of the percentage of scan phases and probes that have completed. Both of the above indicators are automatically refreshed periodically, but they can be manually refreshed by clicking on the refresh icon at the bottom left corner of the grid. Note that the progress indicator is only an estimate, because the execution time of the scan phases and probes vary, and the total number of phases and probes is unpredictable.
To view a more detailed account of the scan progress, click on the Information (“i”) icon of the desired scan, expand the Execution History section, and click on View Status File. This will open a dialog providing a continuously updated log of probes which have started or finished.
If the Status column shows “Error,” then the scan was unsuccessful on at least one scan node. Click on the Information (“i”) icon for the unsuccessful scan and expand the Execution History section to find out which node had the error. Then click on the View Verbose Output link on that node’s row to see information about the error.
Scan Details
The scan details define what job a scan is based on including the scan policy, when the job was first started and ended (if applicable), and the current status.
Execution History
The scan execution history shows the start and end times of the executed scan, from the defined job. This information describes which scanner node was used (for standalone installations this will be the local node), the start and end times of the scan, the current status for each scanner used in the job, a link to the status file for the scan, expanded status details describes a “verbose output,” and a hyperlink to go directly to the scan results in the Analyze tab. The example shown above describes the current status of a scan being run on the built-in scanner local node. Note that running scans on multiple nodes will provide a visual status of scan progress on each node used in the scan.
View Current Status of a Running Scan
The Scan Details Execution History provides a hyperlink to view the status file content that shows the current state of a scan, ongoing progress of individual scan processes by date/time stamp, affected hosts and ports, and other useful information as a scan progresses toward completion. This information can also be useful to determine if particular hosts have been scanned or were unavailable at the time the host was assessed. The following is an example of a status file, and some of the information you may see during your own scans.

View Verbose Output
Viewing verbose output is done in the same manner as viewing the status file. While the status file focuses on the status of scan activity, the verbose output provides insights into the underlying results. For example, in the screen shot below we see host information and vulnerability results described for a target being scanned. While not a complete record, this information can be useful in gaining some insight into intermediate results for a scan.
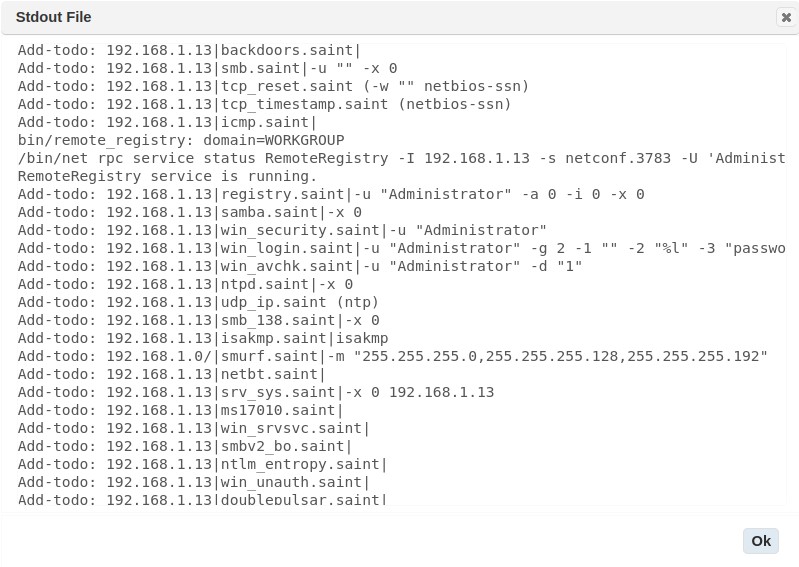
View Results
The View Results hyperlink provided in the job details is a convenient, one click link to view scan results in a grid display in the Analyze tab and set the focus of the analysis on the selected job.
Pausing and Stopping Scans
While a scan is running, two additional action buttons appear to allow you to control the scan: Pause and Stop. The Stop button causes the scanner to immediately cease all scanning activity and terminate the scan process. At that point, a Resume button appears. Pressing the Resume button causes the scan to re-enter the scan queue and reload the scan’s state into a new process so it can continue scanning where it left off.
The Pause button is a gentler alternative to Stop. It tells the scan process to refrain from initiating any new probes, but doesn’t terminate the scan process. The Continue button can then be used to tell the process to resume scanning. Note that while a scan is paused, the process remains alive and thus it continues to use system resources. Also, note that the pause function only stops initiating new probes and doesn’t terminate probes which are already running, so it could take several minutes after pausing a scan before all scanning activity fully ceases.
Delete Scan
Delete a single scan:
-
Click the Delete option (trash can icon) on the scan row that you wish to delete.
-
Confirm the delete action.
Delete multiple scans at once:
-
Click the check boxes in the left most column on the scan rows that you wish to delete.
-
Click the Delete Scans under the Grid Actions menu above the grid.
-
Confirm the delete action.
Export Scan
Use the Export icon (box with diagonal arrow) to export the desired scan run. See Export Job for further information.
Request Attestation of Scan Compliance
If the scan ran using the PCI scan policy and completed successfully, then the scan results can be used to request an Attestation of Scan Compliance. Note: this option only appears if Attestation of Scan Compliance is enabled in your license. Furthermore, this feature does not include ASV attestation services. You should have your own certified ASV staff members in order to use this feature as intended.
To request an Attestation, go to the Scan -> Scan Jobs page and click on the Scans tab. Then click on the checkmark icon for the desired scan. (If the checkmark does not appear, then the scan is incomplete, the scan did not run using the PCI scan policy, or attestations are not included in your license.) This brings up a five-step attestation request wizard, as shown below.
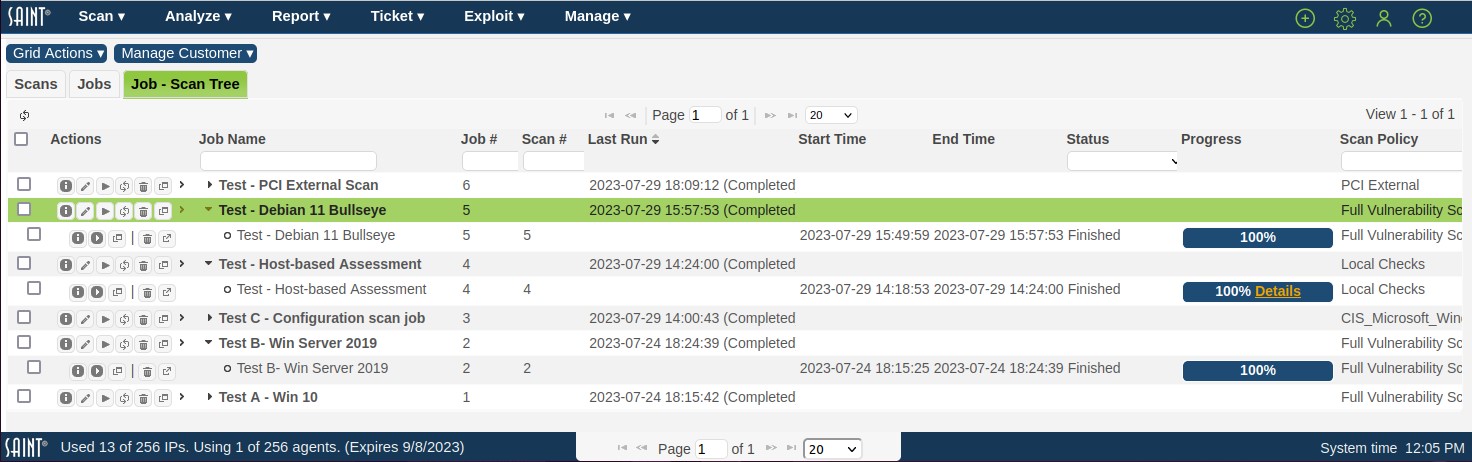
Each step must be completed before you can advance to the next step. However, you can return to previous steps at any time. The steps are as follows:
-
Scan Scope – This step will display the scan scope and ask you to confirm that the scope is correct. It will also inform you if any possible scoping discrepancies were detected.
-
Scan Results – This step shows whether or not the scan detected any vulnerabilities which cause PCI failure. If there are vulnerabilities which cause PCI failure, click on the Go to failing vulnerabilities button to see what they are. (This exits the wizard, but you can re-enter the wizard at any time.) Then, you can either fix the failing vulnerabilities and run the scan again, or click on the X icon beside the failing vulnerabilities to submit disputes. (See Create a Dispute.)
-
Special Notes – This step shows whether the scan detected any conditions that require special notes according to the ASV Program Guide. If there are special notes, click on the Edit Special Notes button to view the special notes and enter declarations for them.
-
Customer Identity – This step is where you enter the name, address, phone number, and other information to appear in the Scan Customer Information section of the Attestation of Scan Compliance. Click on the Add New Identity button to enter this information, or select an existing identity from the drop-down menu.
-
Customer Attestation – This step is where you make several attestations and agreements required by the ASV Program Guide, the PCI Security Standards Council, and the ASV solution. All of the required boxes must be checked before the attestation request can be submitted. (The text can be customized using the Customer Attestations system option.)
When you have completed the five steps in the wizard, click on the Submit button. This will notify the ASV staff (as defined by the Attestation Resolver(s) system option) that action is required, and cause an open attestation request to appear on the PCI Attestations page. (See PCI Attestations.)
Job-Scan Tree Tab
The Job-Scan Tree tab provides a grid that combines the functionality of both the Jobs and Scans tabs. To set this as the default tab whenever navigating to Scan or Scan Jobs from the navigation bar, use the checkbox in the Grid Actions pull-down menu labeled Default Tab. For information on the features of the Jobs and Scans tabs, see the documentation sections Jobs Tab and Scan Tab.
Using the Job-Scan Tree Tab
To display all the scans for a given job, click the solid right arrow to the left of the job name. To expand or collapse every job, use the Expand All or Collapse All options, which are in the Grid Actions pull-down menu. The grid will automatically refresh every three minutes and its current state will persist, so jobs will not have to be re-expanded; this is also true when sorting, searching, refreshing the grid, and changing the number of records currently in view. To refresh a single job, use the Refresh Job icon in the Actions column next to the job name.
Additional Functionality in the Job-Scan Tree Tab
This grid also allows you to delete both jobs and scans at the same time. Any row that is checked, which is done by using the checkbox column on the left side of the grid, will be deleted when choosing Delete Selected from the Grid Actions pull-down menu.
Schedules
The Schedule pages provides the same information as the Schedules and Execution History sections of the View Job Details dialog, but in calendar format. It allows you to view your past scans, running scans, and upcoming scans for a given day, week, or month.
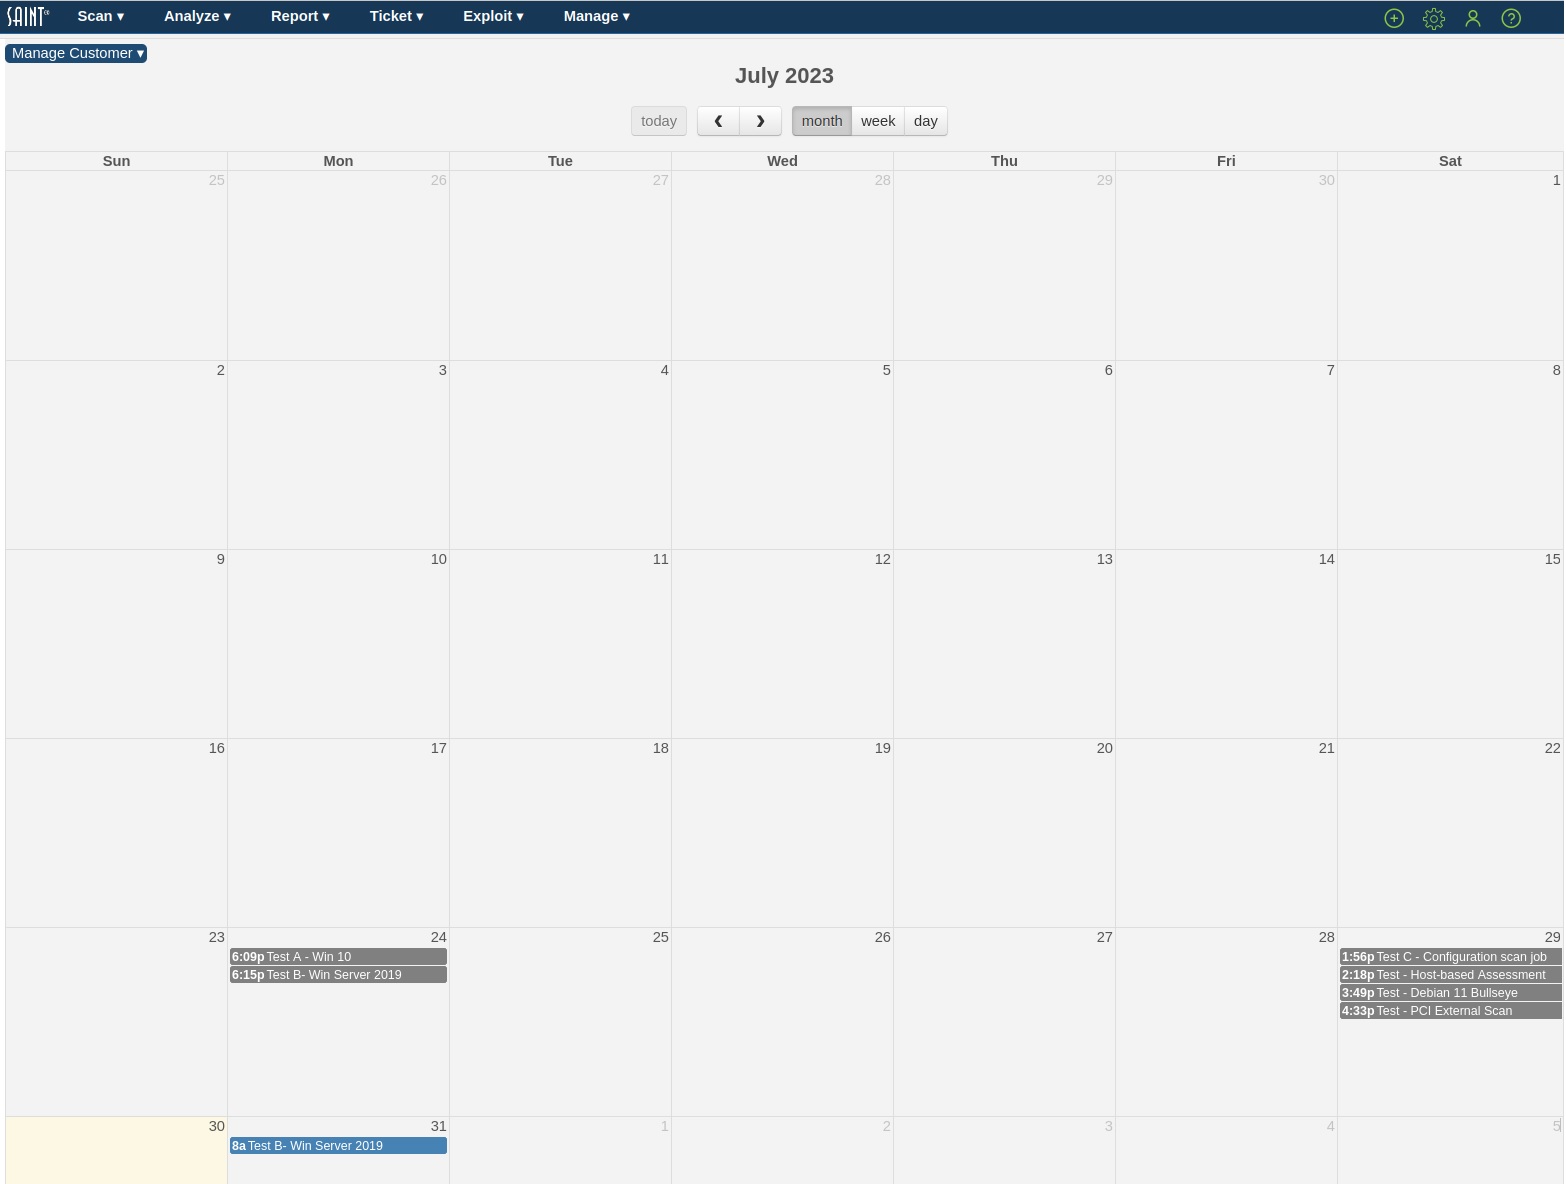
To select the time period for which to show the scan schedule, use the Month, Week, and Day buttons at the top of the screen to switch between calendar layouts. Then use the forward and backward buttons to move to the desired, month, week, or day. Alternatively, use the Today button to skip to the current day, week, or month.
On the scan schedule, gray blocks represent past scans, green blocks represent running scans, and blue blocks represent scheduled scans. Click on any block to view the job details. On the daily and weekly views, the size of gray and green blocks corresponds to the duration of the scan job for long-running scans.
To create or delete scan jobs, choose Manage Jobs from the Scan Menu.
Target Groups
The main purpose of this feature is to create a logical collection of “like” scan targets, to reduce the time to set up scan jobs and insert target lists to be scanned. Unlike an asset “tag”, where a tag is associated with an existing host (collected from a scan job's execution) for the purposes of tracking, analyzing, remediating and reporting; a Target Group is simply a method to identify a logical collection of hosts to scan. For example, a Target Group = Servers with a Target list of 192.168.1.1 – 192.168.1.50 describes a range of IP addresses that a job will scan for when the “Servers” target list is selected for job’s target list. Live hosts found from this scan will then be appended to the Asset table for management. Targets become Assets once they have been acquired from a scan and stored in the Asset table. If Assets are selected for scanning by their Asset Tag, for example Location=Data Center, then a scan job will scan only the Assets currently in the Asset table that have this tag.

Create Target Group
-
Click the Target Groups tab under Assets.
-
Click on Grid Actions > Create Target Group option to display the Target Group creation form..
-
Enter a unique name for the target group.
-
Enter a description of the collection of scan targets.
-
Define the targets for the group.
Single Node Target Groups
For installations that are using only a single scan engine (local scanner node), such as standalone installations or shared installations that are scanning reasonably small environments, enter targets into the Enter Target(s) area. Targets can be specified by IP address, hostname, URL, subnet, or CIDR address. IP addresses can be either IPv4 or IPv6. Additional options for selecting or importing target lists are available by clicking on the More Options link. See Target Entry Options for more information about these other options.
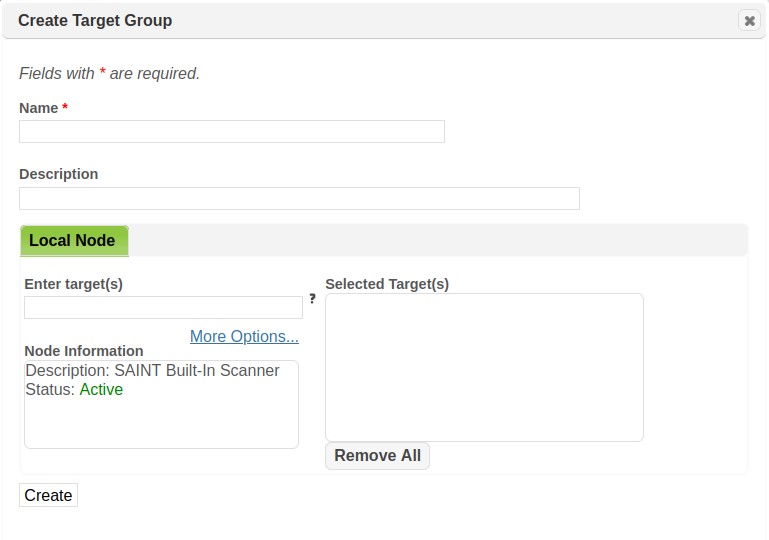
Multi-Node Target Groups
For environments deploying multiple scanner nodes, you can also create target groups that include targets that span across the enterprise, and specify the distributed scanner that can access individual targets and report findings back to the installation acting as the central manager. For example, creating an target group for all Cisco routers, and associating individual routers in each subnet to the scanner node that is deployed in the subnet that can access the target. For those environments, the Create Target Group dialog will display the primary (local node) scanner as a named tab, with a plus (+) symbol over a second tab to associated target groups to other available scanners.
Enter targets that will be scanned across multiple nodes, by entering each target list under their associated node. For example,
A. Enter targets that will be scanned by the local node.
B. Click the + button beside the Local Node tab to view a list of additional nodes you have permission to scan from.
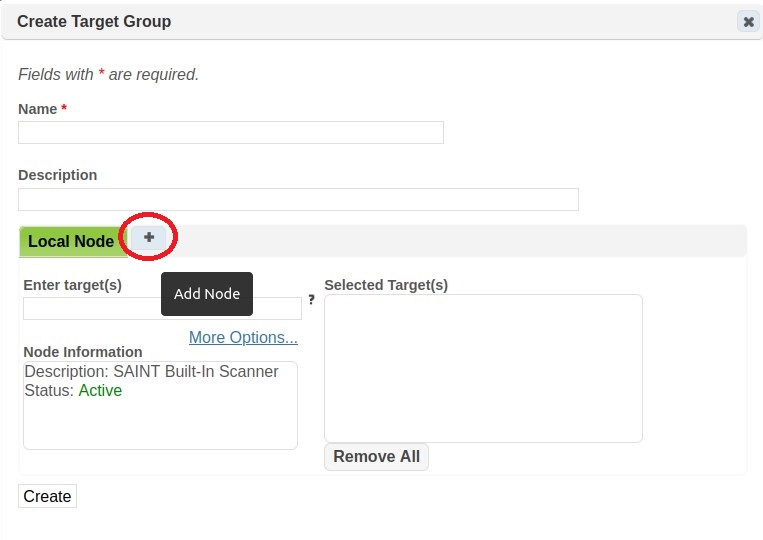
C. Click on the name of the next node you want to use in setting up your target group to display that node's target list fields.
D. Enter the targets to be scanned by the additional node.
E. Continue this process for any additional nodes and targets, as needed.
-
Click Create to create and save the new target group. The new target group will be displayed in the target group list.
-
View the details of a new target group later by double clicking on a row, or select a row and click on the edit (pencil) icon.
Edit Target Group
-
Click the Target Group tab from the Asset page..
-
Double click the target group's record or single click and click the Edit option (pencil icon) on the target group row that you wish to edit.
-
Type or copy/paste in the values to be changed.
-
Click Save.
Scan Policies
The Scan Policy grid shows all checks by the scan policy visible in the grid’s header row. This grid shows all vulnerability checks, to include a descriptive name, associated CVEs, and whether the checks are currently enabled for the policy. This page also provides the capability to select a Custom Severity Set and view the relationship between those defined custom severities and the vulnerability checks within the selected Scan Policy. Note: The Custom Severity column is hidden by default. It can be added by selecting it from the grid's column selector. This view will facilitate such actions as enabling/disabling checks for creating a custom policy; and creating new checks that may be needed for local requirements or for vulnerabilities that may not be available in SAINT’s current check repository.

Use the Tree Grid button (upper right corner of the grid) to view checks in a hierarchical view, by various categories, such as by “Database” and “Vendor”. This list also shows the total number of checks, by category. Clicking on each level of the hierarchy will provide more detail, with the actual checks displayed in the lowest level, as shown below in the example:
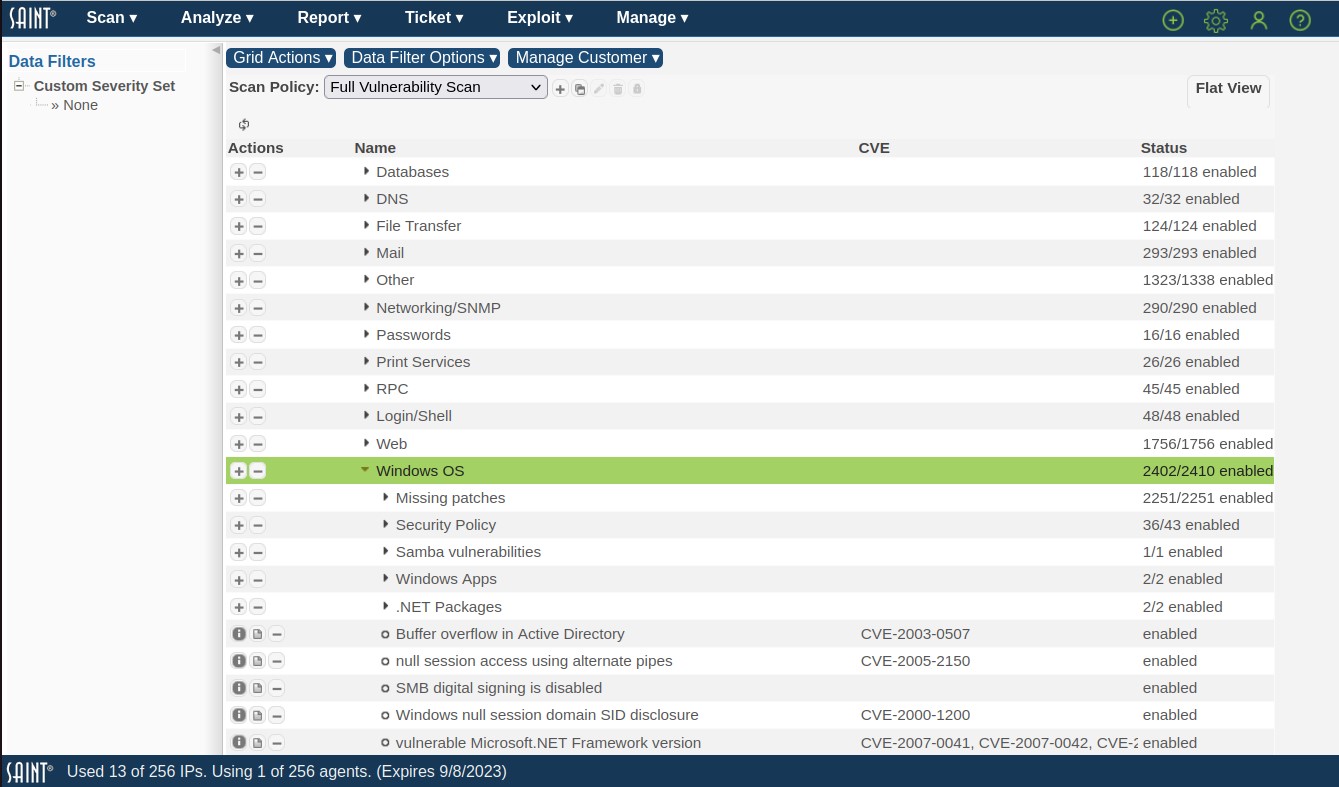
Click the Flat View button to return to the flat view. In the Flat View, inside the Grid Actions menu, you can export the list of checks and indicate whether each is enabled or disabled by clicking Export Policy Checks. You can select CSV or XML format, and the default filename for the export will be the name of the selected Scan Policy with all special characters replaced by underscores.
Creating a Custom Policy
There are instances where you may wish to create a policy that disables some checks, while retaining others. This can be done by:
-
Using the check boxes to select the checks on which to act
-
Select the applicable Enable or Disable option
In the example below, we’ve performed a column search for checks for “Firebird” for “SAINT’s Full Vulnerability Scan” policy. Once that list is present, we’ve checked all of these checks, to take the required steps to disable them and create a custom policy that excluded the execution of these checks.
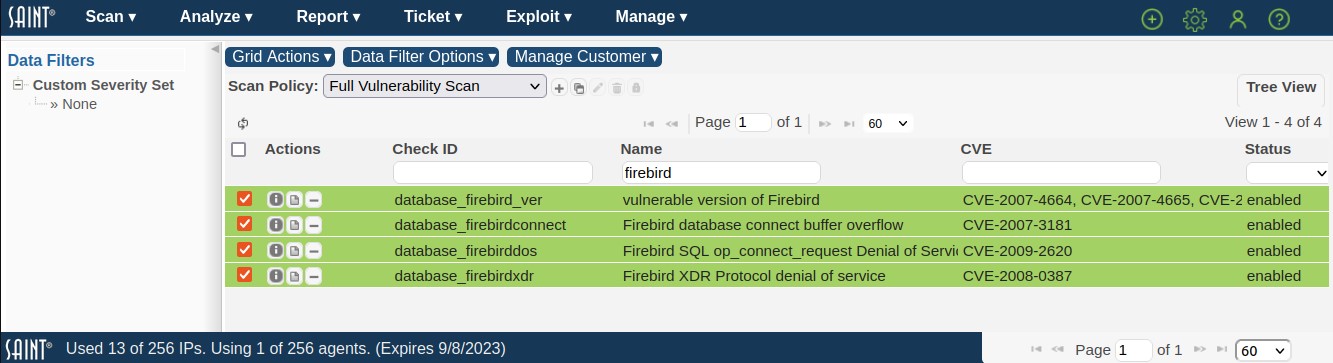
-
Once you located and clicked in the checkbox for the vulnerability check(s), click the Disable option from the Grid Actions dropdown to give the new policy a name.
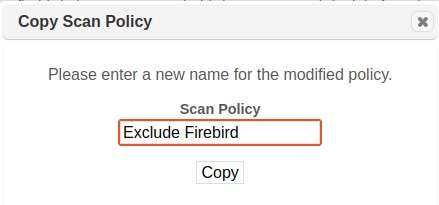
-
Optional. Enter a comma-separated list of ports or port ranges in the Extra Ports box at the top of the grid, and click on the Save button. Example: 8000-8002,8080
If specified, these ports will be added to the scan policy. This is only necessary for detecting vulnerabilities on non-standard ports. The standard ports for the enabled vulnerability checks are automatically included. If this field is left blank, only the standard ports for the enabled vulnerability checks are included.
The default for these ports is TCP. To add a UDP port, append "/UDP". Example: 111/UDP
This custom policy will now be available, as shown in this example:
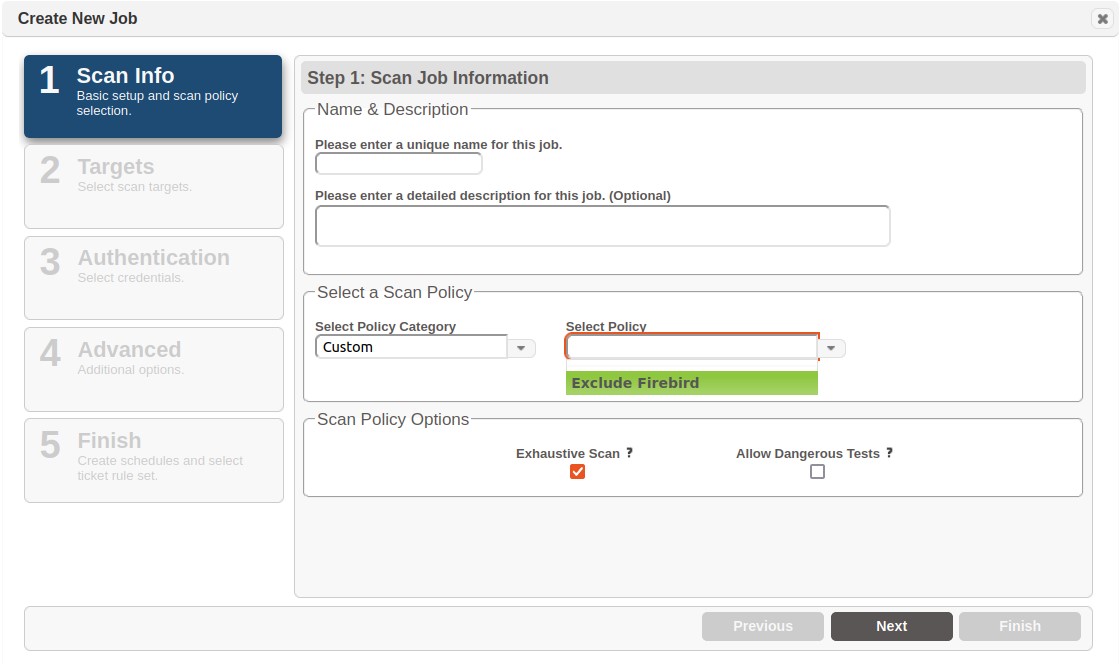
Custom Vulnerability Checks
Although SAINT's check repository contains thousands of vulnerability checks, there may be reasons to add custom vulnerability checks, such as site-specific security guidelines which define misconfigurations for which there isn't already a check.
SAINT allows you to create custom vulnerability checks without requiring any programming knowledge. All associated information, such as the severity level, CVE, and tutorial, is created along with the check. Once created, a custom check will run at the default vulnerability scan level, and can also be selected when creating custom scan levels.
Create a Custom Check
-
Select the Create Custom Check option from the Policy's Grid Action dropdown to open the New Custom Check dialog (shown below).
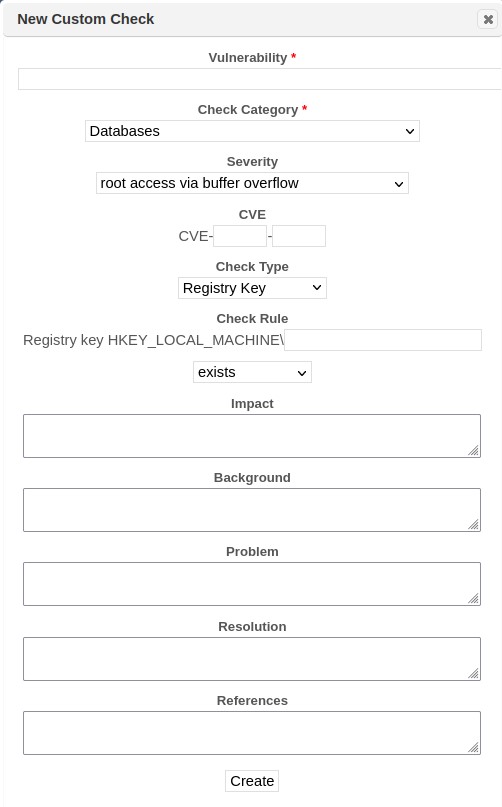
-
Complete each required field (*) and optional fields, as necessary to define the check details.
-
Vulnerabilities Title – This is the short vulnerability description which will appear if the vulnerability is detected.
-
Category – This selection determines where the vulnerability will appear in the vulnerability hierarchy. Top-level categories are indicated by three asterisks (***). Subcategories are indicated by two dashes (--).
-
Severity – This is the severity level of the vulnerability.
-
CVE – This is the CVE name for the vulnerability, if any.
The next step in creating the check is to create the rules which determine when to report the vulnerability. If the rule is true for a target, then the vulnerability will be reported on that target. There are several rule templates, each of which uses a different check methodology. To create the rule, choose the radio button beside the desired rule template, and fill in the template. The available rule templates follow:
-
Registry key exists/doesn't exist – Fill in the path to the registry key. Note that the hive HKEY_LOCAL_MACHINE is already there, so start with the top-level key under that, such as SYSTEM or SOFTWARE. Use a backslash to delineate sub-keys.
-
Registry value equals/not equal/less than/greater than x.y in key – Fill in the registry value, operand, and registry key. Note that a numerical comparison is performed on the operand, which is typically a version number. When entering the key, start with the top-level key under the HKEY_LOCAL_MACHINE hive.
-
File in folder is dated earlier than date – Fill in the file name, folder name, and date. The folder name should start with the root (either slash or backslash is accepted) and the same character should be used to delineate sub-folders. The date should be in Month/Date/Year format, with a four-digit year.
-
File in folder is less than version x.y – Fill in the file name, folder name, and version number. The folder name should start with the root (either slash or backslash is accepted) and the same characters should be used to delineate sub-folders. Note that determining the file version requires the file to be downloaded, which could slow down the scan if the file is large.
-
Received string from port (and version equals/not equal/less than/greater than x.y) – Fill in a string and a port number, or an asterisk or the string <any> to run the check against every port. If the data received from the specified port matches the string, the vulnerability is reported. If the second variation of this template is used, then the %version% substring within the string is a placeholder for a version number to be extracted from the network data, and then a numerical comparison is performed on that version number.
-
URL contains string (and version equals/not equal/less than/greater than x.y) – Fill in the URL and string. Note that the http://target/ portion of the URL is already there, so specify the URL beginning with the first character beyond the slash following the target, or leave the field blank to specify the home page of the target. The URL will be requested from the server using a GET request, and the vulnerability is reported if the string is found in the resulting page. If the second variation of this template is used, then the %version% substring within the string is a placeholder for a version number to be extracted from the resulting page, and then a numerical comparison is performed on that version number.
-
-
Optional - Impact, Background, Problem, Resolution, References – Complete these paragraphs to create the Remediation Tutorial for the vulnerability. HTML tags can be used in these fields to create hyperlinks or formatted text.
-
Click on the Create button to create the check.
Running Custom Checks
Custom checks are run the same way as built-in checks. That is, they will be included in scans run at the Vulnerability scan level, and can also be selected when creating custom scan levels. The custom check will appear in the vulnerability hierarchy in the category that was specified when creating the check.
Viewing and Editing Custom Checks
Custom checks are stored and associated with the scan policy they were created for. Whether part of an existing SAINT policy or a custom policy. Custom checks can be viewed and edited using the following steps.
-
Click on the main Scan menu – Policies page.
-
Select the applicable scan policy from the policy drop down list in the top of the vulnerability checks grid to view all vulnerability checks for the selected scan policy.
-
Locate a specified custom check by searching the CheckID field, check name or associated CVE, or use the custom column (already displayed or chosen from the grid’s column chooser). Selecting the Yes value for the custom column will constrain the records to only custom checks for the selected policy.
-
Click on the details (i) option for the custom check to view current details about the check, relate to vendor references, severity and authentication requirements.
-
Click on the edit (pencil) option to view the specific details about the custom checks settings and tutorial content, and make any required modifications.
-
Click Save to save changes made to any of the settings or content.
Delete a Custom Check
To delete a custom check, simply click on the Delete (trashcan) option on the row of the check to be deleted; then confirm the delete action.
Credentials Manager
The credentials manager allows you to store user credentials securely, and then use them later in scan jobs to authenticate to targets. When selected, a credential “file” is packaged up and passed securely to the scanning engine to support authenticated scans for more in-depth results.
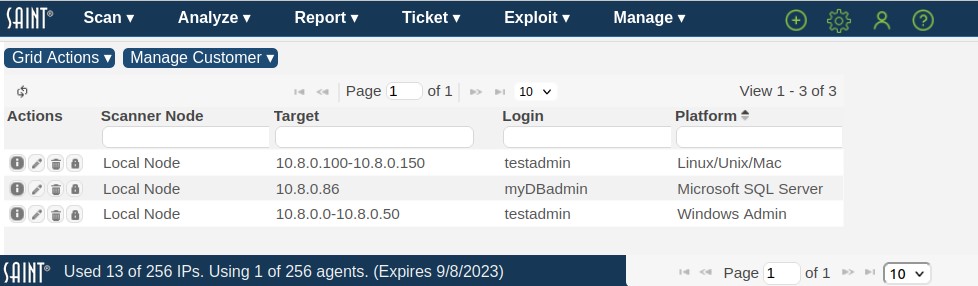
Authenticating to various Platforms
Windows Targets
For authentication to Windows targets, use an account with administrative privileges on the domain for the Windows Admin credentials. It is not necessary to specify the domain; the scanner will authenticate to the target’s domain by default, or a local account if the target is not a member of a domain. If you wish to authenticate using an account in a different domain than the target, specify the login as domain\username. (Note that the separator is a backslash, not a forward slash.) To use a local account even if the target is a member of a domain, specify the account name as "local:login", where login is the login name. Do not put a space after the colon.
The Windows Admin credentials are used to detect Windows updates, registry settings, and program versions, as well as enumerating users, shares, services, and software. If the scan uses the mobile device scan policy, these credentials may also be used to authenticate to Active Directory servers using LDAP to search for mobile devices which may have vulnerabilities. To enable LDAP authentication, in addition to providing Windows Admin credentials, the SSL certificate for the Active Directory server should be installed on the scanning host, and the TLS_CACERT setting in the ldap.conf file should be set to the path of the certificate. See http://www.sans.org/reading-room/whitepapers/protocols/ssl-secure-ldap-traffic-microsoft-domain-controllers-33784 for more information about setting up SSL certificates for Microsoft domain controllers. If SSL is not enabled for the LDAP service or the SSL certificate is not available, and you wish to accept the risk of using insecure authentication to the Active Directory server, then enable Allow Insecure LDAP under the Authentication tab of the scan options.
The Windows Non-Admin credentials are used to evaluate file share access controls. Use an account with typical user privileges. As with the Windows Admin credentials, it is not necessary to specify the domain.
If you wish to verify that the Windows Admin login and password are correct, enter the same password in the Confirm Password field beside the login and password boxes. Clicking on this button will display a green Login OK message within a few seconds if authentication to the target was successful using those credentials. If there are multiple primary targets selected, the first one will be used for this test. Targets must be specified individually, not as ranges, CIDR blocks, or subnets, in order to use this feature.
Keep in mind that detection of Windows updates should be used as a baseline assessment only. The scanner detects Windows updates using simple checks for the presence of registry keys and file time stamps, which cannot always account for updates that have been incorrectly installed, uninstalled, rendered ineffective due to incorrect order of installation, or other unusual situations. For a more thorough evaluation of Windows updates, it would be advisable to use one of several available patch management tools.
Configuring Windows Targets for Authenticated Scans
Windows Vista introduced more restrictive security settings than previous versions of the Windows operating system. That is good from a security perspective, but creates some challenges for scanners. In order for authenticated checks to work on modern Windows operating systems, the following conditions must be true:
-
Samba 3.0.23d or higher must be installed on the host running Security Suite.
-
OpenSSL 0.9.7 or higher must be installed on the host running Security Suite
-
The Remote Registry service must be running on the target host. This service is not started by default. If it is not running, the scanner will attempt to start it before running any credentialed checks, and stop it after the scan is finished.
-
File and Printer Sharing must be allowed through the Windows firewall. To enable this setting, go to the Control Panel, choose Windows Firewall, and click on Change Settings. Under the Exceptions tab, check the box beside File and Printer Sharing.
-
If the target is not a member of a domain, either one of the following must be true:
-
The scanner must authenticate to the target using the built-in Administrator account. This account is disabled by default so it must first be enabled. (An account which is not the built-in Administrator account does not have sufficient privileges to perform most checks, even if it is in the Administrator's group.)
-
OR, the following registry value is set:
Key: HKEY_LOCAL_MACHINE\SOFTWARE\Microsoft\Windows\CurrentVersion\Policies\system\
Value Type: DWORD value
Value Name: LocalAccountTokenFilterPolicy
Value Data: 1
This setting grants sufficient privileges for running a scan to any user in the Administrator's group.
-
-
Ensure that no Windows security policies are in place that block access to these services. Two common problems are the SEP configurations that block off the scanners even after the scanner is authenticated and a network access model that sets network access to "Guest only" permissions.
Linux, Unix, or Mac
For authentication to Linux, Unix, and Macintosh targets, any active user account on the system may be used. The SSH service must be running on the remote target in order for authentication on Linux, Unix, and Macintosh targets to function. If you choose not to authenticate, the scan engine will still conduct its full set of unprivileged vulnerability checks, omitting only those few which require authentication.
SSH Private Key
Optional – You also have the option to use SSH public key authentication to Linux, Unix and Macintosh targets. To use public key authentication, paste the private key into the ssh_private_key text area. The private key should correspond to a public key contained in the authorized_keys file on the target host. If the private key requires a passphrase, enter it in the Password field.
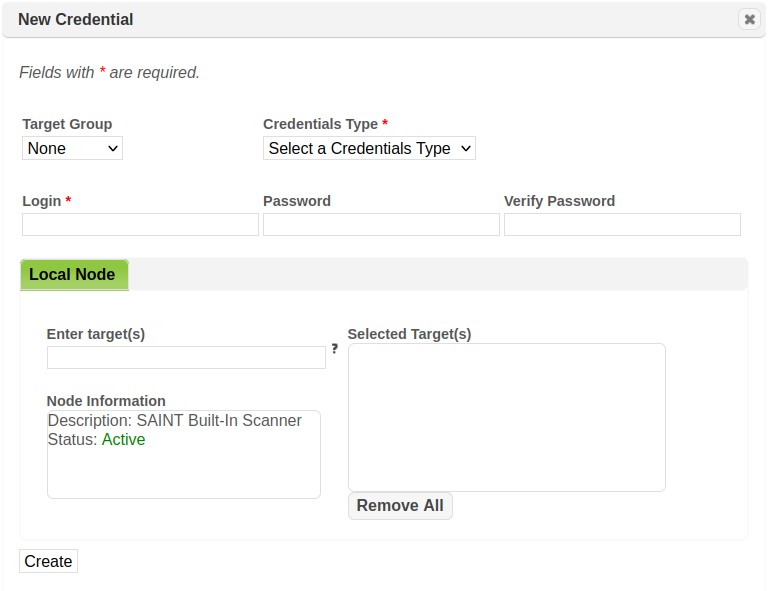
Oracle Database Servers
For authentication to Oracle Database servers, a fully privileged account such as SYS or SYSTEM should be used. The scanning system must meet the requirements for the Oracle Instant Client in order for Oracle authentication to succeed. The Oracle instant client, which enables Oracle Database account checks and exploits, is included with Security Suite and supported on Linux with glibc 2.3 or higher (x86 or x86_64) and Mac OS X 10.4 or higher (x86). Oracle authentication allows the scan to detect local Oracle vulnerabilities such as users or roles with ANY privileges or users with the DBA role. Note that Oracle authentication is not necessary to check for Oracle security patches. Windows or Linux/Unix authentication is required for that.
Oracle SID
Besides specifying the Oracle login and password, it is also possible to specify the SID of the database instance to be scanned. Enter this value when creating the credentials for an Oracle target.
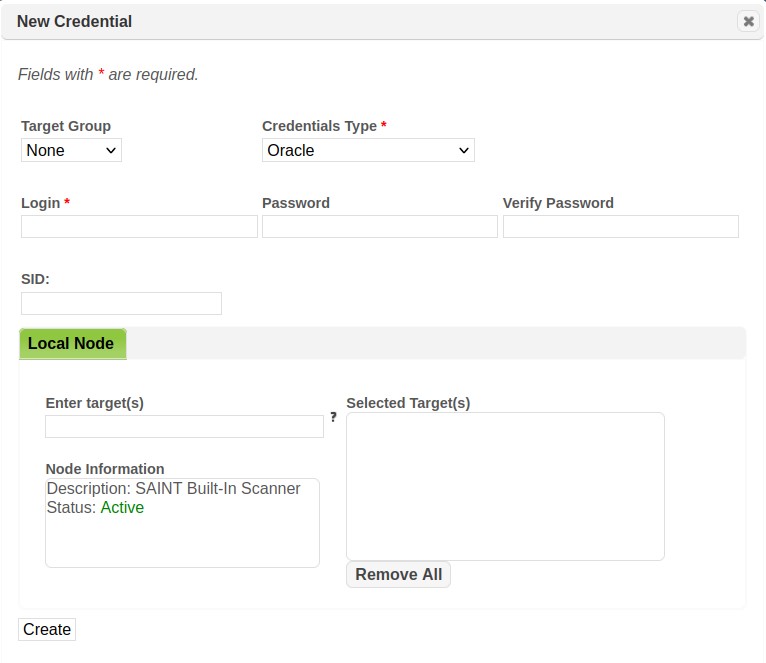
The SID is needed in order to authenticate to the database. If the SID is omitted, the scanner will attempt to determine the SID of the remote database; however, determining the SID of the remote database is not always possible. Therefore, it is advisable to specify the SID if known. The SID can be specified even if the login and password are not, in order to assist the password guessing attempts.
Microsoft SQL Server
Authentication to Microsoft SQL Server allows scanning for local database vulnerabilities such as privilege elevation through stored procedures and privilege elevation through web tasks. Authentication to Microsoft SQL Server requires the database to be configured to use mixed-mode authentication, and to allow remote connections using TCP. A fully privileged account such as "sa" should be used. (Security Warning: The Microsoft SQL Server password will be sent over the network using weak encryption.)
Note that Microsoft SQL Server authentication is not required in order to detect whether SQL Server patches have been applied. Windows authentication should be used for that.
MySQL Databases
Authentication to MySQL databases allows scanning for local database vulnerabilities, such as users having excessive privileges. The mysql client program must be installed on the Security Suite host in order for this feature to be used. Also, authentication to MySQL requires the database to be listening over the network, and for access to be allowed from the Security Suite host. A fully privileged database account such as "root" should be used to authenticate.
Note that MySQL authentication isn't required for determining vulnerabilities in the MySQL software itself. Those vulnerabilities are inferred without authentication from the MySQL version number found in the network response from the MySQL service. Unix/Linux authentication may be helpful for reducing false positives however.
SNMP Version 3
For collecting certain system properties from SNMP services using version 3 SNMPv3 credentials may be supplied.
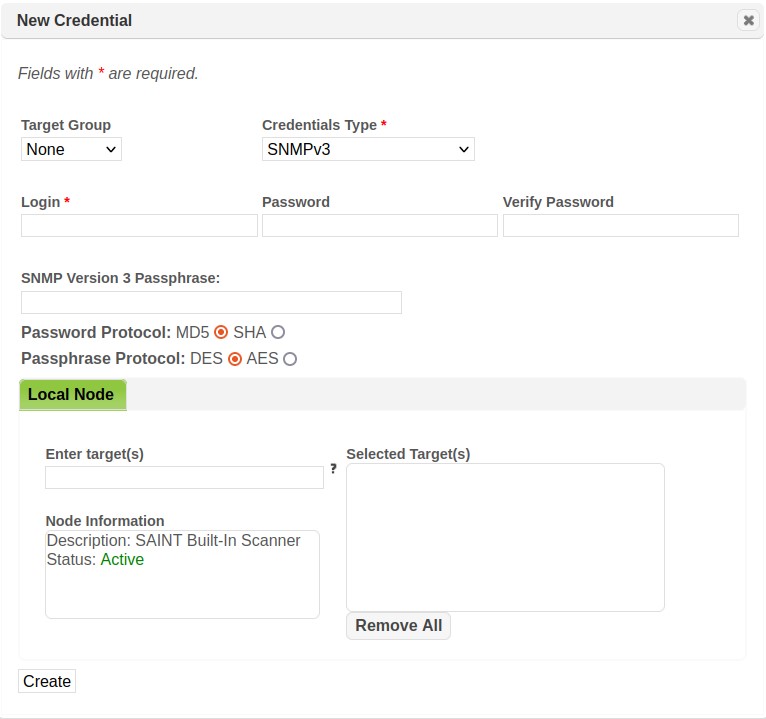
These fields correspond to the following snmpget tool arguments:
Login: -u (securityName)
Password: -A (authKey)
Password Protocol: -a (authProtocol)
Passphrase: -X (privKey)
Passphrase Protocol: -x (privProtocol)
Web Applications
SAINT also supports form-based authentication to web applications. However, instead of simply specifying the login and password directly on the Scan page, you must either record the login steps or specify the POST parameters to be sent to the application.
To authenticate to a web application using form-based authentication:
-
Open the New Job wizard and proceed to step three of the wizard.
-
Click on the Set button beside Web Application. A dialog box will appear.
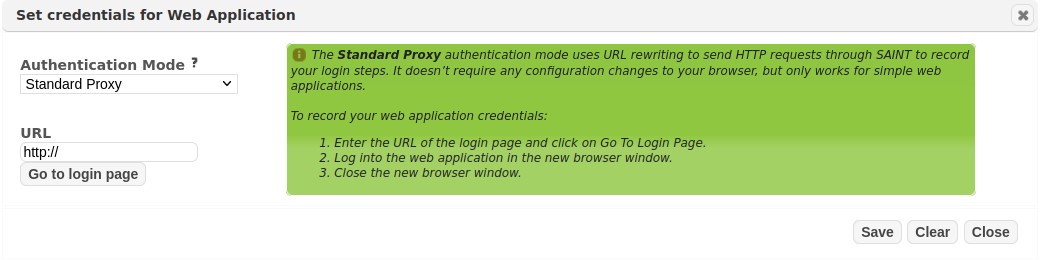
-
Optional. Choose the Authentication Mode. There are four modes:
-
The Standard Proxy is the default mode. It uses URL rewriting to send HTTP requests through SAINT to record your login steps. It doesn’t require any configuration changes to your browser. The standard proxy is deprecated because it’s unreliable for modern web applications. It will be removed in a future version.
-
The Advanced Proxy records your login steps without modifying URL references. This may improve usability on more complex sites, but requires you to make configuration changes to your browser. The advanced proxy is deprecated because it’s unreliable for modern web applications. It will be removed in a future version.
-
The Manual mode allows you to specify a browser cookie. Choose this option if you already know the session ID of an authenticated session on the site.
-
The POST Data mode allows you to specify your application credentials as form parameters without using a proxy. However, this only works for applications that use single-step authentication.
Note: If you choose an option other than Standard Proxy, skip to the appropriate instructions below.
-
-
Enter the URL of the login page for your web application.
-
Click on the Go to login page button. This will open a pop-up window with the login page for your web application.
-
Log into the web application.
-
After you have successfully logged in, close the pop-up window. Your session cookie will be displayed.
-
Click on the Save button.
Note that web authentication only works if the application uses HTTP cookies for tracking sessions. Also, note that the authentication steps are saved as well as the session cookies. Scheduled scans will generate an authentication script which reproduces the authentication steps, rather than saving the session ID itself. That is because the session ID will usually expire after a certain amount of idle time.
Note: the authentication script may be unable to correctly reproduce the authentication steps if the steps are very complex.
Advanced Proxy
The Advanced Proxy uses an HTTP proxy service to capture your login steps. This helps avoid URL rewriting errors which may be unavoidable when using the standard proxy. However, it requires you to modify your browser’s configuration to send all HTTP requests through the proxy service. It also requires you to import a CA certificate into your browser’s certificate store. That is because the proxy service must decrypt TLS sessions in order to record the authentication steps. Therefore, the proxy service creates and signs a certificate for each TLS server, allowing itself to negotiate a TLS session with your browser on behalf of the server. The CA certificate tells your browser to accept these server certificates.
To use the advanced proxy, first follow steps 1 through 3 above, and choose Advanced Proxy in step 3. Then follow the instructions shown in the yellow box on the right side of the dialog box. Click on the Save button after completing the steps. Note: be sure to choose a proxy port which is allowed through your firewall.
Manual Web Authentication
Besides carrying out the authentication steps, it is also possible to enter an existing session ID for an authenticated web application session directly. This may be desirable, for example, if you already have an authenticated session and don’t want to bother repeating the steps, or if the authentication steps are too complex to work in the standard proxy mode and you don’t have an unfiltered port to use for the advanced proxy mode.
To use manual web authentication, first follow steps 1 through 3 above, and choose Manual in step 3. Then continue as follows:
-
In the Post-authentication Landing Page box, enter the full URL of the page which you normally arrive at after authentication.
-
In the Cookie box, enter your session ID as an HTTP cookie value, i.e., as a list of name=value pairs, separated by semi-colons. For example: sid=123456; uid=789
-
Click on Save.
POST Data
In cases where a web application uses a single form submission to send login credentials, this option allows you to specify the POST data and action URL directly, without using a proxy. This may be more reliable than using the Standard Proxy, and more convenient than using the Advanced Proxy. The wizard helps you determine the form parameters and action URL for your application’s login page, so you can still use this option even if you don’t already know this information. Once your credentials are saved as POST data, this data will be sent to the specified action URL at the start of every scan run, and the resulting session cookie will be used throughout the scan.
To specify your credentials as POST data, first follow steps 1 through 3 above, choosing POST Data in step 3. Then continue as follows:
-
Enter the URL of your web application’s login page in the Login Form URL box.
-
Click on the Load button to automatically initialize the remaining fields based on the content of the specified login form.
OR
Fill in the remaining fields manually. Click on the Add Row button if more parameter rows are needed. Click on the minus icon beside any parameter row to delete that row. -
Enter any missing parameter values such as the login name and password. (Click on the Add Row button if the needed parameter names are not already present.)
-
The POST Data field shows you the raw POST data which will be posted to the action URL. It is automatically updated as you modify the parameter names and values, so you do not need to modify this field by hand.
-
Optional – In the Successful Login Response Pattern input, enter a string which the application always returns after a successful login. The scanner will search for this string to verify that authentication is successful. If this string is specified but is not matched in the response page after the POST data is submitted, the scan will not run, and the scan’s status will be set to “Error”.
-
Click on the Save button.
HTTP Authentication
HTTP authentication refers to credentials which are sent in the HTTP request headers. Note that this is not the same as form-based authentication, where the user is prompted to enter a login and password into a web page. If the login and password are normally entered into a web page, see the Web Application section above.
When you choose HTTP Authentication, you must also choose one of two HTTP authentication types:
- HTTP Basic authentication refers to web servers hosting password-protected directories. Choose this option if you normally enter a login and password into a browser pop-up box.
- HTTP Bearer authentication is a token-based authentication scheme. Choose this option if you have a bearer token for the web application.
When entering HTTP authentication credentials, be aware that the password will be sent over the network without encryption if the web server runs as a cleartext service such as http (port 80).
Create a Credentials File
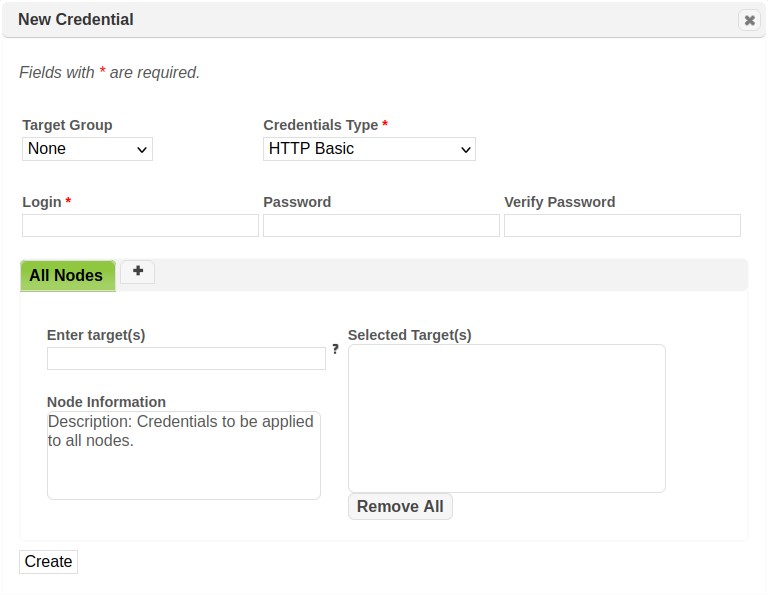
-
Navigate to the Credential Manager page from the main Scan menu.
-
Click Create Credential from the Grid Actions dropdown list.
SAINT will display a dialog window. -
Optional – Select a target group. This will automatically populate the target selection.
-
Select the credentials type.
-
Enter the login and password.
-
Optional – Select the scan node on which to apply the credentials from the tabs above the Enter Target(s) box. If the desired node is not shown, choose the “+” tab and select it from the drop-down menu. (If the “+” tab is not shown, then all allowed nodes are already shown.) To apply the credentials on multiple nodes, select the desired scan nodes one at a time, and enter the targets for each node under the corresponding tab. To apply the credentials on all nodes, enter the targets under the All Nodes tab.
-
Type targets into the Enter Target(s) box one at a time. Targets can be specified by IP address, URL, Subnet, or CIDR address. Note that IP addresses can be either IPv4 or IPv6.
-
Click Create.
Credentials File Format
platform|target|username|password
Platform may equal any of the following:
-
'B' = windows/linux/mac
-
'W' = windows
-
'L' = linux
-
'O' = oracle
-
‘X’ = windows non-admin
-
'M' = Microsoft SQL Server
-
'Y' = MySQL
-
'H' = HTTP basic authentication
-
‘S’ = SNMP Version 3
Example Files:
W|127.0.0.1|user|pass
B|127.0.0.4|admin|pw
L|127.0.0.10|root|abc123
L|127.0.0.5|somekey:someuser|x4y5z6
S|127.0.0.1|somekey~~~~SHA~~~~DES:someuser|abc456
Note that the passwords will be encoded and never displayed in plain text.
Edit a Credentials File
-
Navigate to the Credential Manager page from the main Scan menu.
-
Click the Edit (pencil) action for the credential record to be edited.
An edit dialog window will be displayed. -
Change the applicable fields (e.g., target, login ID, password)
-
Click Save
You will now see the edited version of the save credentials in the Credentials grid.
Delete a Credentials File
-
Navigate to the Credential Manager page from the main Scan menu.
-
Click the Delete (trashcan) action for the credential record to be deleted.
A message will be displayed to confirm the delete operation.. -
Click OK to confirm and delete the stored credentials.
You will now see the deleted credential record is no longer displayed in the Credentials grid.
Configuration Scanning
Configuration scanning provides the capability to assess scan targets against various industry-standard best-practices and security states such as platform configurations, patch levels, software inventory, and status of known vulnerabilities tracked by standards bodies such as CIS, NIST, DISA, Red Hat, AIX, Cisco, and others. For example, the configurations are security configuration baselines that allow a user to assess a host’s platform configurations to ensure their security settings map to industry best-practices.
The following shows an example list of the current configuration baselines available for comparison against your host environment.
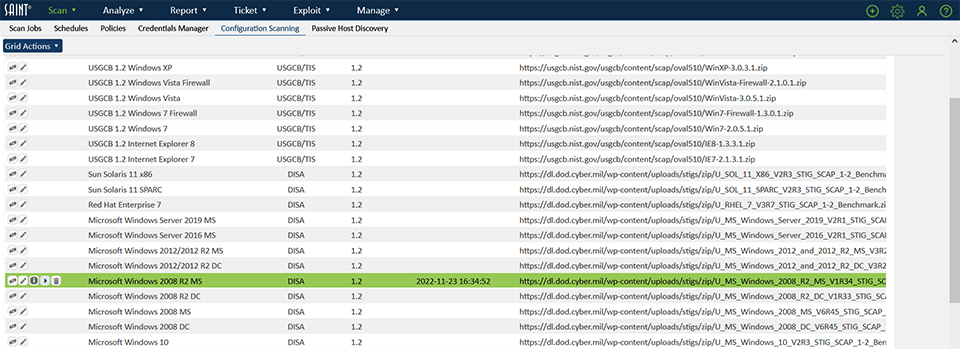
The capabilities supported on this page enable a user to download the latest policies and profiles, using the download option under the Actions column of a data grid, create scan jobs, and execute the selected assessment against hosts associated with the applicable platform. Additionally, the software also provides a configuration Policy Editor to modify selected configuration profiles and create custom configurations to support local requirements.
SAINT’s configuration scanning capability requires Oracle Java 8 to be installed on the scanning system. See System Requirements for more information.
Target Settings
Due to the type of scan assessments performed in configuration analysis, the hosts must have certain configurations enabled to ensure a thorough and accurate assessment. The following settings must be configured on hosts assessed by these profiles:
For Linux/Unix (*nix) targets
-
Ensure SSH is installed on the target and is running.
-
If using the root account to scan (recommended) make sure root log in is enabled in SSHD:
a) Open /etc/ssh/sshd_config
b) Set 'PermitRootLogin no' to 'PermitRootLogin yes'
c) Restart SSH
- Make sure iptables / firewall allows communication to/from the SAINT 10 host.
For Windows targets
-
Configure firewall rules for ws-management and ensure port 139 is not blocked; and enable and configure ws-management on the hosts.
-
Configure the needed Firewall Rules via the group or local policy, or whatever other means are used on your network. For example:
a) Open the local policy editor
b) Add a firewall rule using the predefined type - Windows Remote Management Service (WS-Management)
c) Add a firewall rule using the port type - TCP 139
-
From the network andsharing center, make sure a network other than “public” is being used. WinRM does not work over “public”.
-
The Remote management (WinRM) ws-management service must be running and configured on the host. It is pre-installed on all versions of Windows operating systems, except XP, but is not running by default. Reference: ws-management reference: http://msdn.microsoft.com/en-us/library/aa384372%28v=vs.85%29.aspx . To configure WinRM:
a) Open control panel > Administrator tools > Services
b) Start the Windows Remote Management Service (WS-Management) (default port 5985)
c) Right click cmd and Run as Administrator
d) Type winrm qc
e) Enter y twice; this enables WinRM in its default configuration
-
Additional steps may be required to get port 139 and 5985 unblocked/filtered from the network on the target host. These may include:
a) Enabling file and printer sharing
b) Starting the netbios over TCP/IP service
c) Making changes to the Windows Firewall Domain Profile if the target is Windows XP:
-
-
Enable Windows Firewall > Domain Profile > Allow file and print sharing exception
-
Enable Windows Firewall > Domain Profile > Allow local port exceptions
-
d) The user account used to perform SCAP scans must have a password associated with that user account unless it is a SSH account using a SSH key.
MICROSOFT WINDOWS TROUBLESHOOTING TIPS:
-
Incorrect password
-
Attempting to log in as a user who is not a member of the Administrator's group. Only Administrators are able to login via WS-Management.
-
The target machine is configured to disallow the “Negotiate” authenticate method. To view permitted authentication methods on the target, run the command: winrm get winrm/config/Client/Auth
-
In certain situations, when the target machine is joined to a domain, logging in using a local machine account is disabled. This problem has been observed after upgrading from Windows Management Framework 1.0 to 2.0, for example, on a Windows 2008 Server machine (not R2). To enable local account logins in this situation, you must create the LocalAccountTokenFilterPolicy registry value:
Key Path: HKLM\SOFTWARE\Microsoft\Windows\CurrentVersion\Policies\System
Value Name: LocalAccountTokenFilterPolicy
Type: DWORD
Value: 1
-
If WinRM has been configured and port 5985 still appears to be filtered on the target, which can be checked by running nmap -p5985 from the scanner, then a Group Policy Object (GPO) may have prevented the WinRM listener from being set up correctly. This can be checked by running the following command on the target as administrator:
winrm enumerate winrm/config/listener
If you notice something similar to the following,
Listener[Source=”GPO”]
.
.
.
ListeningOn=null
Then the GPO needs to be updated before reconfiguring WinRM on the target. To do this:
1. Set the IP filters in the GPO setting: Allow automatic configuration of listeners, to an asterisk (*)
2. Reload the GPO on the target
3. Shut down the ws-management service
4. Run winrm qc again as administrator
For CIS-hardened Windows Systems
---------- WinRM Auth Setup -------------------
The following should be performed after you have applied the L1 GPO before you scan and also after you have applied the L2 GPO before you scan.
------------------------------------------------
Ensure that your account is part of the Administrators group.
Ensure that your account is part of the Remote Management Users group.
Ensure that Administrators have Full Control over WinRM:
$]winrm configSDDL default
- Ensure Administrators have FULL control.
$]wmimgmt
- Right click WMI Control -> properties
- Security Tab -> Security button
- Ensure Administrators have FULL control.
GPO -> Computer -> Local Policies -> User Rights Assignment
'Deny access to this computer from the network' should only be 'Guests'
'Access this computer from the network' should include 'Administrators'
'Allow log on locally' should include 'Administrators'
GPO -> Computer -> Administrative Templates -> Windows Components -> Windows Remote Management -> WinRM Service
'Allow remote server management through WinRM' = 'Enabled' Set IPv4 to *
'Allow Basic authentication' = 'Disabled'
'Allow unencrypted traffic' = 'Disabled'
'Disallow WinRm from storing RunAs credentials' = 'Enabled'
GPO -> Computer -> Administrative Templates -> Windows Components -> Windows Remote Shell
'Allow Remote Shell Access' = 'Enabled'
The firewall must be enabled for the PASS state scans so make sure you have a firewall rule:
$]netsh advfirewall firewall add rule name="WinRM-HTTP" dir=in localport=5985 protocol=TCP action=allow
You may also need to allow the WinRM program through the firewall and / or run winrm qc again.
When using a local admin account the following key must be set to 1 before performing a scan.
This setting likes to reset on occasion so it's a good idea to check it before scanning.
[HKLM\SOFTWARE\Microsoft\Windows\CurrentVersion\Policies\System] LocalAccountTokenFilterPolicy
You will get an error code 5 if this has been set to 0 on the target.
Test that you can access WinRM from your scanner by running:
nc -z -w1 10.7.0.34 5985;echo $?
the output should be '0'
Configuration Scanning
-
Click on the Import Policy button under the Actions column for the applicable profile. This step will validate the current configuration and update it, if applicable, to ensure your scan uses the most current profile(s).
Note: Some platforms may have multiple profiles, based on the authoritative source’s defined levels of security baselines. For example, the Microsoft Windows 2008 DC configuration 9 distinct profiles based on the various security configuration levels. -
Once the download step is complete, you can view the configuration settings of a selected profile by clicking on the Edit (pencil) icon beside the applicable profile.
-
Click the Run (right arrow) button in the Actions column to create a new scan job and run the imported profile against targets defined in the job. For configurations with multiple profiles, use the Run (right arrow) button in the Profiles dialog window to select the applicable configuration profile.
-
Refer to the Create a New Job section for more detail on setting up a scan job.
Note: Use the Info (i) button in the Action column to view the XML content for any profile on this tab.
Creating Custom Configurations
SAINT provides the capability to modify configurations to create custom configurations for local use. To view or modify a profile, click on the Edit (pencil) icon for the applicable profile. This profile Editor can be used for modifying any profile listed in this tab, including SCAP configurations. Refer to the Configuration Policy Editor section for more information about this process.
Passive Host Discovery
The Passive Host Discovery grid displays targets on the network which have been discovered by silently watching for traffic from new IP and MAC addresses, rather than actively probing a range of addresses. The grid indicates when each host was last seen and last scanned.
Note: This feature is disabled by default. To enable and configure it, see Passive Host Discovery.


Scanning Passively Discovered Hosts
After hosts have been discovered, they can be easily scanned by choosing Scan Hosts from the Grid Actions menu. This brings up a dialog box with the following three options:
-
Scan Selected Hosts – This option will scan the targets which are currently selected in the grid. (This button is disabled if no targets are currently selected.)
-
Scan By Interval – This option will scan all passively discovered hosts which have not been scanned in the chosen number of past days, including hosts which have never been scanned, regardless of whether they are selected in the grid. If this option is chosen, the target list will be dynamically generated every time the scan job runs. This allows you to create a recurring scan job which regularly scans all new devices seen on the network.
-
Scan All Hosts – This option will scan all passively discovered hosts, regardless of whether they are selected in the grid. As with the previous option, this option will cause the target list to be dynamically generated every time the scan job runs. This allows you to create a recurring scan job which regularly scans all devices which have been recently seen on the network.
Click on the button corresponding to the desired scan option. This opens the scan job setup wizard. Proceed with the scan job setup as described in Create a New Job but skip the target entry step.